

The developer of RegCleaner, jv16 PowerTools, Uninstalr, WinFindr, Startup Timer, ScreenshotX, System Examiner and Windows Update Fixer.
CHKDSK or “Check Disk” is a built-in disk check utility from Microsoft. It scans for and fixes errors in your drives and is accessible by running specific commands in Command Prompt, PowerShell, or File Explorer.
The way it works is that CHKDSK (Check Disk Utility) will verify that a file’s size, location, and system information matches with the data stored on the disk. In addition, this utility also scans for areas on the hard drive that could potentially cause data corruption.
In simpler terms, what Check Disk Utility does to the disk drive is like what a mechanic does to a car. CHKDSK will make sure that your data is in the right sizes and in the right places. If it finds any damaged parts (corrupted data) or parts that aren’t in the right places (file system errors), it will try to fix them and make sure everything is still working correctly. Also, just like how a mechanic works, if CHKDSK is unable to fix the issues, it’ll still be able to tell you that something is wrong and you need to buy a new drive.
Typically, CHKDSK utility is being used for the following cases:
- Monitor your HDD and SSD health by running a complete disk drive scan
- When you want to scan and fix file system errors
- When you’re experiencing drive issues
- When you’re experiencing bad sectors (when a part of a hard drive is broken, so the drive no longer uses it to save data) in your drive
- When you’re experiencing slow performance with your computer
- When you want to try recovering some lost data
- When you want to maintain your system performance
Some things to consider before running the CHKDSK command
First of all, it’s super important to back up your data before running CHKDSK. Even though the tool itself is very safe and built by Microsoft, in the case where things don’t go as expected, your data will remain intact if you have a backup.
Another thing to consider is, depending on the parameter you use, bear in mind that CHKDSK can also take up your system resources. Also, some parameters would force dismount your drive, which means that it’ll force close all open files in the drive, making you unable to access them. Check Disk Utility could also take some time to complete. So, ideally, you’d want to run this when you’re not in a hurry and without multitasking.
Lastly, CHKDSK might not always be able to fix drive errors, especially if your drive experiences physical errors or extensive corruption. However, it’s still a good idea to run Check Disk Utility because at the very least you’ll know when you’ll need a new disk drive.
Running CHKDSK command
Here are different ways to run the CHKDSK command. If you’re using Command Prompt and PowerShell, please refer to the syntax explained in the next section. Do keep in mind that you need admin access or administrative privileges to run the command.
From Command Prompt
You can run the CHKDSK command from Command Prompt. Here’s how:
- Type cmd on the Search bar
- From the search results, right-click and select ‘Run as administrator’
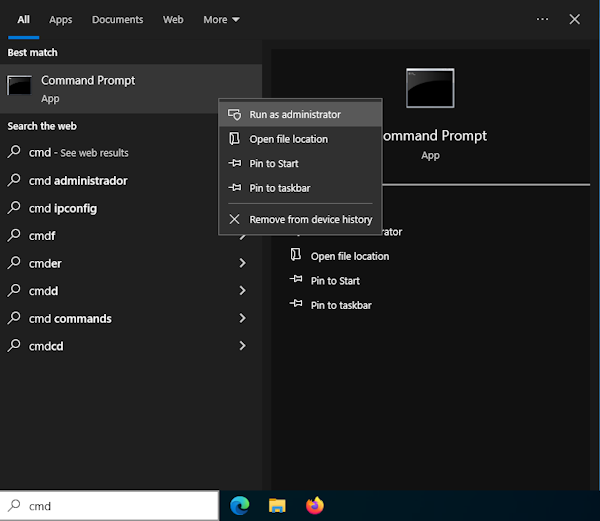
- Type in your desired syntax in Command Prompt and follow the instructions from there

From PowerShell
You can run the CHKDSK command from PowerShell. Here’s how:
- Right-click on the Windows start menu > select Windows PowerShell (Admin)

- Type your desired syntax in PowerShell and follow the instructions from there

From File Explorer
Please note that accessing CHKDSK from File Explorer will only allow you to run a basic check. For more advanced options, consider running the command line through Command Prompt or PowerShell.
Here’s how to use CHKDSK from the File Explorer:
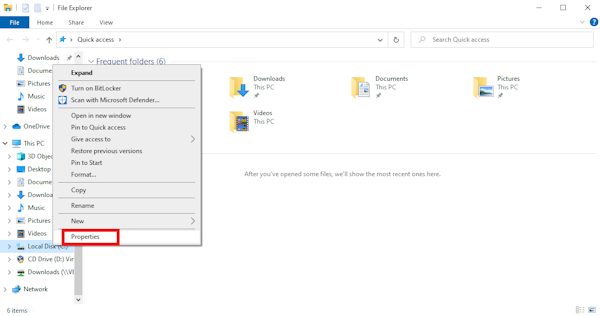
- Open File Explorer
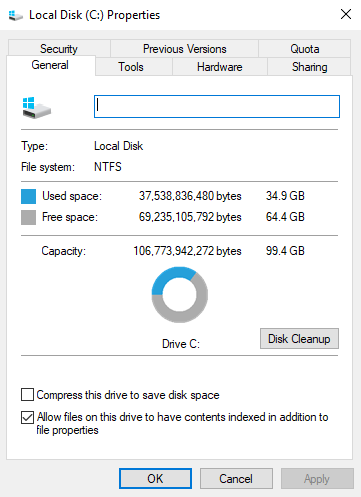
- Right-click on the drive you want to check > select Properties
- A new window will appear, in the “Tools” tab select ‘Error checking’ and click the “Check” button
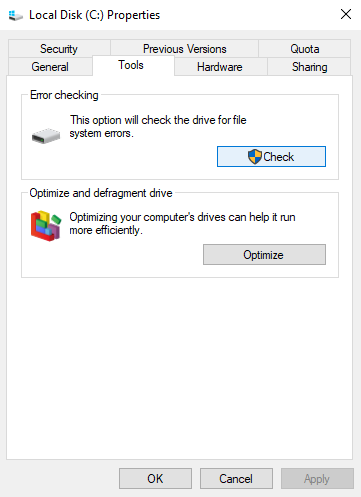
- Wait until the CHKDSK scan finishes
Syntax and parameters
File System
Before getting into the parameter, you need to keep in mind that some commands only run for specific file systems. A file system is essentially the way Windows stores data on your disk driver. There are different types of file systems, but the most commonly used are FAT/FAT32 (file allocation table) and NTFS (new technology file systems).
Here’s how you can check the file system used in your driver:
- Open File Explorer > look up the drive you want to check and right-click on it > select “Properties”
- In the new Properties window, choose the “General” tab and look up “File System”
Syntax
Generally, the syntax to run the CHKDSK command looks like this:
chkdsk [<volume>[[<path>]<filename>]] [/f] [/v] [/r] [/x] [/i] [/c] [/l[:<size>]] [/b]
As you can see, there are different parameters included in the syntax following the chkdsk command. We’ll get into these parameters shortly but for now, you need to understand what the syntax looks like.
CHKDSK Parameters
In order to understand which CHKDSK command to run to fix what cases, you’ll need to understand what the parameters in the syntax mean. Below is a simple explanation of the above parameters:
chkdsk
Read as “Check Disk”, this is essentially the command itself. When run without any parameter, this command will do a scan of your drives and display their status once it finishes.<volume>
Volume refers to the name of the drive you want to scan and fix. You can replace this parameter with the drive letter (followed by a colon), mount point, or disk name. For example, chkdsk c:[ [<path>]<filename>
You need to use this with FAT/FAT32 only. This parameter specifies the location and name of the file(s) you want to check. If you want to specify multiple files, you can use the ? and * characters./f
This parameter fixes errors on the disk you specify. You need to lock the drive – in other words, make sure no other program can write to the drive you specify while using it. Otherwise, you’ll be asked whether you want to check the drive the next time you restart the computer./v
This parameter shows the full path and every file’s name on the FAT/FAT32 disk drive while it’s being checked./r
This parameter includes the functionality of /f, with the additional analysis of physical disk errors. It looks for bad sectors (broken parts of a hard drive which causes the drive to no longer use them to save data) and recovers readable information. You need to lock the drive you specify while using this parameter./x
This parameter also includes the functionality of /f. This will force the drive to dismount first, if it’s necessary. All open handles to the drive are invalidated/i
You need to use this parameter for NTFS only. This performs a less vigorous check of index entries, which reduces the amount of time required to run chkdsk./c
You need to use this parameter for NTFS only. This does not check cycles within the folder structure, which reduces the amount of time required to run chkdsk./l[:>size>]
Use with NTFS only. Changes the log file size to the size you type. If you omit the size parameter, /l displays the current size./b
Use with NTFS only. Clears the list of bad clusters on the volume and rescans all allocated and free clusters for errors. /b includes the functionality of /r. Use this parameter after imaging a volume to a new hard disk drive./scan
Use with NTFS only. Runs an online scan on the volume./forceofflinefix
Use with NTFS only (must be used with /scan). Bypass all online repair; all defects found are queued for offline repair (for example, chkdsk /spotfix)./perf
Use with NTFS only (must be used with /scan). Uses more system resources to complete a scan as fast as possible. This may have a negative performance impact on other tasks running on the system./spotfix
Use with NTFS only. Runs spot fixing on the volume./sdcleanup
Use with NTFS only. Garbage collect unneeded security descriptor data (implies /f)./offlinescanandfix
Runs an offline scan and fix on the volume./freeorphanedchains
Use with FAT/FAT32/exFAT only. Frees any orphaned cluster chains instead of recovering their contents./markclean
Use with FAT/FAT32/exFAT only. Marks the volume clean if no corruption was detected, even if /f was not specified.
You can also find more information from what each parameter means and what it does by typing in the following in Command Prompt or PowerShell:
chkdsk /?
CHKDSK command in practice
Below are some examples of how to use the CHKDSK command in different scenarios. You can use the following examples in Command Prompt or Windows PowerShell. In real cases, you’ll need to specify the drive you want to check by typing the drive letter, but here we always use the drive C: in the examples to make it simpler.
Scan the drive
This is the most common usage of the CHKDSK command and it’s suitable for when you want to monitor your disk’s health. To look for errors within the drivers without fixing them (also called running the Read-Only mode), you can type in the following, no parameter needed:
chkdsk
After the scan is done, Check Disk will display the status of scanned drivers and you can proceed from there.
Check the drive and repair
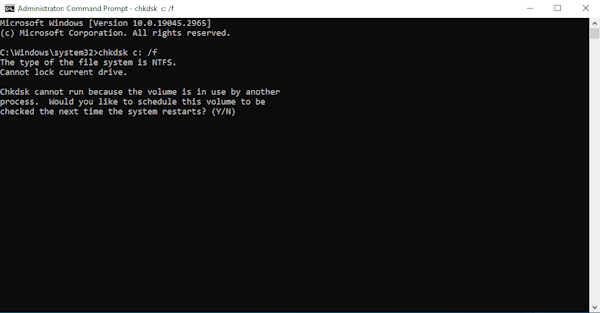
When you want to check for logical file system errors while also fixing them, you can use the /f parameter. For example, if you want to do a CHKDSK scan on drive C: and fix the drive errors in there, you can use the following command:
chkdsk c: /f
Do keep in mind that if the drive you’re checking contains files that are in use, CHKDSK will ask whether you want to schedule the scan the next time your system restarts.
Check and repair the drive with a bad sector scan
To check for drive errors and fix them, while also performing bad sector scan simultaneously, you can use the /r parameter. For example, if you want to do a check disk scan on drive C: and fix the errors in there, while also finding any recovery information from bad sectors, you can use the following command:
chkdsk c: /r
Check and repair the drive with bad sector scan and force dismount
This parameter is suitable for when you want to do a CHKDSK scan for a bad sector and repair the drive, while also force dismounting it. In this case, dismount means that the check disk utility will force to close all open files from the disk. This is an example of how to do this on the drive C:
chkdsk c: /f /r /x
Scan drive online, but send the errors found on the offline queue
You can use this parameter when you want to do an online scan of your disk drive. The online scan is especially useful when you don’t want to close all open files from the disk (dismounting it). However, after the scan finishes, rather than fixing the errors found on the go, this will only send them to the queue for offline fix. Here’s how you can do it on the drive C:
chkdsk c: /scan /forceofflinefix
Fix the drive errors while using it
You can use these parameters to fix errors on the drive while using it. However, this will use your system resources to make the check disk scan as fast as possible. This might affect your computer performance if you’re running another program while performing CHKDSK. Do keep in mind that this will only work for NTF file systems. To fix the drive errors on the drive C: while using it, you can use the following:
chkdsk c: /r /scan /perf
The above are just a few examples of the most commonly used CHKDSK commands and parameters. You can refer back to the Syntax section for more options if the examples don’t cover your use case.
Maintaining your drive’s health
Check Disk Utility (CHKDSK) is a very useful built-in Windows tool to maintain your disk’s health and ultimately, your system performance. It’s recommended to run CHKDSK every few months as a preventative measure to make sure that your disk drives are free from errors and your system is running perfectly.
Another measure that you can take to maintain your drive’s health is to proactively free up your disk space by uninstalling unused programs. In one of the benchmark tests that our team conducted, it’s shown that uninstalling unwanted programs speeds up the system by 39% which makes it clear that maintaining disk space also contributes to system performance.
It’s not always easy to keep track of all of the programs you’ve installed though, and some stubborn programs are difficult to remove. Luckily, with a trusted third-party uninstaller tool like Uninstalr, it’s now way easier to maintain your disk space and the performance of your system.
Uninstalr is an easy-to-use and very accurate software uninstaller created by the team behind jv16 PowerTools. It supports batch uninstallation, and unattended uninstallation, leaves little to no leftovers, is able to monitor new software installation, and is completely free!
You can download Uninstalr for free in the Setup or Portable version from its website: https://uninstalr.com/ to try it for yourself!