

The developer of RegCleaner, jv16 PowerTools, Uninstalr, WinFindr, Startup Timer, ScreenshotX, System Examiner and Windows Update Fixer.
The error code 0x80070002 is one of the most common update issues. It’s usually related to Windows update errors and happens when you’re trying to install Windows updates, even though it’s not always the case. This error code also reportedly shows up after installing Windows updates or when trying to activate a specific feature update, such as an update to Windows 10, Version 1903. This Windows error can put your computer at risk since it prevents you from installing the necessary updates and bug fixes.
Dealing with Windows errors is always a headache – especially because the error codes and messages are usually too generic and not very descriptive. But there’s no need to worry because, in this article, we’ll give you some tips on how to fix the 0x80070002 Windows error.
Understanding the causes of the 0x80070002 error
Before delving into different methods to fix the error code, let’s take a look at some possible causes of the 0x80070002 error:
- Corrupted or missing system files
When system files become corrupted or missing during the update installation, this could potentially cause the error. - Not enough space or running low on space for update installation
When you don’t have enough space to download the update or only have a small amount of free space available during the update process, an error could potentially occur. - Conflicts between hardware devices
If there’s a conflict between hardware components in your computer, this can also potentially cause the error.
What to do before troubleshooting the 0x80070002 error
Before trying different methods to troubleshoot the 0x80070002 error, it’s recommended to back up your data or create a system restore point so you won’t lose important data in case there’s an issue during troubleshooting.
Troubleshooting steps to fix the 0x80070002 error
There are different methods you can try to fix the 0x80070002 error. Let’s take a look below.
Method 1: Restart your computer
“Have you tried turning your computer off and on again?” is the most common question that tech support would ask – for a reason. Sometimes, a simple system reboot is what it needs to solve issues with your Windows.
Before restarting your computer, it’s recommended to disable any peripherals connected to your computer. This is because the 0x80070002 error may also be caused by a conflict between hardware devices. Try to disconnect your webcam, microphone, printer, or other devices while restarting your computer and see whether the issue persists by trying to install the update again. If this doesn’t solve it, you can try the next method.
Method 2: Run Windows Update Troubleshooter
One of the easiest ways to fix any issues with Windows update errors is by running the Windows Update Troubleshooter.
Here’s how you can run Update Troubleshooter in Windows 10:
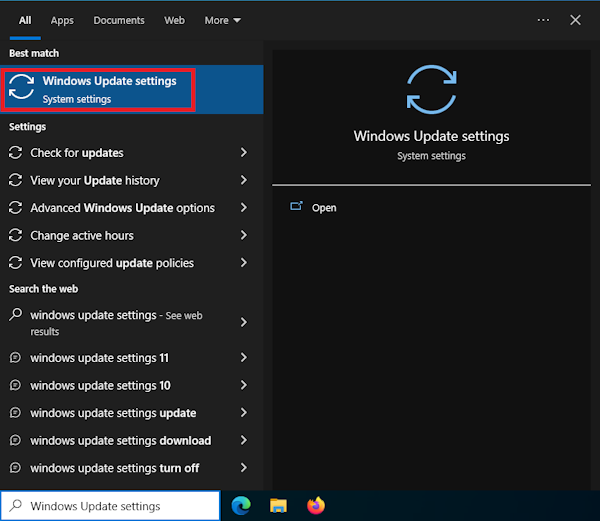
- Look up “Windows Update settings” from the Search bar > click from the search results.
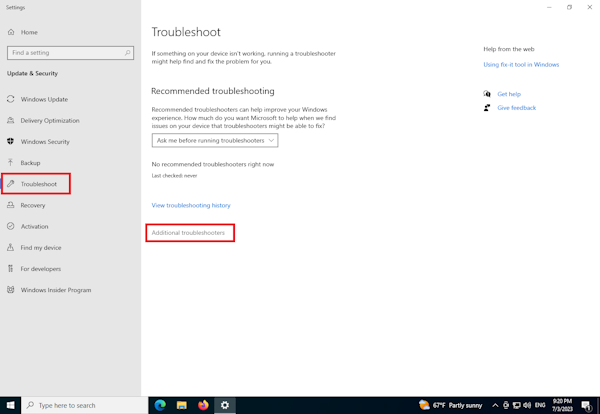
- In the new window, click on the “Troubleshoot” menu > click “Additional troubleshooters.”
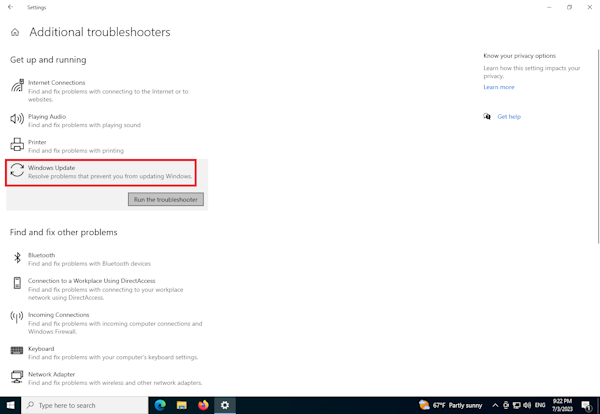
- A new window will appear. Under the “Get up and running” menu, click the “Windows Update” option > click the “Run the troubleshooter” button.
- Windows Update Troubleshooter will attempt to find the issue with the update. After it’s done, you need to apply the recommended fix from the troubleshooter.
- Restart the computer and check for new updates by looking up “Check for updates” in the Search bar and clicking the result > hit the “Check for Updates” button.
Method 3: Restart the Background Intelligent Transfer Service (BITS Service) and Windows Update Service
While running a Windows update, there are specific services that need to be active such as Background Intelligent Transfer Service (BITS) and Windows Update Service. You need to double-check these two services are running. If they’re running, you need to restart them.
Here’s how to check the status and restart the BITS Service:
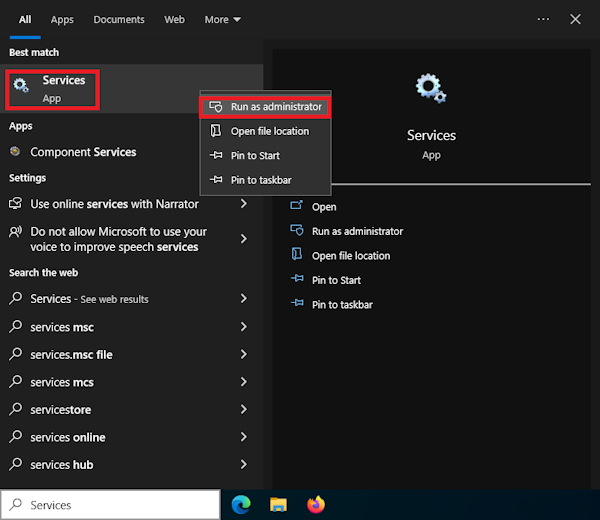
- Look up “Services” in the Search bar > In the search result, right-click the “Service” menu and choose “Run as administrator.”
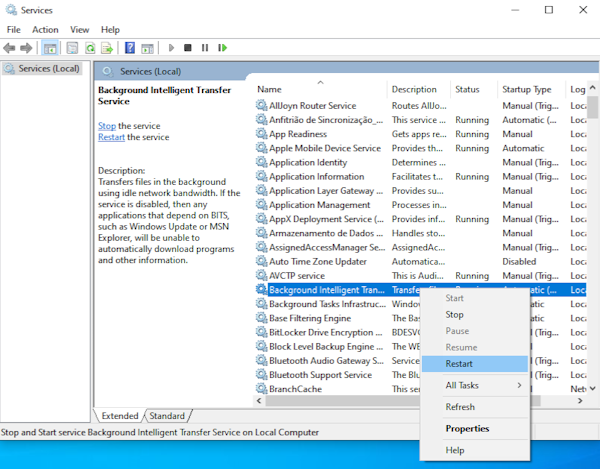
- In the new “Services” window, search for “Background Intelligent Transfer Service,” then check out the service status.
- If the service status is ‘Running,’ you need to right-click on it and then click “Restart.”
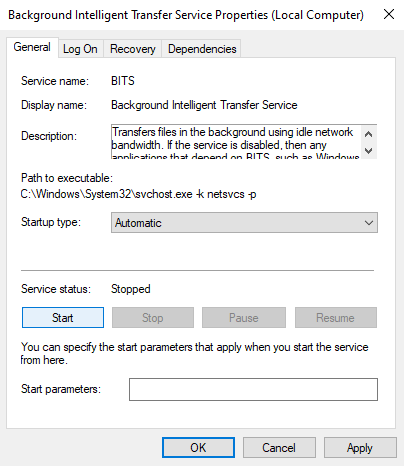
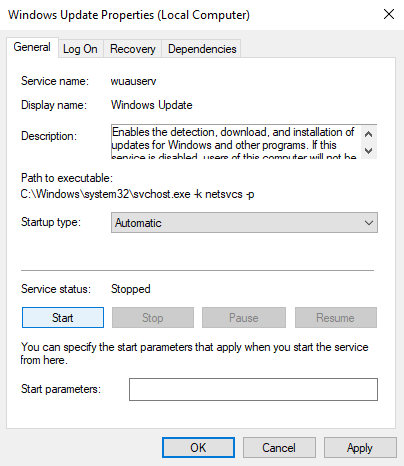
- If the service status isn’t ‘Running,’ you need to double-click on the Background Intelligent Transfer Service > change the startup type to ‘Automatic’ from the dropdown menu > click the “Start” button.
Here’s how to check the status and restart the Windows Update Service:
- Look up “Services” in the Search bar > In the search result, right-click the “Service” menu and choose “Run as administrator.”
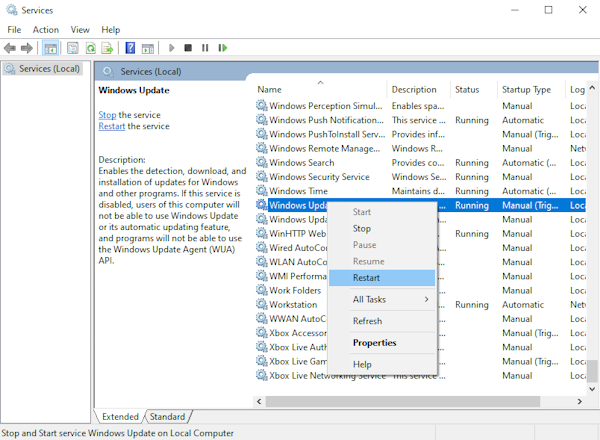
- In the new “Services” window, search for “Windows Update Service,” then check out the service status.
- If the service status is ‘Running,’ you need to right-click on it and then click “Restart.”
- If the service status isn’t ‘Running,’ you need to double-click on the Windows Update Service > change the startup type to ‘Automatic’ from the dropdown menu > click the “Start” button.
Method 4: Perform a System File Checker (SFC) scan
Since one of the possible causes of the 0x80070002 error is corrupted system files, the next method you can try is performing a System File Checker (SFC) scan. SFC is a built-in utility from Windows that scans and repairs broken system files in your system. Do keep in mind that you need admin privileges to do the scan. Here’s how you can do it:
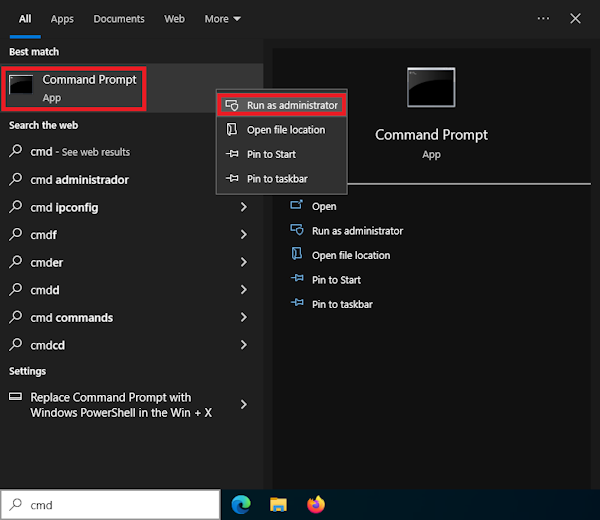
- Look up “cmd” in the Search bar > in the search results, right-click “Command Prompt,” and select “Run as administrator.”

- In the new Command Prompt, type the following command and hit Enter > wait until the scan is completed.
sfc /scannow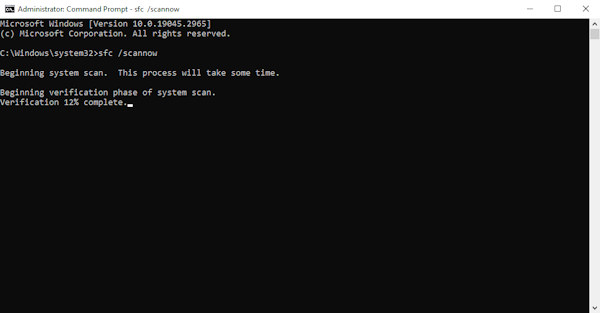
- Type the following command and hit Enter > wait until the scan is completed.
DISM /Online /Cleanup-Image /CheckHealth- Type the following command and hit Enter > wait until the scan is completed.
DISM /Online /Cleanup-Image /ScanHealth- Type the following command and hit Enter > wait until the scan is completed.
DISM /Online /Cleanup-Image /RestoreHealth- After all of the scans are done, restart your computer and try installing the update again.
Method 5: Check for hard drive errors using the CHKDSK command
Another method that you can try is to scan your hard drives using CHKDSK (check disk) command. CHKDSK is a built-in Windows utility to look for file system errors in your hard drives. Here’s how you can do it using Command Prompt:
- Look up “cmd” in the Search bar > Right-click “Command Prompt” and choose “Run as administrator.”
- In the new Command Prompt window, type in:
chkdsk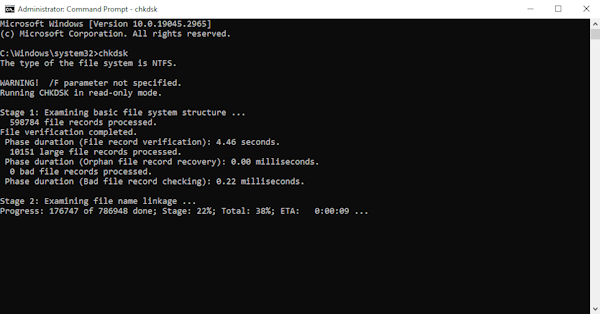
- Wait until the scanning process finishes and look up errors found in the results.
Do keep in mind that the CHKDSK command only scans your hard drives and won’t automatically repair the errors it finds. You can check out this resource from Microsoft for more details on repairing errors using CHKDSK syntax.
Method 6: Restore your system to a previous state
If the previous method doesn’t solve it, a method that you can try is to restore your system to a previous state. Do keep in mind that you need to have restore points created and set up a system restore before trying this method. Here’s how:
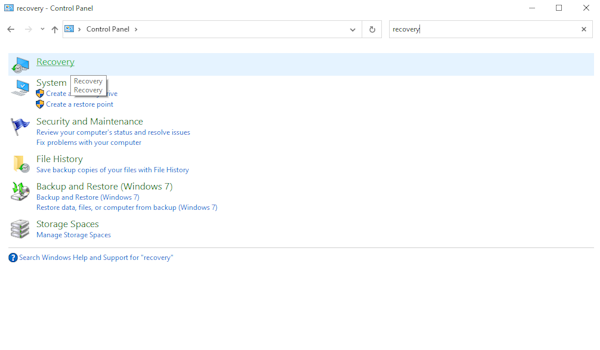
- Look up “control panel” from the Search bar > click “Control Panel from the search results.

- In the new Control Panel window, look up ‘recovery’ in the search box > choose “Recovery” from the results.
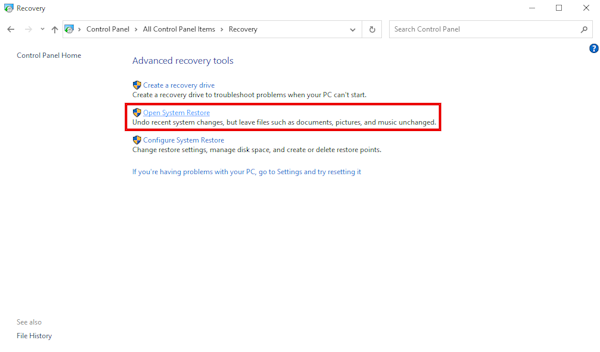
- In the new window, click “Open system restore.”
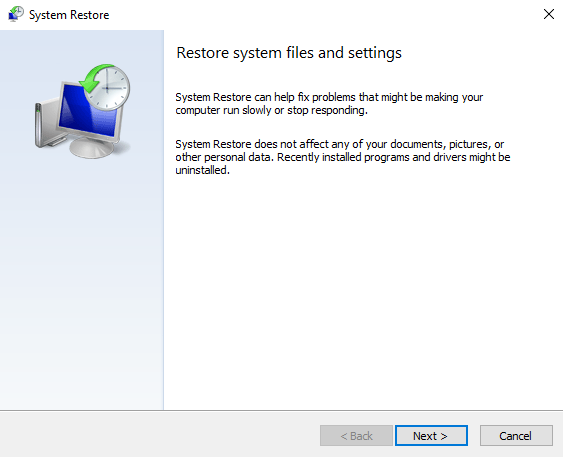
- In the new ‘System Restore’ dialog box, click the “Next” button.
- A new window where you can see different restore points will appear. You can tick the “Show more restore points” box to see more restore points to choose from > click the restore point of your choice.
- You can click the “Scan for affected programs” button to see which programs will get removed if you choose to restore to a previous state. If everything looks good for you, click the “Close” button.
- Click the “Next” button to proceed with the system restore. A new window will appear where you can check the restore point you chose and the affected drives. Click the “Finish” button to restore your system to the previous state.
Method 7: Use a third-party tool
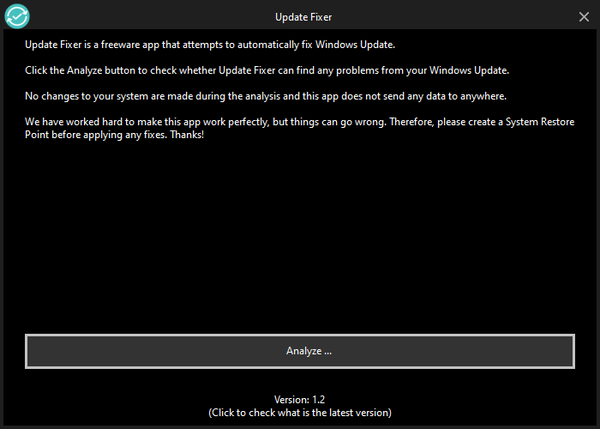
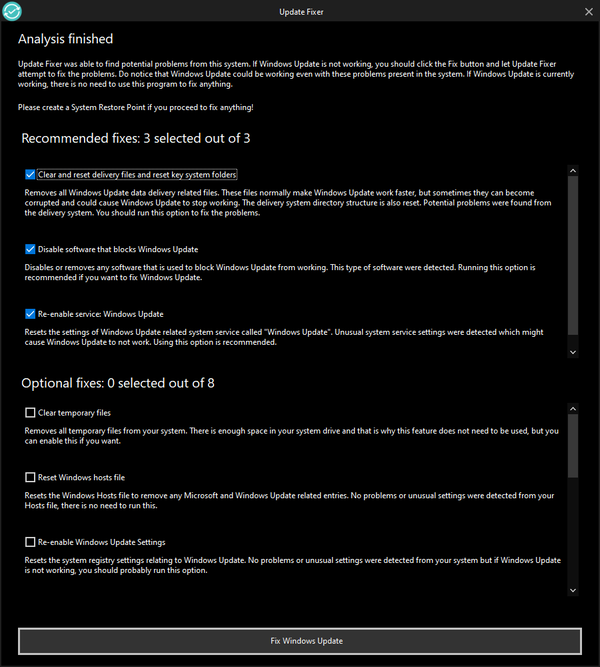
Another method that you can try is using a third-party tool that diagnoses the possible causes of Windows Update errors and automatically fix them, such as jv16 PowerTools’ Update Fixer. Here’s how:
- Run Update Fixer from jv16 PowerTools.
- Click the “Analyze” button to start the scan.
- Once the scan finishes, select the recommended fixes and click the “Fix Windows Update” button.
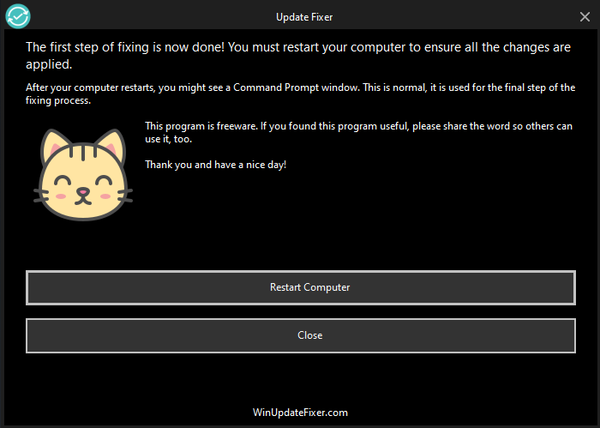
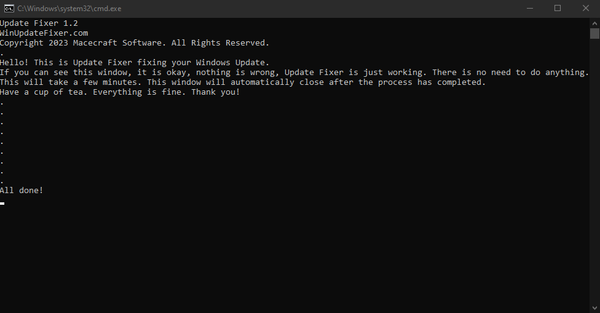
- Your computer will automatically restart, and a script will run after the restart. Wait until all of the processes are done.
- Try to install the update again and see whether this solves it.
Conclusion
The 0x80070002 error is one of the most common errors. Unfortunately, the error code and the error message aren’t very descriptive, so there are no straightforward fixing methods. There are, however, different methods you can try, ranging from the simplest method to more complicated ones.
One of the easiest but most effective ways to fix the 0x80070002 error and other errors related to updates is by using a trusted third-party tool like jv16 PowerTools’ Update Fixer.
Update Fixer is a lightweight open-source app to automatically fix Windows Update. You can access Update Fixer and other powerful tools to make your life with Windows easier by signing up for a 14-day free trial to jv16 PowerTools or download it separately for free from https://winupdatefixer.com.