


The developer of RegCleaner, jv16 PowerTools, Uninstalr, WinFindr, Startup Timer, ScreenshotX, System Examiner and Windows Update Fixer.
Do you want to uninstall iTunes on Windows 10? This article will show you how.
iTunes is a media platform created by Apple. Initially started as a media player app for Mac computers, the iTunes app then developed into the following:
- Media library where you can save your music files
- Mobile device management utility where you can sync your content to iPod, iPhone, or other iOS devices
- Client app for the iTunes store where you can buy, download, and manage your iTunes purchases

Even though the iTunes app itself is originally designed for Mac and iOS devices, it’s also available for Windows operating systems, including Windows 10. You can download iTunes for Windows from their official website or Microsoft store.
Using iTunes on Windows PC
Though it seems strange to install an Apple application on Windows computers, iTunes gained popularity as a media player of choice – even if Windows already provided a media player app built in, like Windows Media Player. It’s because, in addition to its core feature which is to play music, iTunes also provides additional support such as managing the iTunes library and purchases, and also syncing content from iPod, iPhone, and iPad.
Since June of 2021, iTunes is no longer supported on Mac computers as Apple is pushing more on Apple Music. However, you still can install iTunes for Windows computers through the Microsoft store.
Why uninstall iTunes on Windows?
With the rising popularity of streaming services, people started to ditch media player apps, including iTunes. There’s a shift from listening to music and podcasts from media player software to streaming them online via streaming apps. Nowadays, even Apple encouraged its users to stream and sync their content via Apple Music, making iTunes grow obsolete. It also doesn’t help that iTunes came with other software attached to it, such as Apple Software Update, Apple Mobile Device Support, Bonjour, and Apple Application Support – making it a bloated application.
However, iTunes still has loyal users and another reason could be simply that they need to completely uninstall iTunes and then later re-install it to fix iTunes issues.
How to manually uninstall iTunes on Windows 10
There are different ways to manually uninstall iTunes from Windows; Uninstall from Windows Settings and Control Panel. We’ll explain the step-by-step further in a bit.
Before you start, please keep in mind that after uninstalling iTunes, you’ll also need to uninstall the following programs in this order:
- Apple Software Update
- Apple Mobile Device Support
- Bonjour
- Apple Application Support (64-bit)
- Apple Application Support (32-bit)
This is to make sure that there are no unintended effects happened after the uninstallation.
Uninstall iTunes from Windows settings
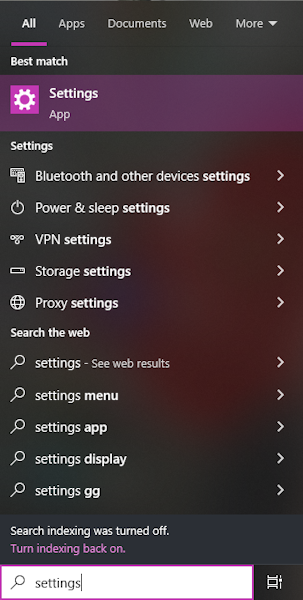
- Open Settings by clicking the Start menu > select Settings. Or, type “Settings” from the Search bar and click the Settings app from the search results
2. A new Settings window will appear > select “Apps”

3. On the “Apps & features” section, type in ‘iTunes’ in the search box and hit enter
4. The search result will appear > click ‘Uninstall’ to begin uninstalling iTunes

5. A new dialog box will appear, click ‘Uninstall’ to confirm the uninstallation

6. Repeat step 3 to 5 for other iTunes-related software
7. Restart your computer
Uninstall iTunes from Control Panel
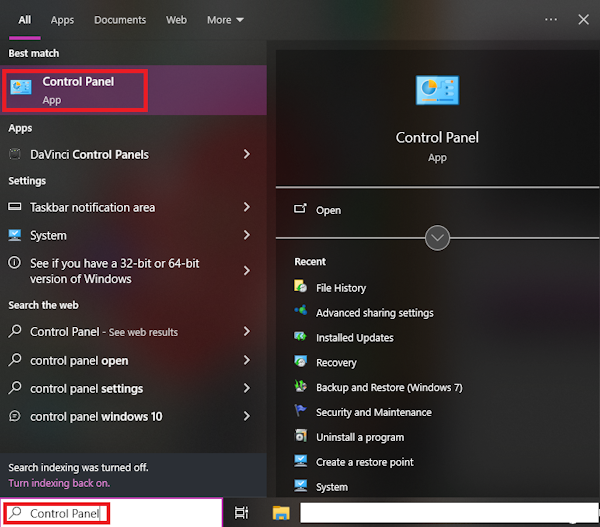
1. Type in “Control Panel” from the Windows search bar
2. Open the application by clicking the Control Panel app from the search result
3. A new Control Panel window will appear. Select “Uninstall a program” under ‘Programs’

4. In the new Control Panel window, sort the results to only include iTunes and other related software components > Select iTunes by double click on it

5. Select “Yes” in the new dialog box to confirm the uninstallation

6. Repeat steps 4 and 5 for other iTunes-related software components
7. Restart your computer
How to uninstall iTunes automatically on Windows 10
If you’re not a fan of manual installation – which to be fair can be tedious, you can also uninstall iTunes using a trusted third-party app, like Uninstalr. Uninstalr is an easy-to-use and very accurate software uninstaller for Windows created by the team behind jv16 PowerTools. This free tool can completely uninstall iTunes along with its related components without any leftovers.
Here’s how you can remove iTunes using Uninstalr:
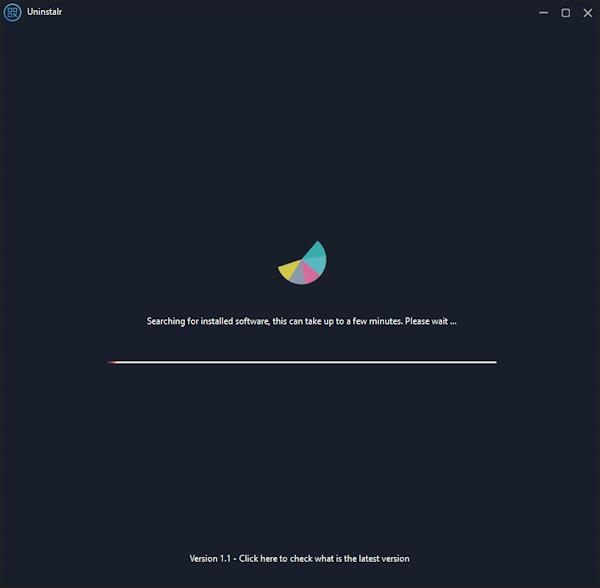
1. Run Uninstalr. This will automatically run the scan within your system. Wait until it finishes
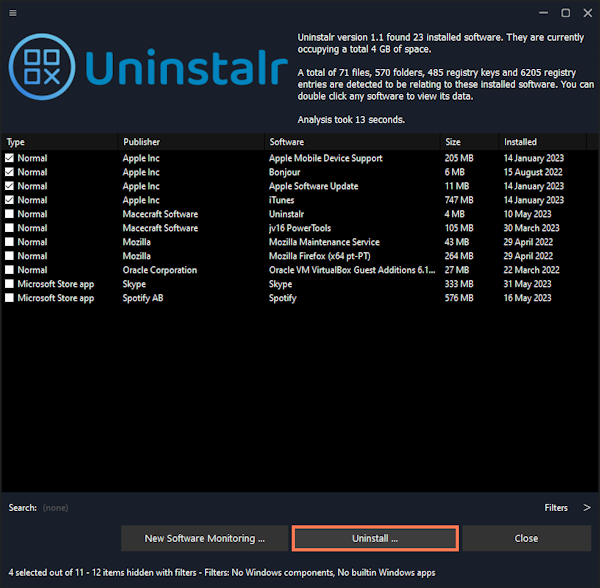
2. When it’s done, select iTunes and its related software components from the list > click the Uninstall button
3. A new screen will appear. Review the items that will be removed and click “Start Uninstallation” to begin the uninstallation

4. A new warning pop-up will appear. Click “Yes” to confirm and proceed with uninstallation

5. Uninstalr will perform batch uninstallation automatically. Typically, Uninstalr will automatically restart your computer (unless the setting is disabled). After the restart, a script will run in the background to make sure leftovers are fully removed. You don’t need to do anything here aside from waiting until the process finishes

Unable to uninstall iTunes on Windows 10
There are rare cases where iTunes can’t be uninstalled from Windows 10. It’s not very common, but it can happen sometimes because of these possible reasons:
- A corrupt download of the iTunes installer
- Incomplete iTunes installation
- Errors in Windows registry because of changes in iTunes-related component
- iTunes doesn’t have an iTunes.msi file
- Another program conflicting with iTunes
- There are still related apps and components that haven’t been deleted
How to automatically fix unable to uninstall iTunes issues
Manually fixing this issue can be time-consuming and we don’t recommend tweaking your registry (especially if you don’t know what you’re doing) since it can mess your system up. Instead, we recommend using a trusted third-party app, like jv16 PowerTools’ System Fixer tool.
Before starting, it’s recommended to create a backup though jv16 PowerTools will also automatically create a System Restore Point after you install the app.
Here’s how you can fix the unable to uninstall iTunes issue using System Fixer:
1. Run jv16 PowerTools and open the System Fixer tool by clicking the “System Fixer” menu

2. A new window will appear, click “Start” to start the scanning process
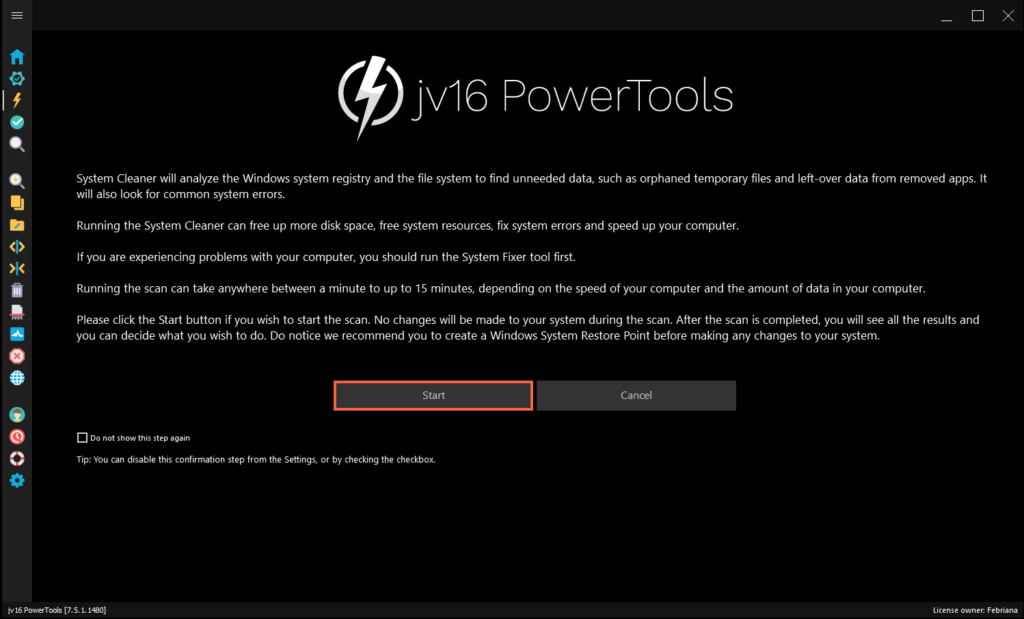
3. System Fixer will scan your Windows system to look for errors

4. When it’s done, a new window that shows the errors and recommended fix will appear. You can review the items and click the “Fix All Errors” button if all looks good
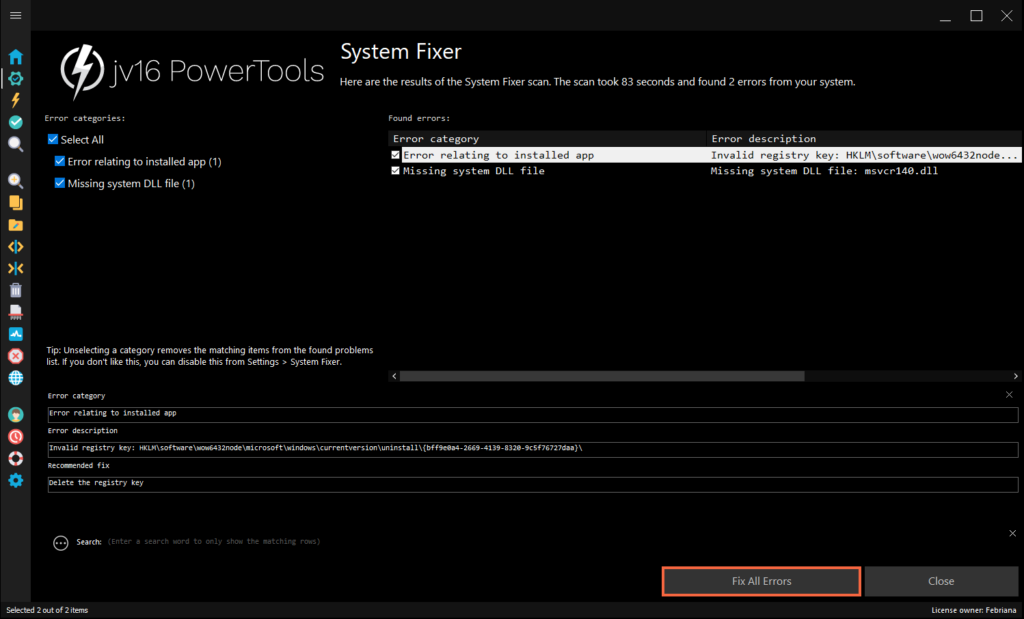
5. System Fixer will automatically implement the fix. It’s recommended to restart your computer after this step to make sure the fix is implemented correctly
If the issue persists even after you implement the fix from System Fixer, we recommend visiting iTunes Support’s page to find the solution to your issue and get your product related questions answered.
Reinstalling iTunes on Windows PC
You need to make sure that iTunes and its related software components are completely uninstalled before you can reinstall iTunes. Typically, you’ll need to make sure that iTunes and supporting files belonging to its related components are fully deleted from a specific folder. However, considering how tedious and prone to error this step can be, we recommend you use a tool that can automatically do the work for you.
You can use jv16 PowerTools’ Finder tool to make sure that iTunes and its related components are completely uninstalled. Finder is a tool to look for files and registry data from your computer. Here’s how you can use it:
- Run jv16 PowerTools
- Click the “Finder” menu
- Type the following into the search box
iTunes | Apple Software Update | Apple Mobile Device Support | Bonjour | Apple Application Support- Click the start button and the tool will look up possible leftover files for you

Once confirmed, you also need to make sure that you still have the disk space required to reinstall iTunes.
You can reinstall iTunes by downloading the installation files from iTunes’ official website, Apple Support’s Download page, or the Microsoft store and following the instructions for installation.

Do keep in mind that after uninstalling and reinstalling iTunes, you won’t lose the music that you previously had. They’ll be automatically synced in the Music folder in your iTunes library.
Easily and safely remove any application with Uninstalr
Uninstalling iTunes or other applications, in general, may seem trivial, but actually quite tricky. You can delete them from the Control Panel and use their own uninstaller, but there are no straightforward ways available from Windows to make sure that they’re completely deleted.
You can manually look up and delete possible files remaining in the recycle bin or a specific folder, but doing so is tedious and can potentially harm your computer – especially if you’re not very familiar with the ins and outs of your system. Not to mention if you need to uninstall more than one program, the amount of manual work required and time needed will multiply.
This is why we recommend Uninstalr. Uninstalr is an easy-to-use and very accurate software uninstaller for Windows created by the team behind jv16 PowerTools. With a few clicks, the tool will automatically scan your whole system, and uninstall the applications that you want to delete while making sure that no leftover items are remaining. It’s suitable for batch uninstallation, unattended uninstallation, and also completely free.
Try Uninstalr by downloading it from the site: https://uninstalr.com/. It’s available in both Portable and Setup versions.