


The developer of RegCleaner, jv16 PowerTools, Uninstalr, WinFindr, Startup Timer, ScreenshotX, System Examiner and Windows Update Fixer.
Google Chrome is one of the most popular web browsers. Chrome is used by 2.65 billion people in 2021 and claimed 65.52% of the world wide web browser market share across all device types – Windows PC, Mac computer, android device, iOS device, you name it.
Even though Microsoft Edge is the default web browser for Windows computers, many users still prefer to use it to install Google Chrome and turn this into the default browser. That’s just how popular this browser is.
Using Google Chrome on Windows
Google Chrome is the most popular web browser used to browse online. It’s also a part of the bigger Google ecosystem, making it very difficult for users to move away from it.
This is especially true if you own an android device and own a Google account. Most android devices come with Chrome preinstalled, though on a rare occasion where you don’t have it, you can simply download it from Google Play Store. You can sync all of your search and history data across your devices simply by logging in to your Google account.
To use Google Chrome on Windows, simply click the Chrome icon to open the Google Chrome app, type the website address you want to visit on the address bar, and start browsing.
Why Uninstall Google Chrome?
Despite the popularity, there are also concerns related to data privacy and heavy RAM usage in Chrome, making users want to uninstall it and switch to different web browsers.
Another reason to uninstall Chrome is also simply because users need to fix issues with the browser itself, and then later re-install it.
How to manually uninstall Google Chrome on Windows 10
The most common way to uninstall Chrome from your computer is through the Windows Settings app and Control Panel. You can find more details on how to do it below.
Uninstall Chrome from Settings
Here’s how you can manually uninstall Google Chrome on Windows from the Settings app:
- Make sure that Google Chrome isn’t currently running. Close all the tabs and the browser window if it’s still running
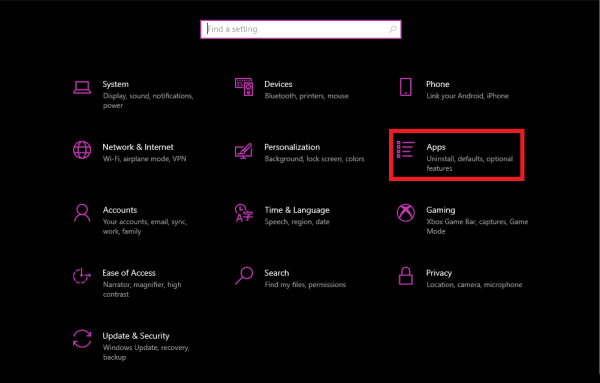
- Press the Windows button to open the Start menu > click the gear icon to open the Settings menu

- In the new Settings window, select “Apps”
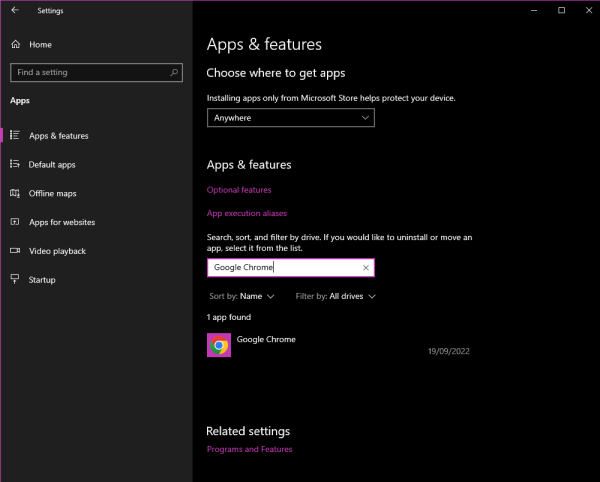
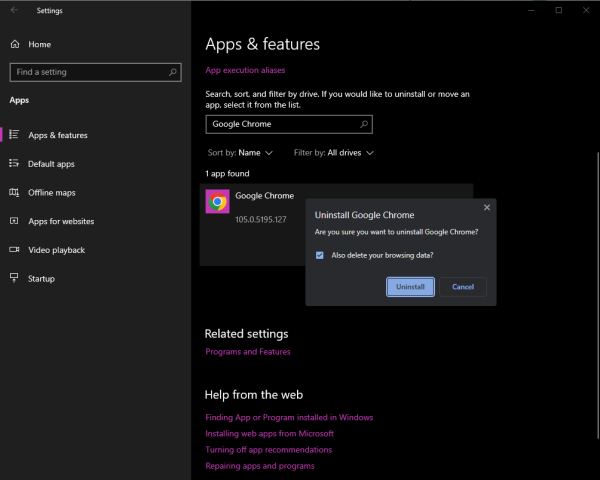
- A new “Apps & features” window will appear. Find “Google Chrome” from the list of installed apps
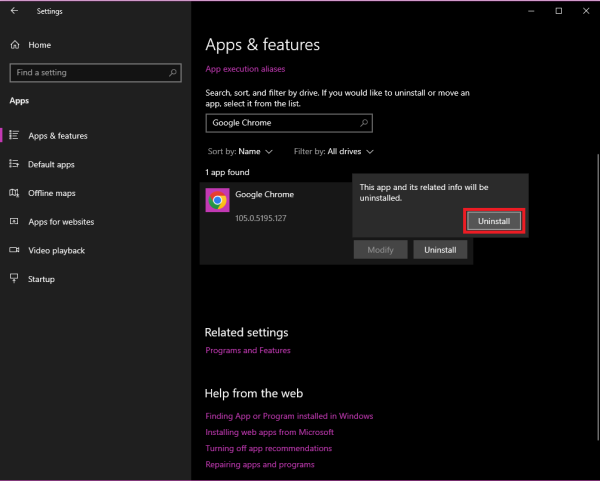
- Click the “Uninstall” button next to the Google Chrome icon
![]()
- A new warning pop-up will appear, click the “Uninstall” button once again to confirm the uninstallation
- A new pop-up will appear > click “Uninstall” to confirm the uninstallation. If you also want to delete your browsing history, you can tick the box next to “Also delete your browsing data?”. Doing this will also remove all your bookmarks, cache, and other temporary files
Uninstall Chrome from Control Panel
Here’s how you can manually uninstall Google Chrome on Windows from the Control Panel:
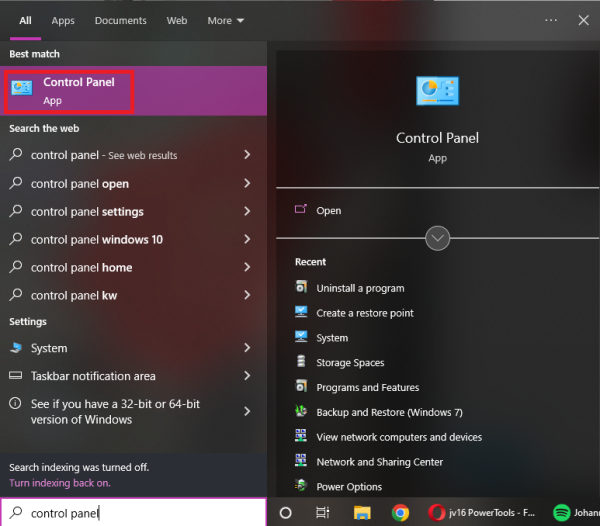
- Type in “Control Panel” on the Search bar > click “Control Panel” app from the search results
- A new Control Panel window will appear, select “Uninstall a program” under the Programs menu

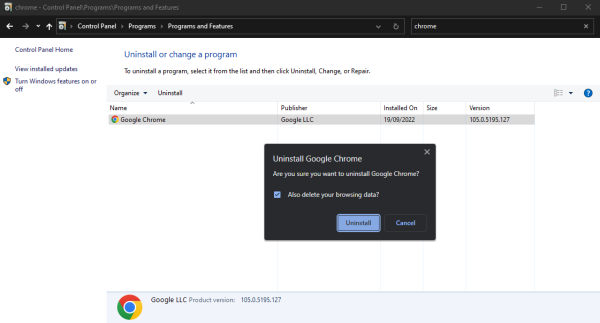
- In the new Programs and Features menu, find Google Chrome from the list of installed programs

- Double click Google Chrome to uninstall
- A new pop-up will appear > click “Uninstall” to confirm the uninstallation. You can tick the box to clear browsing history data in the uninstall process
How to uninstall Chrome automatically on Windows 10
Even though you can remove Chrome from Windows apps, there’s still no guarantee that the above steps can completely remove Google Chrome. There are always leftovers and hidden files that remain in the system files and folders. When they pile up, they can slow down your personal computer system over time.
This is where a trusted third-party app, like jv16 PowerTools’ Software Uninstaller tool, can help. Here’s how you can uninstall Google Chrome using Software Uninstaller:
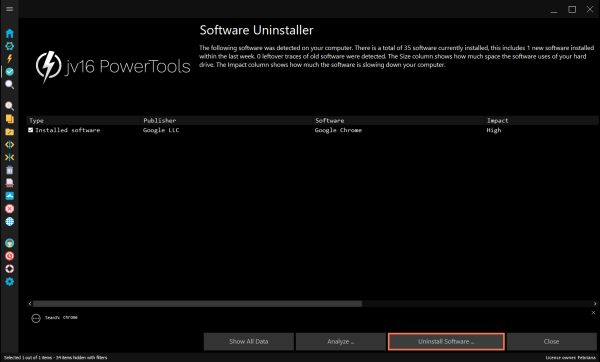
- Run jv16 PowerTools and select ‘Software Uninstaller’ from the Main Menu

- A new window will appear, select “Start” to start the scanning process
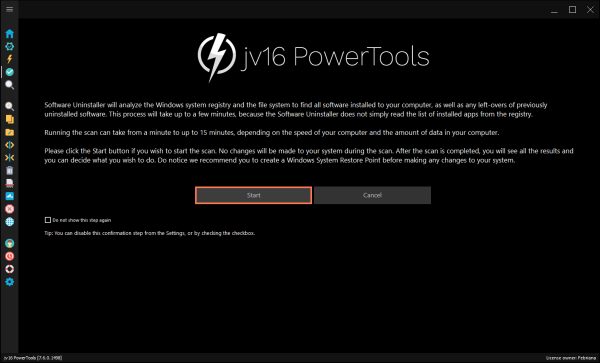
- Software Uninstaller will start scanning all installed software in your system

- When it’s done, select Google Chrome from the list > select Uninstall Software button
- A new warning box will appear, click “Yes” to begin the uninstallation
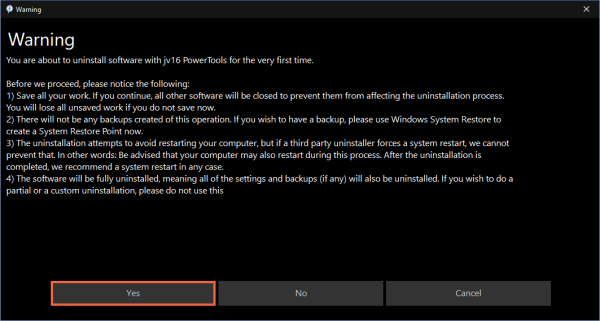
- Before uninstallation begins, you’ll be prompted to review all the files and items that will be uninstalled. Click the “Uninstall Software” button after you confirm that all looks good

- Software Uninstaller will perform uninstallation automatically. You won’t need to do anything at this stage. When it’s done, jv16 PowerTools will automatically restart your computer after all of the applications are successfully uninstalled (if the setting is enabled), otherwise, we recommend you manually restart your computer.
Delete your browsing data
Uninstalling the Chrome app doesn’t automatically delete your browsing history. You need to do an additional step to clear your data.
Depending on which device and how much data you want to delete, there are two ways to delete your browsing history: from your Google account and Google Chrome. This article will show you the detailed steps on how to clear your search and browsing history.
Unable to uninstall Google Chrome on Windows
Uninstalling Chrome usually is pretty straightforward. However, in the situation where you’re not able to do so, you can try the following steps to fix the issue.
Manually fix unable to uninstall Chrome issue
There are a couple of ways you can try to fix this issue: by ending the process in Task Manager and closing background apps.
End the process in Task Manager
The most common reason why Chrome can’t be uninstalled is that Chrome or its associated apps are still running in the background. You’ll need to end its process in Task Manager to make sure it’s not running in the background. Here’s how:
- Close all Chrome tabs or windows that are still running
- Open Task Manager by hitting Ctrl + Alt + Delete buttons at the same time > select Task Manager from the new window. You can also open Task Manager by simply searching “Task Manager” in the Windows search bar
- Go to the “Processes” tab window in Task Manager > Find Google Chrome’s process > right-click Chrome and select End Task

- Try the uninstallation process again
Close background apps
If the above steps don’t solve the issue, another possible reason for the issue is because there are Chrome’s background apps still running. You’ll need to disable them before trying the uninstallation again. Here’s how:
- Open Google Chrome’s Settings by clicking it from the three dots menu on the top right of the window
- Go to the “System” tab > Toggle off “Continue running background apps when Google Chrome is closed”
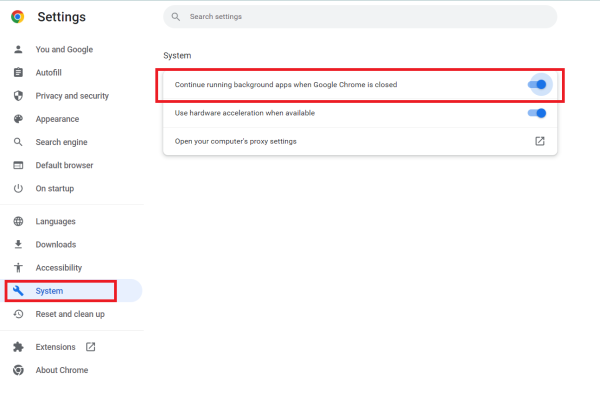
- Try the uninstallation process again
Automatically fix unable to uninstall Chrome issue
If the above steps don’t fix the issue or if you’re unsure of what you’re doing, you can always use a trusted third-party app like jv16 PowerTools’ System Fixer.
Before starting, it’s recommended to create a backup though jv16 PowerTools will also automatically create a System Restore Point after you install the app.
Here’s how you can fix the unable to uninstall Chrome issue using System Fixer:
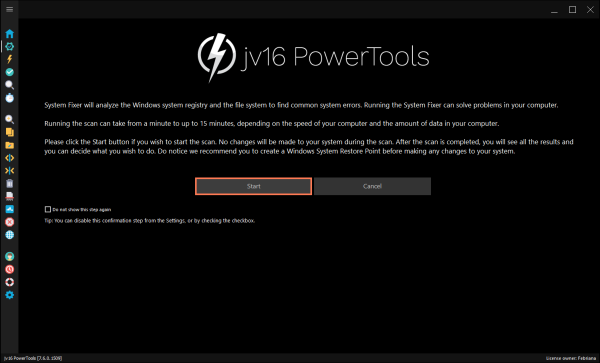
- Run jv16 PowerTools and open the System Fixer tool by clicking the “System Fixer” menu
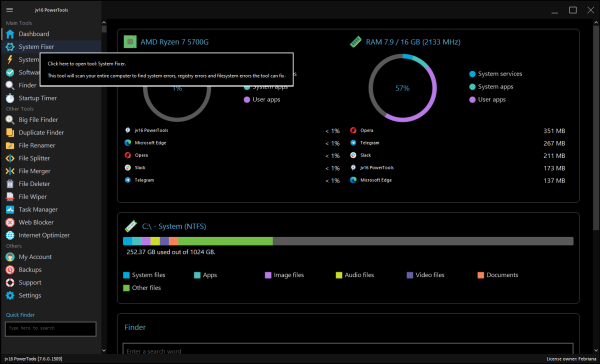
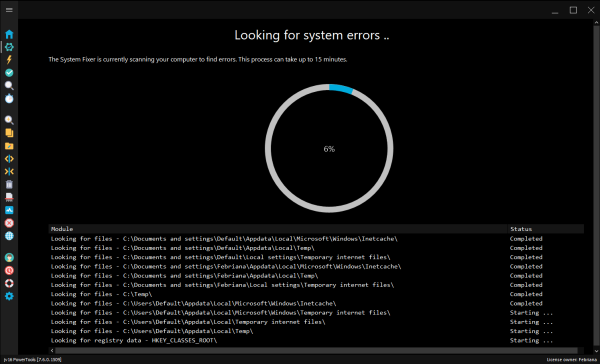
- A new window will appear, click “Start” to start the scanning process
- System Fixer will scan your Windows system to look for errors
- When it’s done, a new window that shows the errors and recommended fix will appear You can review the items and click the “Fix All Errors” button if all looks good
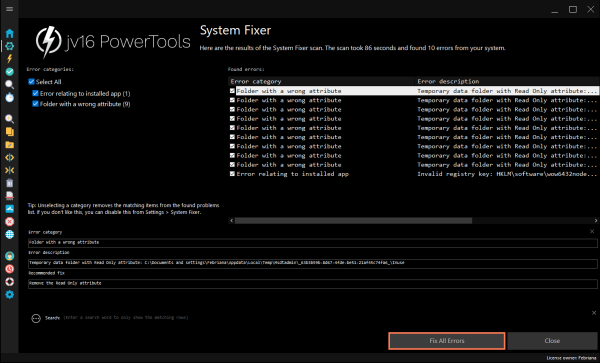
- System Fixer will automatically implement the fix. It’s recommended to restart your computer after this step to make sure the fix is implemented correctly
Install Google Chrome again
If you want to reinstall Google Chrome after the uninstall process, you certainly can do so. The steps are the same as installing Chrome for the first time.
Here’s how:
- Visit Chrome website: https://www.google.com/chrome/ through your default browser (Microsoft Edge for example)
- Click the Download Chrome button on the website to install the Chrome installer

- Launch the downloaded Chrome installer
- Wait until Chrome installation is finished
- After the installation finishes, you can simply run the reinstalled Chrome to start browsing
If you want to have all of your Chrome bookmarks after reinstalling Chrome, you can simply log into your Google account since all of your data is synced on Google’s servers.
Do keep in mind that if you’re on Windows XP and intend to reinstall Chrome to fix issues, you might want to reconsider since Google has stopped issuing Chrome updates and support for Windows XP.
Easily and safely remove any application with jv16 PowerTools’ Software Uninstaller
Uninstalling Google Chrome or other applications, in general, may seem trivial, but actually quite tricky. You can delete it from Settings or Control Panel, but there are no straightforward ways available from Windows to completely uninstall Google Chrome without any leftovers.
You can manually delete possible files remaining, but doing so is tedious and can potentially harm your computer – especially if you’re not very familiar with the ins and outs of your system.
This is why we recommend jv16 PowerTools’ Software Uninstaller. With a few clicks, the tool will automatically scan your whole system, and uninstall the applications that you want to delete while making sure that no leftover items are remaining. It’s also suitable for bulk uninstallation.
We have over 20 years of experience bringing the best out of Windows computers, making jv16 PowerTools very safe to use while still being very user-friendly. Don’t believe us? Try jv16 PowerTools’ Software Uninstaller tool in a 14-day free trial today and see it by yourself!