

The developer of RegCleaner, jv16 PowerTools, Uninstalr, WinFindr, Startup Timer, ScreenshotX, System Examiner and Windows Update Fixer.
Windows 11 is the latest major release from Microsoft, published for the first time on October 5, 2021. Despite being launched more than three years ago, Windows 11 adoption rate is still much smaller compared to Windows 10. It’s 38,13% versus 58,7% per February 2025 to be more exact.
Aside from the big touch-up to the UI – making it almost resemble Linux’s UI somehow, one of the boasted highlights of this version is the claim that Windows 11 runs faster than Windows 10. We’ll talk about this topic another day, but spoiler alert for now: it does run faster, but not by much.
Now, you might have experienced this: Windows 11 is fast and responsive. But after a while, it seems to slow down over time. Then you might also want to make Windows 11 faster for better gaming experiences. These are exactly why we write this ultimate guide on how to make your Windows 11 faster, actually.
Note: for Windows 10 users, we also wrote about how to make Windows 10 faster here
Table of Contents
But first, the caveats
When talking about how to speed up your computer, the obvious recommendation would be to buy faster hardware, such as upgrading your CPU, adding more RAM, or getting a faster SSD. But, this is not what we’re going to discuss here.
Let’s start by defining what this article is exactly about:
- We are not discussing hardware updates – this article is purely about software.
- Furthermore, there are many software products that claim they can make your computer faster. But we are not touching any of those in this article either – we will be only using the tools that come with Windows.
- Thirdly, we need to define exactly what “making Windows 11 faster” means. While we could run multiple different types of benchmarks to establish the speed of a computer, in this article we focus on one very easily measured number: Windows startup time.
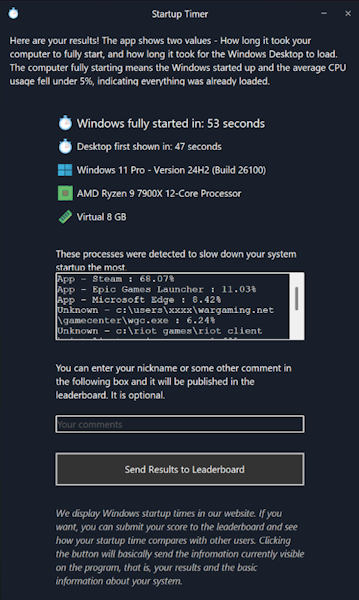
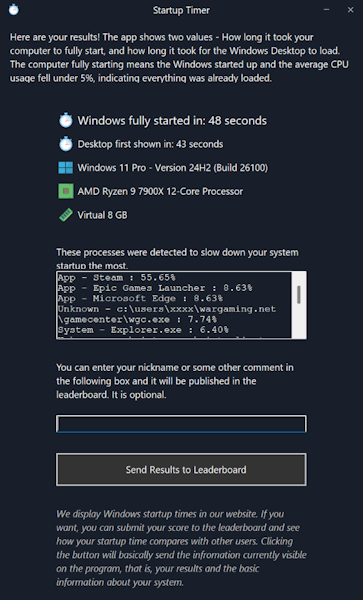
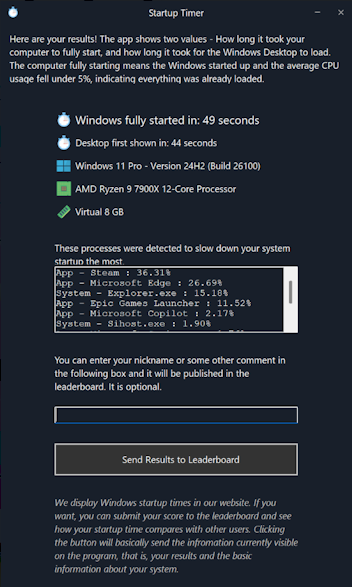
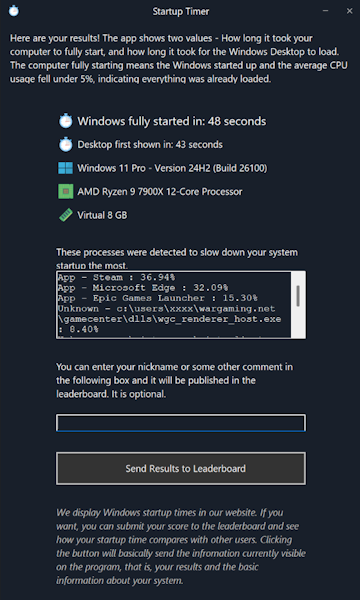
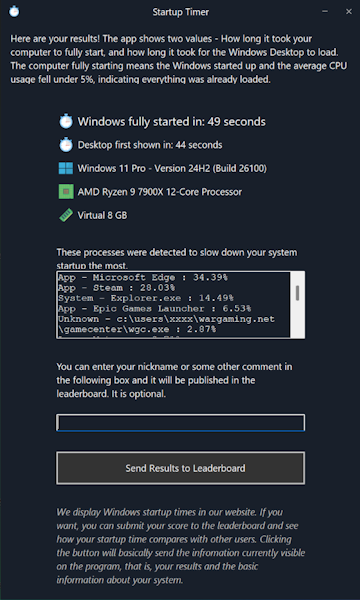
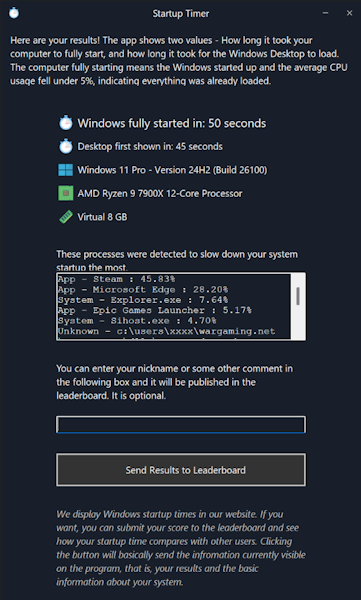
To measure how fast the computer starts up, we are going to use a freeware app called Startup Timer. It measures how long it takes for the system to fully start up, that is, when Windows has booted up, the Windows Desktop has fully loaded and the CPU usage has stabilized to under 5%.
This distinction is very important, because Windows uses delayed loading to show the Windows Desktop as fast as possible, even though the system isn’t fully started up yet. That’s why using an app like Startup Timer is important. Not only does it remove the human element from measuring the Windows startup time, but it also measures when the system is fully started up, instead of only measuring how long it takes for the Desktop to show up.
The basics of making Windows 11 faster
There are many factors that affect the performance of your Windows PC and the key takeaway is that there are no silver bullets to magically boost the speed of your computer.
Most of the tips and tricks shared here relate to disabling things from your system. And that is indeed the key to optimizing Windows: disable and remove all Windows features and apps that you don’t need, because they are probably making your computer slower.
This article contains the best tips on how to make your computer faster and also benchmark tests to see how much effect all these tips actually have.
We know there are a lot of these tutorials and click-bait articles on the best ways of making Windows faster. However, we are doing something that as far as we know, no one else has done: We are actually testing each of these tips to see how much of an effect they have on making Windows 11 start faster.
We include two labels with each tip, ‘Expertise required’ and ‘Potential effect on performance’. The expertise required is our estimation of how difficult it is to apply the tip, while the potential effect on performance is based on the actual benchmarks we did by running Startup Timer before and after applying the tip.
The last thing before we start with the tips on how to make your computer start faster is the baseline. To know how big an effect these tips have, we first used Startup Timer to measure how long it took the system to startup.
Before applying any of the Windows 11 performance tweaks, the system’s baseline startup time was measured three times. The results were:
- Startup 1: 51 seconds
- Startup 2: 50 seconds
- Startup 3: 53 seconds
This means the median startup time before applying any tweaks was 51 seconds.
It’s worth noting that these startup times mean the total amount of time it took Windows to fully start. The time it took for the desktop to show, and what most users would consider the system being started up, was much faster. As discussed earlier, Startup Timer measures the complete system startup time, not just time it took Windows to display the desktop.
This was tested on Windows 11 with all updates installed and some common apps (AnyDesk, Brawlhalla, Discord, Everything, Goose Goose Duck, Maxon Cinema 4D, Mozilla Firefox, Netflix, Steam, Vivaldi and Yu-Gi-Oh! Master Duel etc.) installed.
Windows Update was disabled to ensure no updates were checked or installed during the testing. The testing was done inside a VirtualBox virtual machine, allowing the test system to be reset between each test.
Tips to Improve Windows 11 System Performance
The first tip should go without saying, but let’s get it out of the way regardless: Always keep your Windows updated. This ensures you are running the latest version of Windows with all the possible performance and more importantly, security-related updates.
Tip 1: Disable programs that run on startup
Expertise required: Low
Potential effect on performance: High
When you’re starting up your Windows 11 system, there are programs that run processes in the background, and not all of them are necessary. For example, the Spotify app would run processes in the background even when you don’t want to listen to music every time. You can select which programs to run on startup and disable unnecessary ones from Task Manager to make your system run faster. Here’s how:
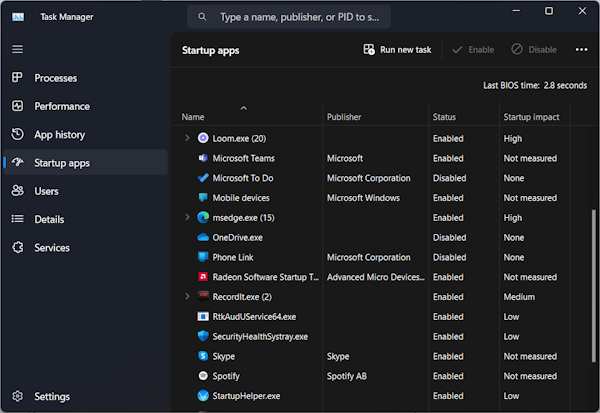
- Open Task Manager by typing “Task Manager” in the Windows search box or pressing Ctrl + Shift + Esc buttons at the same time
- In the new Task Manager, go to the “Startup apps” tab. See programs that run in the program, their status, and their startup impact. From here, you can disable the ones that you don’t always need and have high startup impact for example
In our test, we disabled all the third party apps and non-critical Microsoft apps from automatically starting. This dropped the system startup time from 51 seconds to 19 seconds (the median value from three startups measured with Startup Timer: 22, 19 and 18 seconds). This is a dramatic improvement in performance.
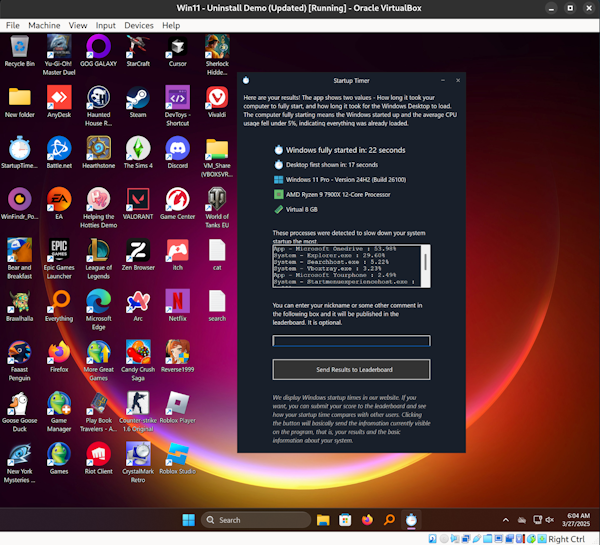
This shows how massive impact automatically running software has on Windows 11 performance. Naturally, we are not suggesting everyone to disable every automatically starting software. But we are recommending you to review and carefully think about what you really want to have automatically starting with Windows. The more software that starts automatically, the slower your computer will become. Choose wisely.
Tip 2: Use efficiency mode
Expertise required: n/a
Potential effect on performance: n/a
Another tip that you can try is to enable efficiency mode. Efficiency mode lowers process priority and improves power efficiency, allowing your system to run faster. The downside is that it may cause instability for certain processes.
Unfortunately, you can’t enable efficiency mode entirely for your system. Rather, you’ll need to enable efficiency mode for each process you want one by one from Task Manager. Here’s how you can do it:
- Open Task Manager by typing “Task Manager” in the Windows search box or pressing Ctrl + Shift + Esc buttons at the same time
- In the new Task Manager, go to the “Processes” tab. See the programs that run processes from the list, then choose the ones that you want to enable the efficiency mode on
- After choosing, click on the program > then click the “Efficiency mode” menu on the top right of the Task Manager window
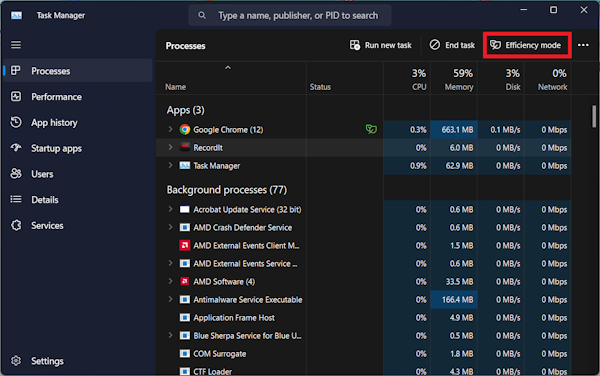
- A new confirmation pop-up will appear, click “OK” to proceed
We were unable to test this, because setting any process to run in efficiency does not remain running in that mode after the system restarts. Therefore, it’s not possible to test whether this setting has any effect.
Also, it’s worth noting that Windows shows a warning about this feature potentially causing system instability. We didn’t notice any in our testing, but there probably is a reason why Microsoft would add such a warning.
Tip 3: Enable automatic Windows maintenance
Expertise required: Low
Potential effect on performance: Unknown
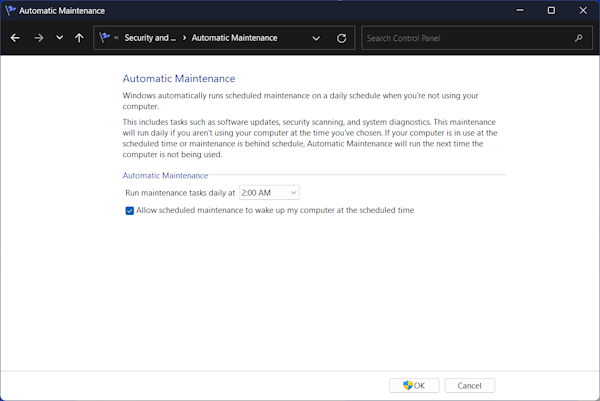
Windows 11 is equipped with a built-in automatic maintenance feature to ensure your system runs on its peak performance. This feature runs in the background every day, typically at 2 AM by default if your computer is plugged into a power source or when it’s in sleep state.
However, there are times when this feature isn’t turned on every day and this could potentially slow your computer down. Therefore, it’s important to make sure automatic Windows maintenance runs every day. Here’s how:
- Open Control Panel by typing in “Control Panel” from the Windows search box > choose Control Panel from the Search results
- In the new Control Panel window, select “System and Security” > select “Security and Maintenance” on the page
- Another new page will appear; expand the “Maintenance” tab > click the “Change maintenance settings” menu
- Tick the “Allow scheduled maintenance to wake up my computer at the scheduled time”. You can also change the default scheduled time of 2 AM to the time that is more convenient for you from this menu. After you’re done, click the “OK” button
The setting was already enabled by default on the Windows 11 test system, therefore its effect on performance was not tested.
Tip 4: Turn off search indexing
Expertise required: Low
Potential effect on performance: Low
Windows 11 has a search indexing feature that allows you to search faster. Though it’s useful when you need to find anything quickly, this feature will also slow down your computer performance. Here’s how you can turn off search indexing to make your Windows 11 run faster:
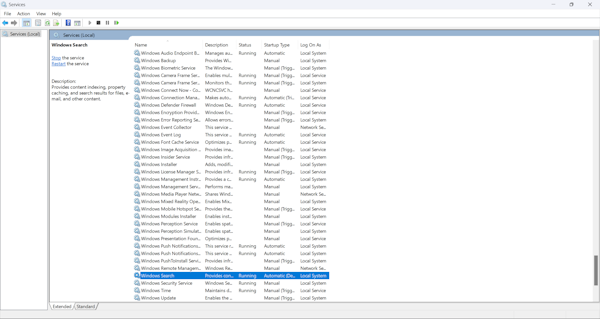
- Look up “Services” or “services.msc” on the Windows search bar > click the ‘Services’ menu from the search results
- In the new Services window, scroll down and find the “Windows Search” option > click the option
- Right Click “Windows Search” and select Properties. From the popup window, click the Stop button to stop the service from running and then change the Startup type to “disabled”
- Restart your system to apply the changes
Disabling the Windows Search Service can be a good idea especially if you are using a third party searching tool such as WinFindr which do not rely on Windows Search Service to work. WinFindr being developed by us, also means we highly recommend it. Wink wink.
Disabling the Windows Search service improved the system startup time from 51 seconds to 48 seconds (the median value from three startups measured with Startup Timer: 46, 48, 49). The effect was bigger than expected and probably relates to the amount of data within the system, the more data there is, the bigger improvement you will probably get.

Tip 5: Disable services
Expertise required: High
Potential effect on performance: Low
Disabling unneeded or unwanted system services has been listed as a trick to improve Windows performance since times long forgotten by mere mortals. Does that trick still work, though? Let’s test it.
We did a review of all the system services running in our Windows 11 test system and by using many tutorials on what you can safely disable, we decided to disable the following.
Since this Windows system doesn’t have any printer or bluetooth devices, all services relating to printing and bluetooth were disabled. Similarly, this system isn’t used for gaming, so all XBox related services were also disabled.
We also disabled Recommended Troubleshoot Service, Program Compatibility Assistant Service, Performance Logs & Alerts, Offline Files Service, Microsoft Diagnostics Hub, Geolocation Service, Cellular Time Service and Parental Controls.
We also changed the startup type to “Automatic (Delayed Start)” for AnyDesk, Everything Plarium and Maxxon services.
It’s worth noting that which services can be safely disabled is based on your specific computer and use case. Disabling the wrong services can probably cause serious issues, so one should proceed with a lot of caution if deciding to change anything about system services.
That being said, disabling all these services caused the system to start in 49 seconds (a median time out of three test startups: 48, 53, 49 seconds) and therefore it seems clear that Windows is smart enough not to waste system resources on unneeded services.
It seems that disabling services does not affect system performance much, and considering the risks involved, this tip might not be worth it.
Tip 6: Clean up your hard disk
Expertise required: Low
Potential effect on performance: Low
Same advice for earlier versions of Windows still applies for Windows 11: clean up junk and temporary files you don’t need from your hard disk for faster performance. You can do this with the infamous Disk Cleanup from Windows. Here’s how:
- Open Disk Cleanup by typing in “Disk Cleanup” on the Windows search bar > choose Disk Cleanup menu from the search results
- In the new Disk Cleanup window, tick the files that you want to delete and click the “OK” button
The slight difference in the Windows 11 system, however, is that there’s a built-in feature called Storage Sense. When you enable the automatic content cleanup option in Storage Sense, the tool will automatically delete unwanted files from your hard disk in the future. Here’s how you can enable this option:
- Open Windows Settings by typing in “Settings” on the search bar > click the menu from the search results
- In the new Settings window, click the “System” menu from the left sidebar > go to the “Storage” menu > click “Storage Sense”
- In the Storage Sense window, configure the options on how often you want Storage Sense to run, and how long you want to wait until unopened files in the recycle bin and Downloads folder are deleted
- Once you’re done, ensure the “Automatic User content cleanup” is enabled and click the Run Storage Sense Now button.
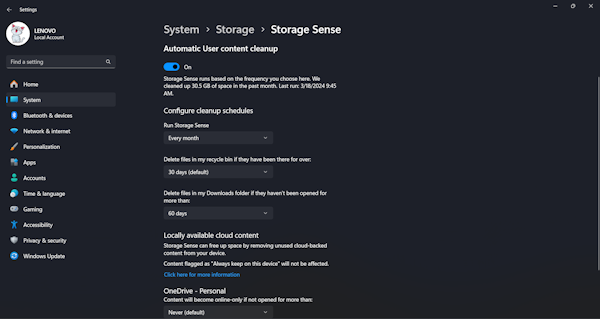
In the testing system, running Disk Cleanup in both normal and admin mode, as well as the Storage Sense cleaning tool were able to free over 2 GB of space.
The system was restarted three times and it now took 50 seconds to fully start (a median value of measured 49, 50, 50 second startups).
It’s perhaps worth noting that cleaning up your unneeded temporary files can provide some amount of performance gain but this depends on many factors. For example, how many temporary files exist and also whether you are using a SSD or HDD type main disk.
In this benchmark, running Windows Disk Cleanup didn’t have a considerable effect on the measured system startup time.
Tip 7: Disable shadows, animations, and visual effects
Expertise required: Low
Potential effect on performance: Low
Windows 11 comes with eye-catching shadows, animations, and visual effects which typically won’t affect system performance in a new computer. If you’re using an older computer though, you might want to disable those to make your system run faster.
Here’s how you can disable shadows, animations, and visual effects on Windows 11:
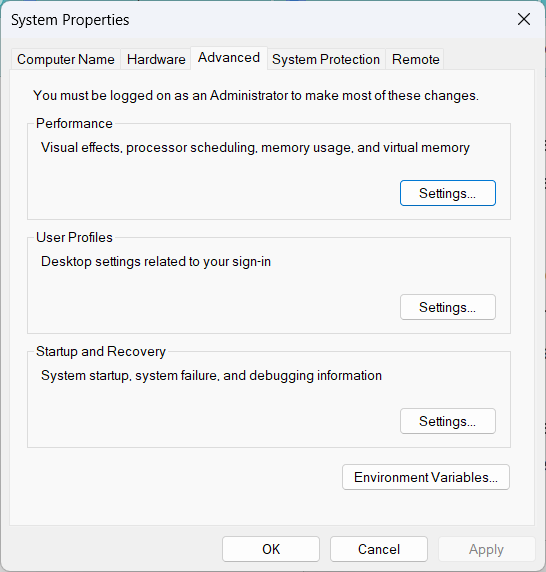
- Open System Properties in Control Panel by typing in “sysdm.cpl” on Windows search > click sysdm.cpl (Control Panel item) from the search results
- In the new System Properties window, go to the “Advanced” tab
- Go to the “Performance” menu in the “Advanced” tab > click the “Settings…” button under “Performance”
- On the “Performance Options” window, go to the “Visual Effects” tab
- From there, you can select the “Adjust for best performance” option > click the “OK” button to save changes
- You can also choose the “Custom” option where you can individually disable visual effects you don’t need
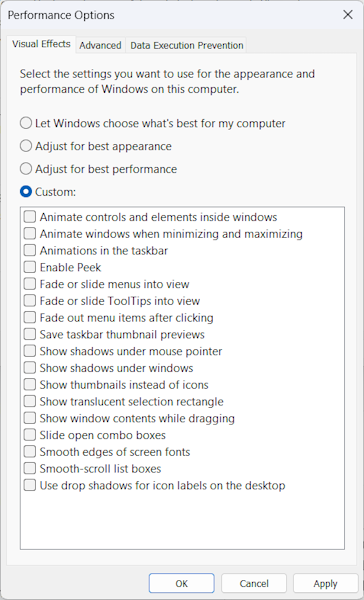
After choosing the Adjust for best performance option, the system was restarted three times and the startup time was measured. With this performance option selected, the system startup time was 47 seconds (a median value of three startup times: 48, 47 and 45 seconds).
Similarly to cleaning up the system disk, this option could possibly improve the system performance but only slightly. That being said, if you are running older hardware and you want to maximize your Windows 11 speed, disabling all the visual effects probably makes sense.
Tip 8: Disable transparency
Expertise required: Low
Potential effect on performance: Unknown
Another tip you can try to make your Windows 11 system run faster is by disabling transparency. Though the feature may seem trivial, it actually requires quite a lot of system resources which in turn, affects your system performance. Here’s how you can disable transparency on Windows 11:
- Open Settings by looking up “Settings” on Windows search or by hitting the Windows button on your keyboard > clicking “Settings” from the menu
- In the Settings window, click the “Personalization” menu from the left sidebar
- In the “Transparency effects” menu, toggle off the button
There were no transparency options visible in the test system, so it was not possible to benchmark the effects of this setting.
Tip 9: Change power settings
Expertise required: Low
Potential effect on performance: Low
Power settings in Windows 11 allow you to adjust how much power your computer uses and its impact on system performance. There are typically three types of power settings:
- Power Saver: This setting would prioritize power usage over performance. When you opt for this setting, your computer might run slower so that it’ll save more battery
- High Performance: This setting would prioritize performance over power usage. When you choose this setting, your computer will run faster but it may also drain the battery quicker as well
- Balanced: This setting would balance both performance and power usage. When you opt for this setting, your system will run with more efficient power usage without sacrificing your system performance
If you want to make your Windows system 11 run faster, you can change your power settings to “Best Performance” rather than the other options. Here’s how:
- Open Control Panel by typing in “Control Panel” on the Windows search bar and clicking the menu from the search results
- In the new Control Panel window, click the “Hardware and Sound” menu
- In the new Hardware and Sound window, click the “Power Options” menu
- Choose “High Performance” under the “Choose or customize a power plan” or “Show additional plans” option

- If you don’t see the “High performance” plan, you can also create and customize the power plan from the “Create a power plan” menu on the left sidebar
The High Performance setting was selected and the system’s startup speed was again tested. With this setting, the system took 51 seconds to fully start (a median value out of three measured startup times: 51, 49 and 51 seconds).

It seems like this setting didn’t have any effect in this test.
Tip 10: Turn off Windows tips and tricks
Expertise required: Low
Potential effect on performance: Low
Windows 11 would sometimes give you some recommendations on how to use the operating system through tips and tricks. If you don’t find them particularly helpful, you can disable the feature as this can affect your system performance as well. Here’s how you can do it:
- Open Windows Settings by typing in “Settings” on the search bar > click the menu from the search results
- Choose the “System” menu from the left sidebar > click the “Notifications” menu
- Scroll down to find the “Additional settings” menu > untick the “Get tips and suggestions when using Windows” and possibly the other two options, as well.
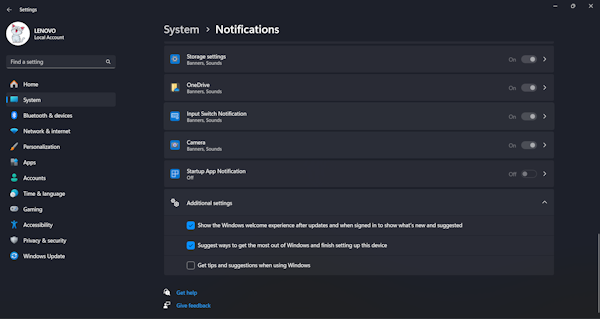
The “Show the Windows welcome experience …”, “Suggest ways to get the most …” and “Get tips and suggestions …” options were disabled and the system was restarted three times. The system startup time was 48 seconds (a median startup time out of 49, 48 and 48 seconds).
Based on the test, disabling Windows tips and tricks notifications perhaps surprisingly does seem to have a slight positive effect on Windows performance.
Tip 11: Disable Game Mode
Expertise required: Low
Potential effect on performance: Low
Game Mode is an option in your settings that will optimize your computer to play games by allocating system resources for gaming in the background. This option is great if you’re an avid gamer. But, for the rest of the people who don’t play games on their computers, this isn’t an optimal choice as this will affect system performance especially because this option is turned on by default. You can disable Game Mode on your Windows 11 to make it run faster. Here’s how:
- Open Windows Settings by typing in “Settings” on the search bar > click the menu from the search results
- In the new Settings window, click the “Gaming” menu from the left sidebar
- Toggle off the Game Mode option on the “Game Mode” menu
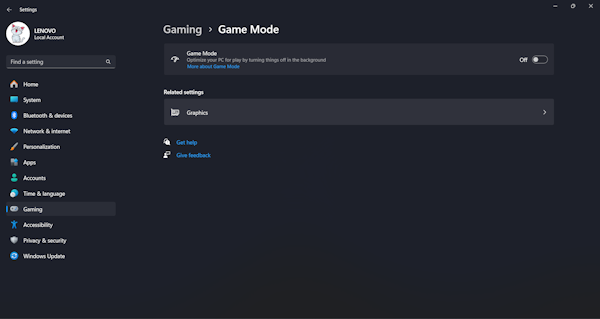
We disabled Game Bar and Game Mode in the test system. After this, the system was restarted three times to measure the effect on system performance. After changing this setting, the system took 50 seconds to fully start (a median startup time of 50, 50 and 52 seconds).
It seems that disabling Game Bar and Game Mode might slightly improve the system’s startup time. Obviously, this shouldn’t be done if you want to use the Game Bar or Game Mode in your system.
Tip 12: Update device drivers and make sure you have the latest updates
Expertise required: Medium
Potential effect on performance: Unknown
Typically an out-of-date driver would slow down Windows 11 system performance. It’s worth checking whether your drivers are up to date to make your system run faster. Here’s how you can do it:
- Go to Device Manager by typing in “Device Manager” on the Windows search box > click Device Manager menu from the search results
- In the new Device Manager window, expand all of the driver categories
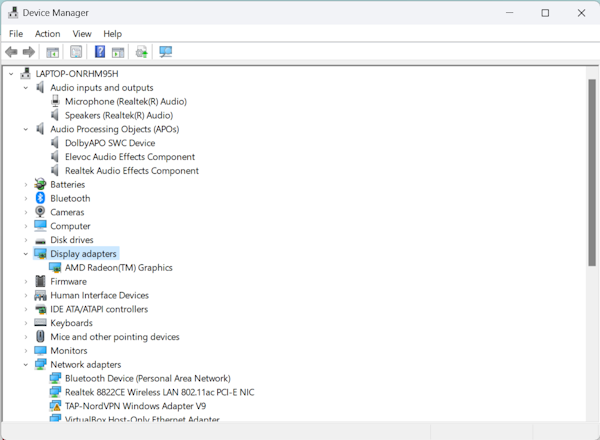
- Look for any devices that have the yellow exclamation mark which indicates an incompatible driver. If you can’t find any, then all of your device drivers are up to date!
You can also make sure all of your device drivers are up to date in the future by installing optional updates that are related to device drivers. Here’s how:
- Open Settings by typing in “Settings” on the Windows search bar > click Settings menu from the search results
- In the new Settings window, click the “Windows Update” menu from the left sidebar
- Go to “Advanced options” > select “Optional updates” under the “Additional options” menu and select any update that is related to your driver to begin the update installation
There were no updates available in the test system, so we were unable to test the performance effects of this.
That being said, keeping your system up-to-date is always a good idea from the security and stability standpoints alone!
Tip 13: Free up space by uninstalling unwanted programs
Expertise required: High
Potential effect on performance: High
One of the main culprits of the Windows system slowing down – including on Windows 11 is low storage. Aside from cleaning up the disk, you can also maintain your storage space by uninstalling programs that you don’t need, such as adware and bloatware.
Here’s how you can uninstall unwanted programs from Apps Settings:
- Open Windows Settings by typing in “Settings” on the search bar > click the menu from the search results
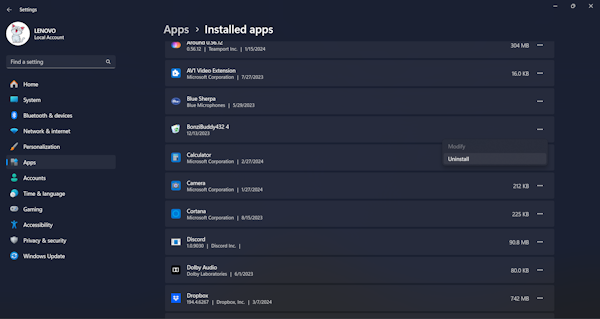
- In the new Settings window, click the “Apps” menu from the left sidebar > go to “Installed apps” menu
- In the new Installed apps window, you’ll be able to see the list of all apps installed on your system. Find the apps you no longer need in your system
- Once you find them, click the three dots on the right side of the app’s name > and select “Uninstall”
- Once you finish with the uninstallation, it’s recommended to restart your computer to make sure all of the unwanted apps are fully uninstalled
All the installed third party apps were uninstalled from the test system, the uninstallation process was completed by one additional system reboot. Then, the system was restarted again three times to measure the startup time of the system.
After uninstalling all the third party apps from the test system, its startup time was measured to be 24 seconds (a median value out of three measurements of 25, 24 and 23 seconds).
Unsurprisingly, uninstalling everything from a computer makes it really fast.
A bit more interesting test is to see what happens if we only uninstall the builtin Windows apps that came with Windows but which we are not using (and which can be easily uninstalled from the Apps listing).
In this test, the following were uninstalled: Camera, Cortana, Feedback Hub, Maps, Media Player, Microsoft Office, Microsoft Clipchamp, Microsoft Todo, Microsoft OneDrive, Microsoft Health Tools, News, Outlook, Paint, People, Photos, Power Automate, Quick Assist, Remote Desktop Connection, Snipping Tool, Solitaire, Sound Recorder, Sticky Notes, Weather, Web Media Extensions, Windows Copilot MSIX Pack, Xbox, Xbox Live.
After uninstalling these builtin apps, the system was restarted once to complete the uninstallation process.
Then, the system was restarted again three times to measure its startup time. It now took 45 seconds to fully start up (a median value of three system startup measurements of 45, 44 and 48).
Rather surprisingly, even uninstalling the builtin Windows apps had a major impact on system performance on this test.
Tip 14: Restart Windows
Expertise required: None
Potential effect on performance: Unknown
In the case when you need to contact tech support, they’d typically ask you the following questions, “Have you turned it off and on again?” or “Have you restarted your device?”. Though it may seem trivial, this recommendation is often mentioned for a reason. Sometimes, a simple restart would flush out excessive use of RAM which you can’t do anything about, or kill the processes running in the background that you can’t kill. Here’s how you can restart your Windows 11 system:
- Click the Windows button from your keyboard or click the Windows menu from your computer
- Click the power button on the bottom left of the Windows menu > click Restart
The test system had been restarted many times during this testing, therefore this tweak doesn’t apply and wasn’t tested.
Tip 15: Check for and remove viruses and spyware
Expertise required: Low
Potential effect on performance: Low
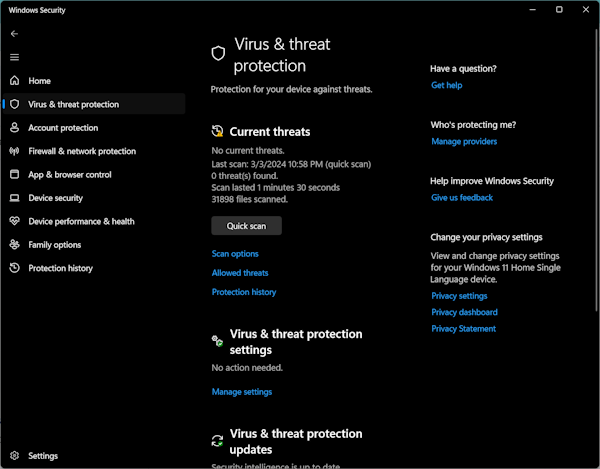
Aside from putting your data security at risk, viruses, and spyware could also potentially slow down your Windows 11 system. Therefore, it’s important to regularly scan your system for threats and remove them when needed. You can do so with Windows Security, a built-in tool to check for and remove viruses and spyware. Here’s how:
- Open Windows Security by typing in “Windows Security” on the search bar > click the menu from the search results
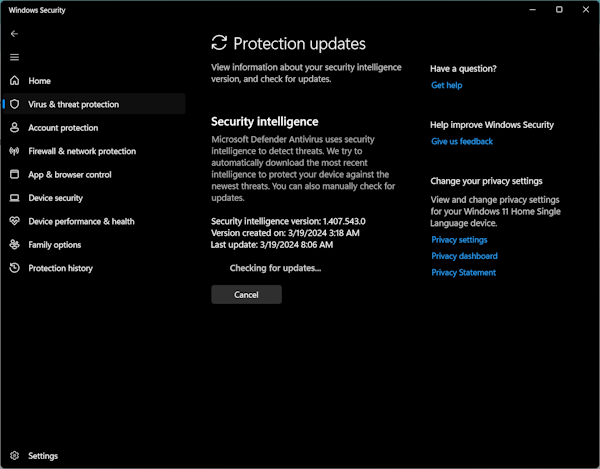
- Choose the “Virus & threat protection” menu from the left sidebar > select “Protection updates” under the “Virus & threat protection updates”
- In the Protection updates window, click the “Check for updates” button to make sure that you have the latest updates
- Go back to the previous page. In the “Virus & threat protection” page, click the “Quick Scan” button under the “Current threats” menu. Wait until the tool finishes scanning and follow the next instructions from there
- After which, you also want to do a full scan
While scanning the system with an antivirus is mostly a security related topic, there are some cases where this would also affect the system performance. For example, the builtin Windows antivirus is probably scanning files in the background. It might be possible that this type of scanning might be reduced in case the user regularly scans the entire system manually, and this could impact performance.
To test this, first the Quick Scan, then the Full Scan and lastly the Offline Scan were used to scan the system.
After this, the system’s startup time was 50 seconds (a median value of three startup times of 51, 50 and 50 seconds).
Running the Windows Antivirus didn’t provide any significant performance gain in this testing.
Tip 16: Pause OneDrive syncing
Expertise required: Low
Potential effect on performance: Unknown
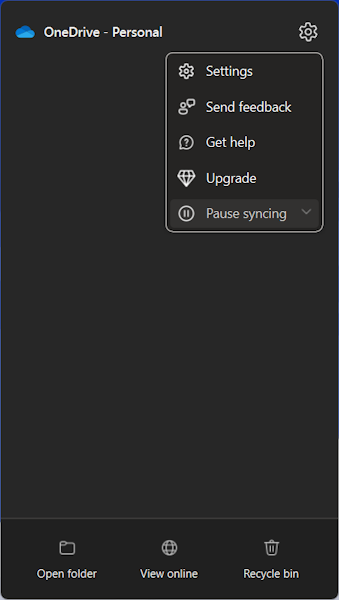
If you’re using OneDrive to store your backup data, syncing your data to OneDrive is a convenient option. However, in the case where you prefer to store your backup data in other services, or you want to make Windows 11 run faster, you can disable OneDrive syncing and then resume syncing later if necessary. Here’s how:
- Look for the OneDrive icon on the taskbar in the bottom right of your screen
- Once you find it, click the OneDrive icon > click “Settings” on the top right of the window > click “Pause syncing”
- Choose how long you want to pause OneDrive syncing. You can choose between 2 hours, 8 hours, 24 hours, or disable OneDrive syncing altogether
- When you want to resume syncing, you can go back to the OneDrive menu and click “Settings” > click “Resume syncing”
The OneDrive syncing was already disabled in the testing system by default, and it was not therefore tested.
Summary
Based on the benchmark tests we performed, we can summarize our findings as follows.
| Recommended tips | Expertise required | Potential effect on performance | How long did the system start? |
| Disable programs that run on startup | Low | High | 19 seconds |
| Use efficiency mode | n/a | n/a | – |
| Enable automatic Windows maintenance | Low | Unknown | – |
| Turn off search indexing | Low | Low | 48 seconds |
| Disable services | High | Low | 49 seconds |
| Clean up your hard disk | Low | Low | 50 seconds |
| Disable shadows, animations, and visual effects | Low | Low | 47 seconds |
| Disable transparency | Low | Unknown | – |
| Change power settings | Low | Low | 51 seconds |
| Turn off Windows tips and tricks | Low | Low | 48 seconds |
| Disable Game Mode | Low | Low | 50 seconds |
| Update device drivers and make sure you have the latest updates | Medium | Unknown | – |
| Free up space by uninstalling unwanted programs | High | High | 24 seconds |
| Restart Windows | None | Unknown | – |
| Check for and remove viruses and spyware | Low | Low | 50 seconds |
| Pause OneDrive syncing | Low | Unknown | – |
‘Expertise required’ is measured based on our estimation of how difficult it is to apply the tip.
The ‘Potential effect on performance’ is measured by how long the system started against the baseline system startup time, which was 51 seconds.
Conclusion
In this article, we listed 16 of the most common tips on how to make Windows 11 faster. We also tested each of the tips to see exactly how much they can make Windows 11 start faster.
Based on this testing, unsurprisingly, the best way to make Windows 11 faster is to either uninstall any software that you no longer need, or the very least disable software from automatically starting with Windows.
Don’t believe everything you read online. Instead, try things out for yourself.
If you want to see how much these tips can actually make your Windows boot up faster, we recommend you try these tips and then run Startup Timer yourself. You can download the freeware app from this link: https://startuptimer.com/