

The developer of RegCleaner, jv16 PowerTools, Uninstalr, WinFindr, Startup Timer, ScreenshotX, System Examiner and Windows Update Fixer.
Here are some of the most common scenarios where you need to check your PC specs:
- You want to see whether your PC build is suitable for your specific needs, such as gaming or programming.
- You want to ask for opinions or make informed decisions before upgrading your PC components.
- You need to send the PC’s detailed specs to tech support when you run into an issue.
- You need to give details of your PC specs before selling your computer.
Regardless of your scenario, there are different ways for you to check PC specs. Microsoft, for example, has added built-in tools to check PC specs, such as Settings, System Information, DirectX Diagnostic Tools, PowerShell, Command Prompt, and Control Panel. In addition, you can also use third-party tools to obtain the PC specs.
In this article, we’ll give you in-depth information about checking PC specs and cover the following:
- Benefits of checking PC specs
- How to check PC specs using Microsoft’s built-in tools
- How to check PC specs using System Examiner
- How to interpret PC specs information
- Common misconceptions about PC specs
- Tips for maintaining your PC’s performance
Benefits of checking PC specs
Before we dive into the topic of how to check PC specs, let’s take a step back and talk about the benefits of checking PC specs. There are several reasons why you need to check your PC specs:
- By understanding your PC specs, you can find out whether your PC is compatible to cater your specific needs, such as gaming or programming.
- If you want to optimize your PC’s performance, understanding the PC specs can help with that. For example, if you know your PC’s RAM, processor, and graphics card, you can find out which part you can upgrade to increase your PC’s performance.
- Understanding your PC specs helps you to diagnose and address the issues with your computer.
How to check PC specs using Microsoft’s built-in tools
Microsoft has built-in tools for you to check your PC specs. Unfortunately, the information provided by those tools is limited, more scattered, and can be too technical for regular users. Here’s how you can check PC specs using their tools.
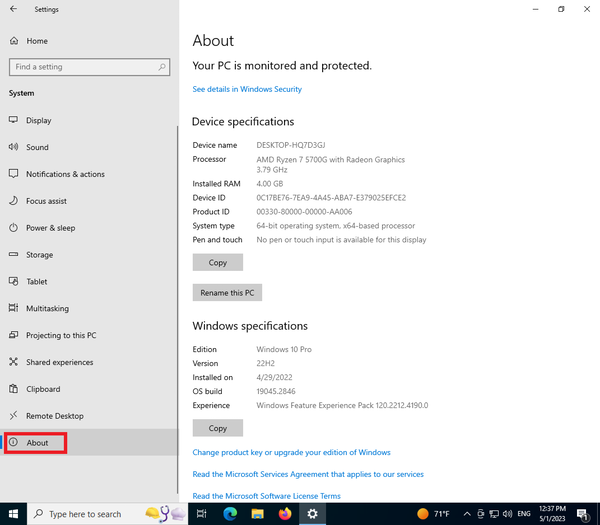
How to check PC specs from Settings
- Click the Start button or press the Windows key
- Click Settings (the gear icon)
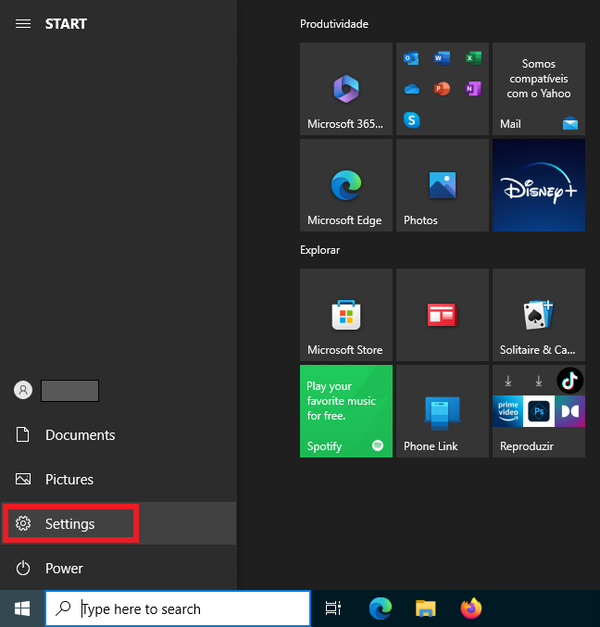
- In the new window that appears, click on the “System” menu
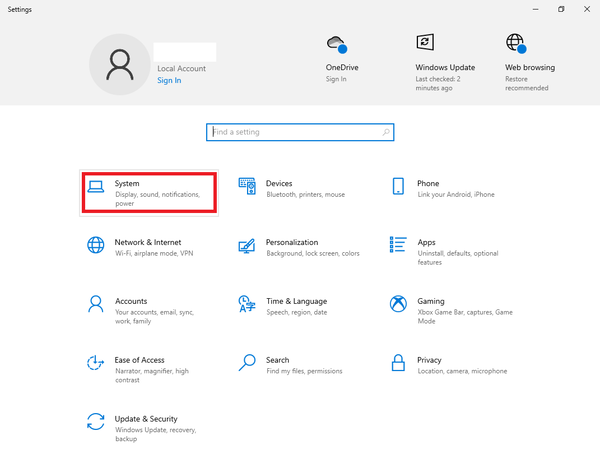
- In the new System window, select “About”
- In the new About window, you’ll be able to see some basic system information, such as Device specifications and Windows specifications
How to check PC specs using Control Panel
- Look up Control Panel in the Search bar > click from the search results
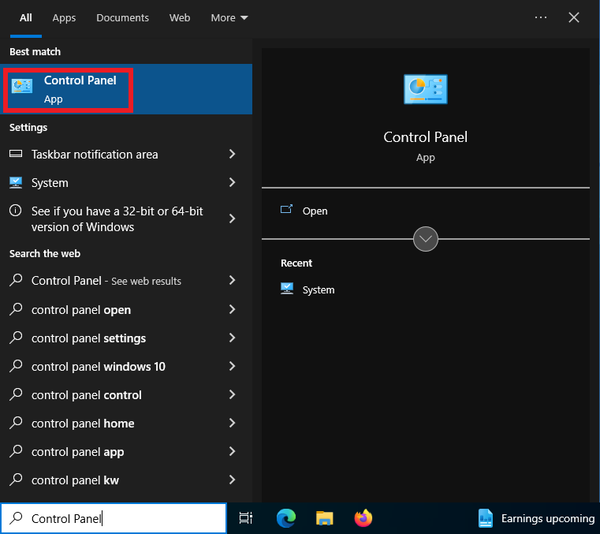
- In the new Control Panel window, click the “System and Security” menu

- In the new System and Security window, click “System”
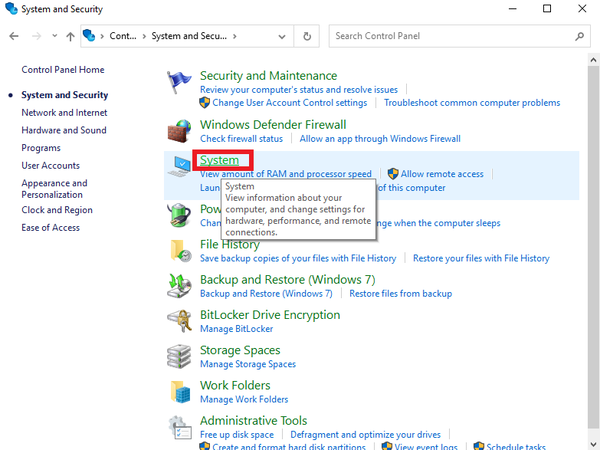
- A new window will appear. From there, you can see some basic specs such as Device Specifications and Windows specifications. Similar to the ones from Windows System Settings
How to check PC specs using Command Prompt
- Open the “Run” window by clicking the Windows key + R key
- In the new Run window, type “cmd” > hit Enter
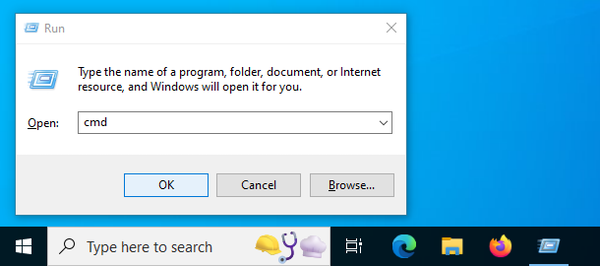
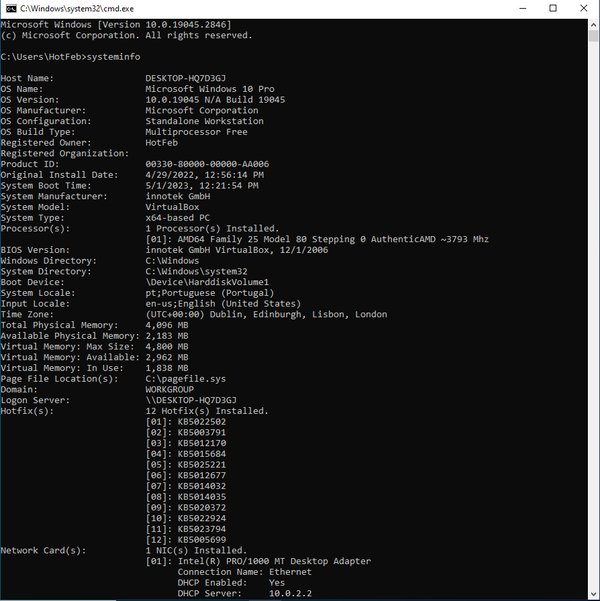
- In the new window, type in
systeminfoin the command line > hit Enter - Command Prompt will show you more details on your system information
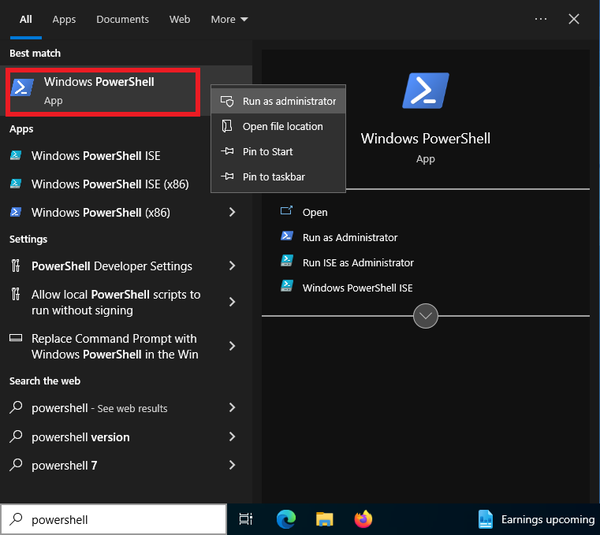
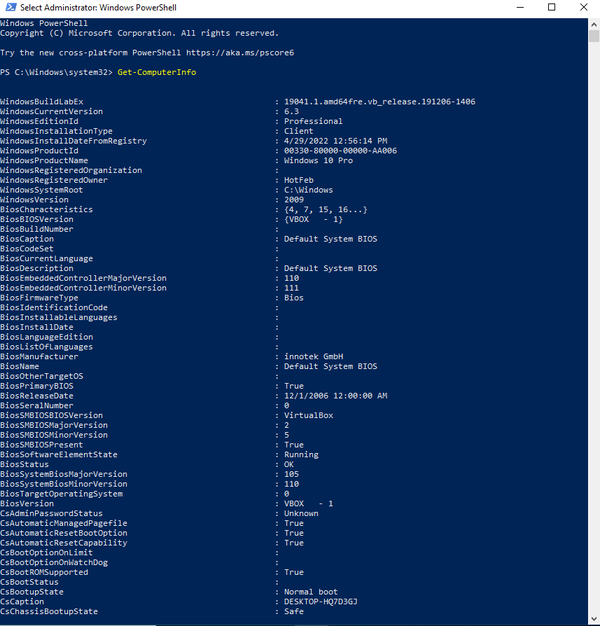
How to check PC specs using PowerShell
- In the Search bar, look up “PowerShell”
- Right-click Windows PowerShell from the Search results > click “Run as administrator”
- In the new PowerShell window, type in
Get-ComputerInfocommand and hit Enter - PowerShell will run and show you details of your system information
How to check PC specs using Task Manager
- Open Task Manager by looking up “Task Manager” on the Search bar > click the result

- Click on the Performance tab in the Task Manager window
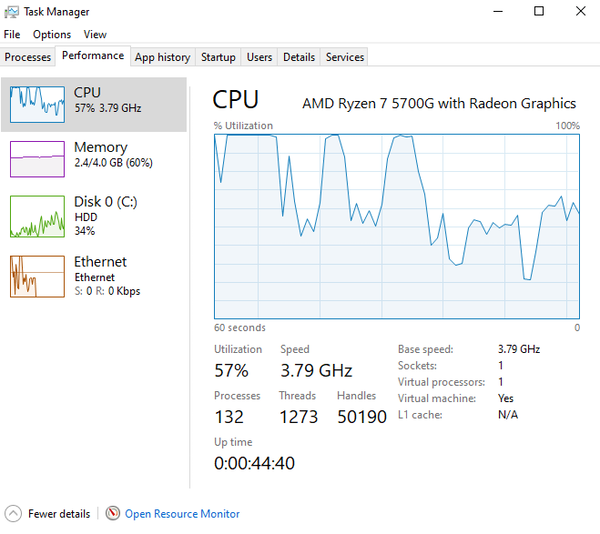
- From there, you’ll be able to see the hardware specifications of your computer, such as CPU specifications (Central Processing Unit), memory, disk, ethernet, and GPU (Graphics Processing Unit)
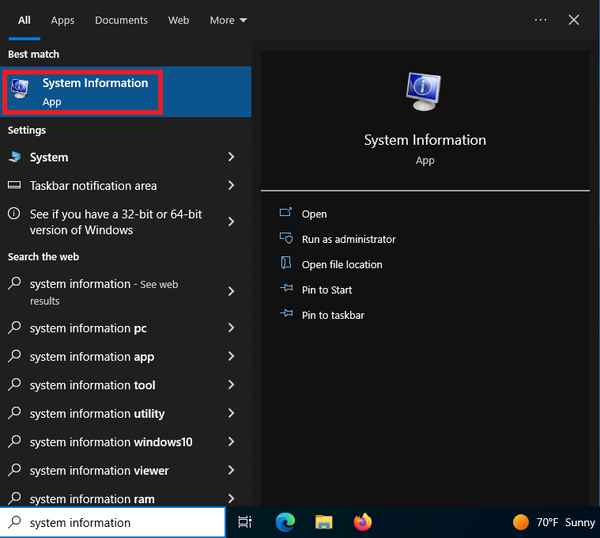
How to check PC specs using System Information
- In the Search box, look up “System Information” > click from the search results
- A new System Information window will appear. From there, you’ll be able to see the System Summary of your PC, hardware resources, components, and software environment
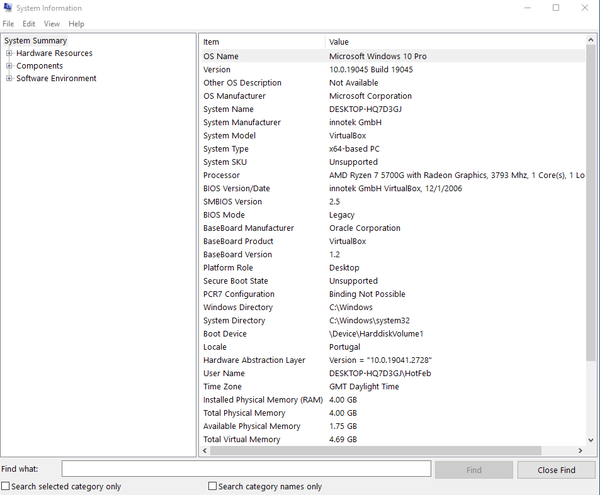
- You can use the “Find” function if you want to look for specific information about your PC specs, and create a report by clicking the File menu > choose the “Export…” function
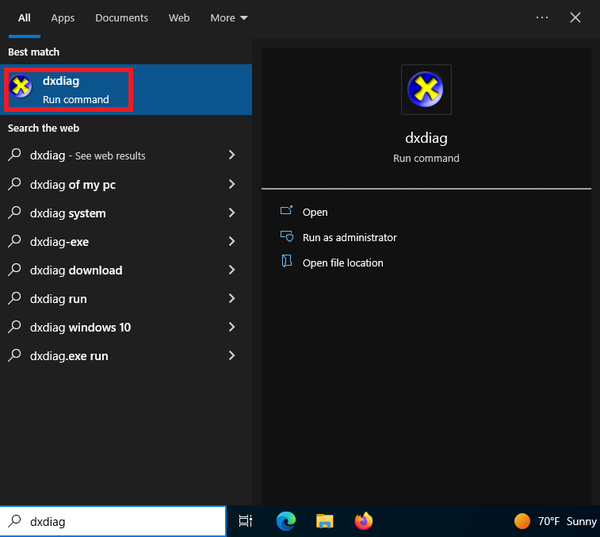
How to check PC specs using DxDiag (DirectX Diagnostic Tool)
DirectX Diagnostic Tool or DxDiag is a Microsoft tool that allows you to detect any issues with the DirectX components in your PC. However, you can also use this tool to check some specs of your computer. Here’s how:
- Look up “dxdiag” from the Search bar > click dxdiag from the search results
- In the new DirectX Diagnostic Tool window, you’ll be able to see four different tabs: System, Display, Sound, and Input
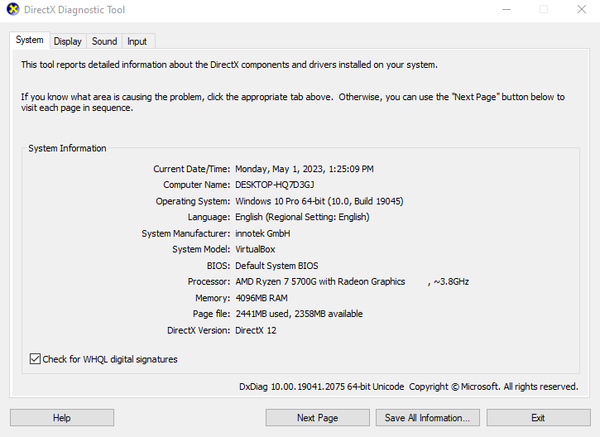
- In the System tab, you can see some basic System Information specifications, such as Operating System, System Manufacturer, System Model, BIOS, Processor, and Memory
- In the Display tab, you’ll be able to see the Display devices and drivers
- In the Sound tab, you can see the audio drivers and devices
- In the Input tab, you’ll be able to see the DirectInput devices such as mouse and keyboard for example
How to check PC specs using System Examiner
Aside from checking PC specs using Microsoft’s built-in tool, a more straightforward alternative is to use a third-party tool, like System Examiner for example.
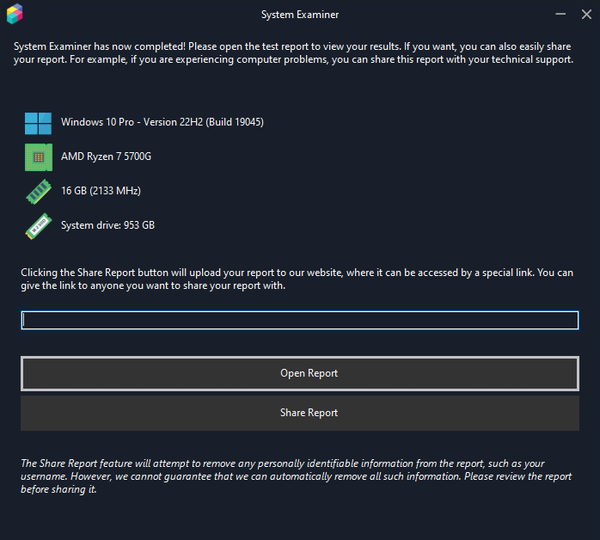
System Examiner is a freeware tool to generate a system information report from Windows computers. It lists details of your computer’s installed hardware and software, as well as attempts to detect common system errors and potential problems inside a computer.
System Examiner comes as a part of the jv16 PowerTools Windows maintenance utility suite, or you can download it as a freeware standalone tool from https://systemexaminer.com – It also has a portable version available.
Using System Examiner to check your PC specs is easy. Simply follow these steps:
- Start System Examiner
- Click the “Create Report” button

- Choose where you want to save the report on your computer
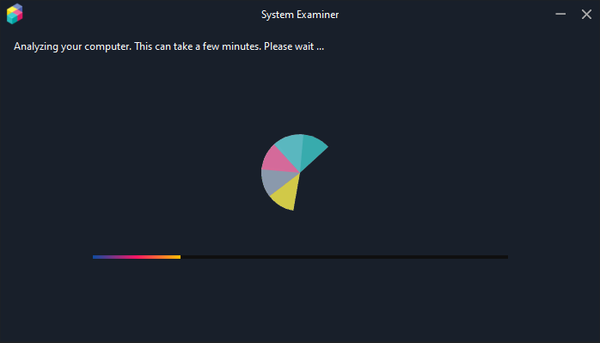
- Wait for System Examiner to analyze your computer’s system information
- Once the scan is complete, you can either click the “Open Report” button to review the results or click the “Share Report” button to share the report with other people using a shareable URL. Here’s an example: https://systemexaminer.com/share/sample_report/
How to interpret PC specs information
Depending on your needs, there are wide ranges of information you can find about your PC specs. However, in general, the most important details you need to understand from your PC specs are the following:
- Processor/CPU (Central Processing Unit)
A processor is essentially the “brain” of your computer, so it’s very important to understand your CPU specs. By understanding your CPU details, you’ll know whether your computer has enough power to handle specific tasks. CPU speed is measured in GHz (gigahertz) and the higher the number, the faster your computer can execute the tasks. - RAM (Random Access Memory)
Your processor stores the data it processes in RAM. RAM capacity is measured in GB (gigabytes), and the higher the number, the more tasks your computer can handle at once. Sufficient RAM capacity is very important since your processor can access the data in RAM faster than in any storage device. - Computer storage
Computer storage basically refers to the devices and components that enable you to store and access digital data within your computer. There are two types of computer storage: hard disk drives (HDD) and solid-state drives (SSD). Storage is measured in GB (gigabytes) or TB (terabytes). The higher your storage number, the more storage capacity you have in your PC. - GPU (Graphics Processing Unit)
GPU is a component that handles all things related to the graphics in your computer, such as images, effects, and videos. Sometimes a GPU is also often referred to as a video card or graphics card.
There is a lot more PC spec information that you can find, but the above essentially covers the main important parts of your computer. From there, you can decide how you want to use this information.
Common misconceptions about PC specs
There are some common misconceptions when it comes to PC specs. We break down some of the most common ones here:
- More cores and higher clock speed equal better performance
While it’s true to some extent, more cores and higher clock speed aren’t the only factors that determine better performance. You need to also pay attention to other factors, such as cache size, memory speed, and storage speed. - More RAM equals better performance
Again, this is true but only to some extent. Once you have sufficient RAM to handle your programs, adding more won’t necessarily improve your PC performance. - Always choose dedicated graphics cards over integrated graphics cards
Even though dedicated graphics cards are generally more powerful than integrated graphics, it doesn’t necessarily mean that you need them. If you don’t need to run heavy software or play video games, you can simply use integrated graphics cards. - Bigger numbers in CPU or GPU model names equal better performance
Bigger number model names don’t always translate to better performance. You’ll still need to compare benchmarks and reviews to decide the model you need. - Higher display resolution equals better image quality
Higher resolution isn’t the only factor that defines better image quality. There are other factors too, such as color accuracy, contrast ratio, and even viewing angles. - Overclocking would always improve performance
While it’s true that overclocking can improve performance, it also increases heat and consumes a lot of power. In the long run, this can reduce your component’s lifespan. - You need to always invest in expensive components
Expensive components don’t automatically mean that they’ll perform better. Quite the contrary, sometimes they can consume a lot of your budget while not providing significant improvement. It’s important to understand your requirements and balance them with your budget to get the best bang for your buck.
Tips for maintaining your PC’s performance
While understanding your PC specs is important, you also need to know how to maintain your computer’s performance. Here we list some of the tips you can try:
- Make sure you pay attention to your CPU temperature. Higher CPU temperatures usually indicate that your CPU is overworking, which is not a good sign of your computer’s performance as the CPU will automatically slow itself down to attempt to stay cooler. Keep an eye on your CPU’s temperature and make sure that it doesn’t overheat
- Make sure your system is up to date. Microsoft would regularly roll out updates to fix bugs and security issues, and also improve the system’s performance. It’s important to ensure that you have the latest updates of Windows and device drivers to maintain your PC’s performance
- Don’t multitask and only open the apps that you need. Having multiple, unused apps running in the background will eat up your system resources and slow down your computer. Try to work on one thing at a time
- Free up your disk space regularly. Junk, temporary files, and software leftover can accumulate in no time and occupy your disk space which can slow down your computer in the long run. Make sure that you regularly check those and use tools to clean up your system, like jv16 PowerTools’ System Cleaner for example
- Make sure to disable unnecessary startup programs. There are some programs that start automatically in the background when you start up your computer, and those programs can slow down the boot time. You can disable the ones that you don’t need to make your computer boot faster
- Uninstall the programs that you don’t need. Based on our benchmark test, uninstalling apps you don’t need is the easiest and most impactful way to make Windows 10 run faster. Unneeded programs can take up your storage space and eventually slow down your computer. It’s important to manage your storage and only keep the programs that you need
- Regularly scan and remove viruses and malware. Viruses and malware can cause serious threats to your computer’s performance and compromise your data, make sure that your PC is free from those and remove them when needed. Windows 10 has a built-in antivirus and security tool called Windows Security which you can use
- Upgrade your hardware. If you have taken the above steps, but you don’t notice any improvement in your PC’s performance, perhaps it’s time for you to consider upgrading your hardware. You can consider upgrading your RAM, using an SSD (solid-state drive), or replacing your GPU or graphics card
jv16 PowerTools System Examiner gives detailed PC specs in a super simple way
Understanding your PC specs is super important and there are many ways you can try to get the specifications of your computer, from using Microsoft’s built-in tools or using a third-party software.
However, most of the tools available in Windows 10 tend to show only basic system specifications. You can get more technical specifications in some others, but there’s no straightforward and centralized way to obtain all of your PC specs.
jv16 PowerTools’ System Examiner is an alternative that you can consider. With a single click, you can get in-depth information of your PC specs and share it using a shareable URL, should you want. Try System Examiner and other powerful tools from jv16 PowerTools by signing up for a 14-day free trial today!