The developer of RegCleaner, jv16 PowerTools, Uninstalr, WinFindr, Startup Timer, ScreenshotX, System Examiner and Windows Update Fixer.
One of the scariest horror stories for a computer user is learning that your important files are lost from your system and can’t be recovered. You certainly don’t want this to happen to you, so preventative measures are needed.
This is why backing up your data is super important. With regular backups, you don’t need to worry about losing important files when there’s an issue happening with your computer.
In this article, we’ll guide you through several backup options, such as Windows Backup, File History, Cloud Backup, System Image Backup, and step-by-step on how to back up your data.
Table of Contents
Types of backup solutions
Depending on your Windows version, there are different types of built-in backup solutions.
For example, if you’re using older versions like Windows 7, you can back up your data using the built-in Backup and Restore feature and System Image Backup. You can then restore that backup to later versions such as Windows 10 and 11, if you want to.
If you’re using Windows 10 or Windows 11, there are more built-in backup features available such as File History, Windows Backup, and System Image Backup.
There are other alternatives you can try in addition to backing up your data using built-in Windows features, such as using an external drive or using cloud storage.
Some cloud backup alternatives you can explore are Microsoft OneDrive, Google Drive, or Dropbox. Nowadays, it has become the most popular option because it’s very easy to do and you can set it to automatically sync with your drives. However, it’s also not free once you hit the free storage limit, with varying pricing points depending on how much space you need.
How to back up your data
There are different ways to backup your data depending on your preference. Follow the step-by-step guide to perform a data backup of your choice.
Backing up your data using Windows Backup
Windows Backup is a built-in Windows feature that allows you to back up your important data, such as files, themes, installed apps, settings, and Wi-Fi information. Bear in mind that signing in to a Microsoft account associated with your computer is required. Here’s how you can back up your data using Windows Backup.
On Windows 10
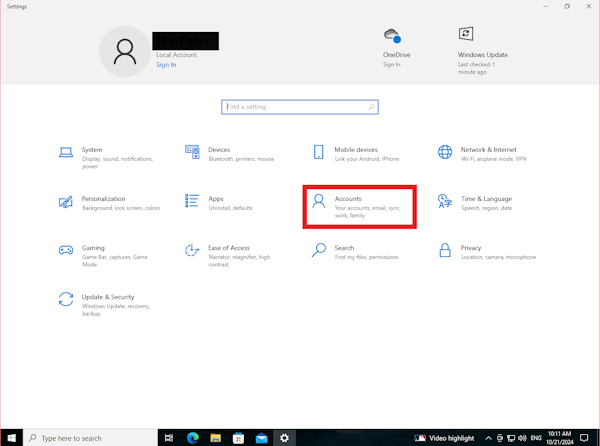
- Login to the Microsoft account associated with your account by clicking the Microsoft button > then click “Settings” or the gear icon > in the new Settings window, click “Accounts”
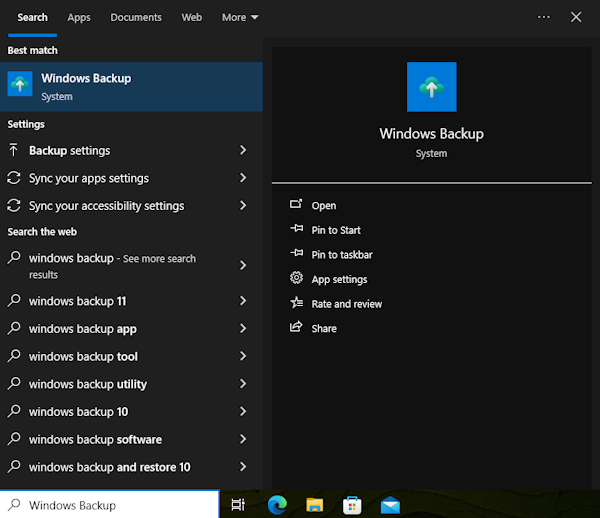
- Once you made sure that you’ve logged in, access the Windows Backup menu by looking up “Windows Backup” on the search bar > click from the search results
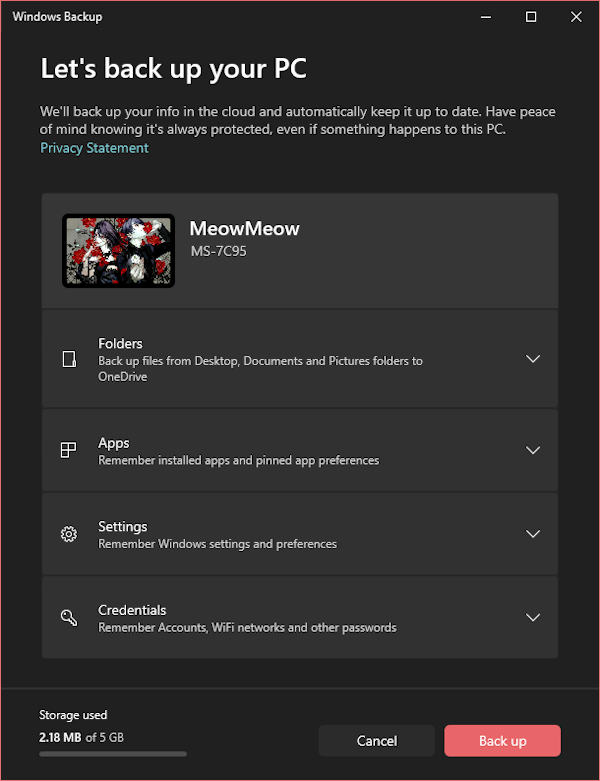
- In the new Windows Backup menu, you can select the type of data you want to make the backup of, such as folders, apps, settings, or credentials. Once you decide which data you want to back up, you can click the “Back up” button, this will sync your data to OneDrive via the Microsoft account you previously signed in with. You will have free storage of 5 GB, but you can also purchase more storage space
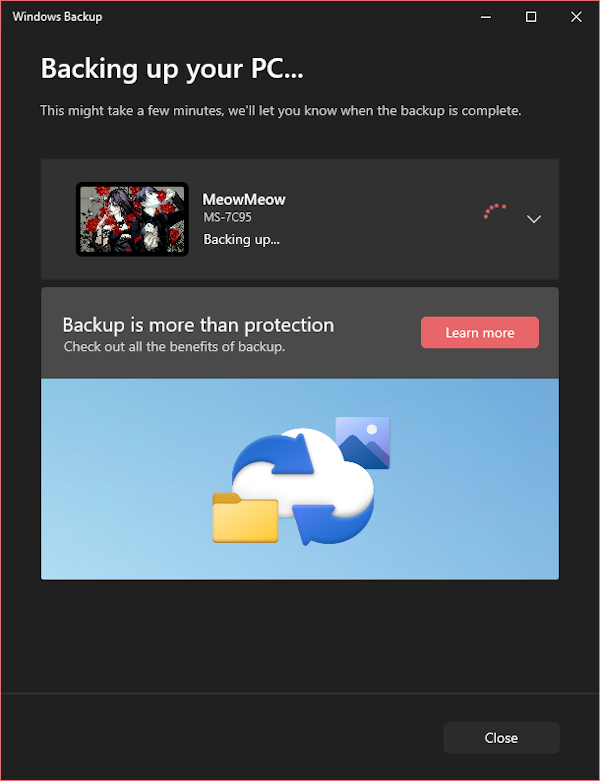
- Wait until the backup process finishes
On Windows 11
- Login to the Microsoft account associated with your account by clicking the Microsoft button > then click “Settings” or the gear icon > in the new Settings window, click “Accounts”
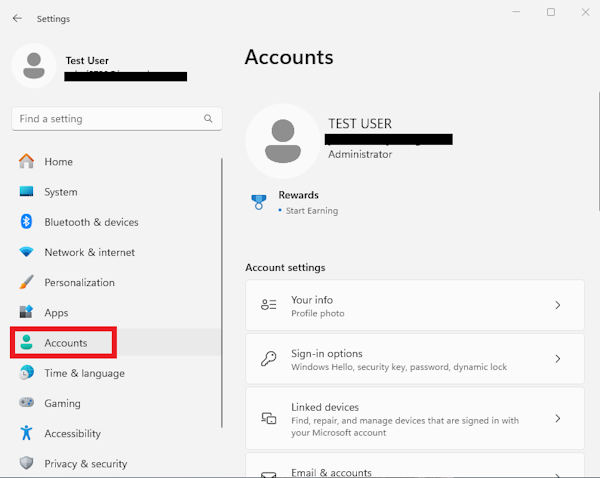
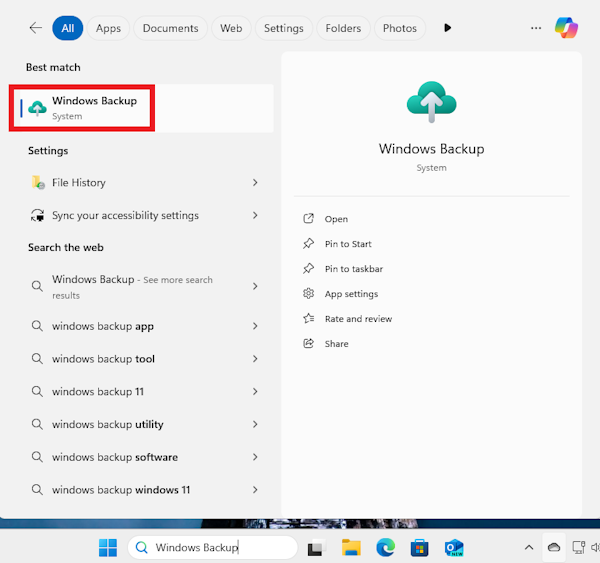
- Login to your Microsoft account associated with your computer, then access the Windows Backup menu. You can do it by looking up “Windows Backup” on the search bar > click the menu from the search results
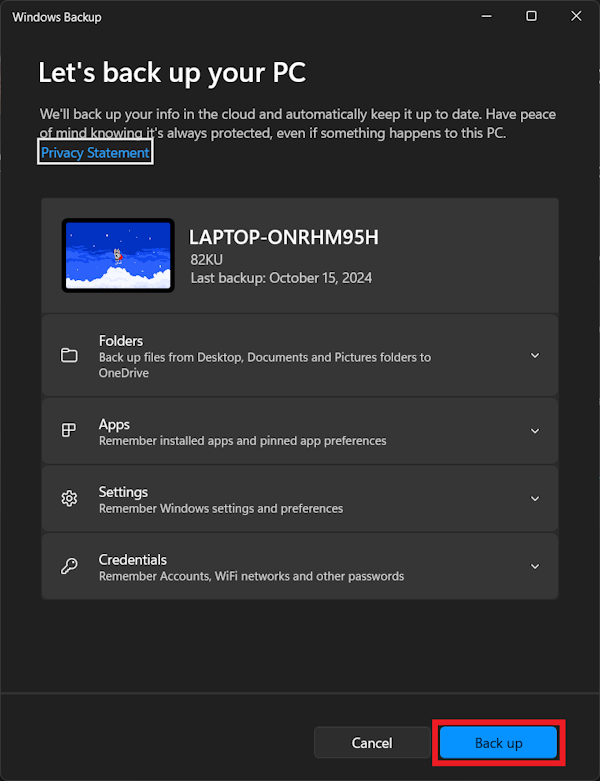
- In the new Windows Backup menu, you can select the type of data you want to make the backup of, such as folders, apps, settings, or credentials. Once you decide which data you want to back up, you can click the “Back up” button, this will sync your data to OneDrive via the Microsoft account you previously signed in with. You will have free storage of 5 GB, but you can also purchase more storage space
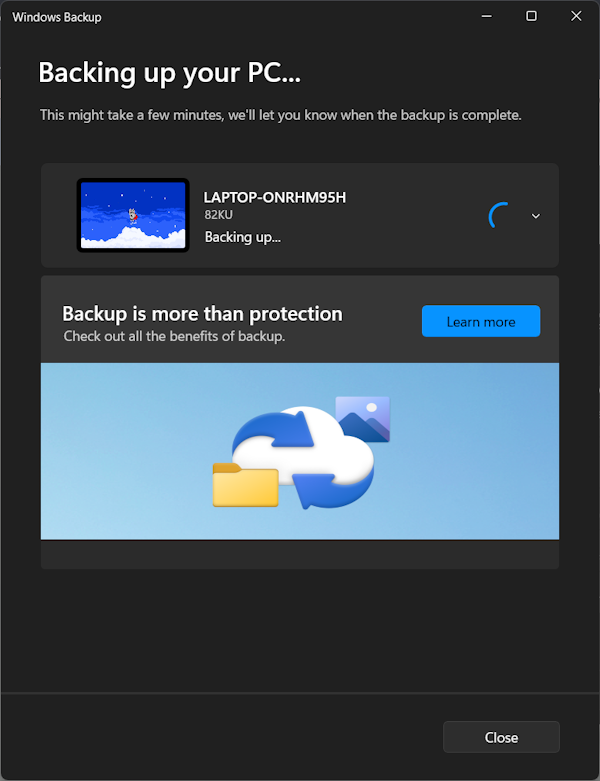
- Wait until the backup process finishes
NOTE: Using Windows Backup basically will sync everything you chose in the previous step on OneDrive, and it could complicate things a little bit when you want to delete files. Please refer to this guide if you use Windows Backup and want to delete some files before proceeding.
Backing up your data using File History
File History is a built-in backup tool introduced by Microsoft on Windows 8, but still accessible on Windows 10 and Windows 11.
File History basically takes snapshots of file versions at a specified time, saves them in an external drive or a network location, and keeps different versions of files that you can easily revert back to.
If you want to back up more data other than your personal files, File History might not be suitable for you. This is because it only backs up personal files in user folders such as Documents, Music, Pictures, Videos, Desktop files, and OneDrive files.
You’ll need to plug in an external drive (USB thumb drive or external hard drive, for example) to your computer before backing up your data using File History. Here’s how:
On Windows 10
- Connect an external drive to your computer where you want to save the backup
- Press the Windows key > select “Settings” or the gear icon
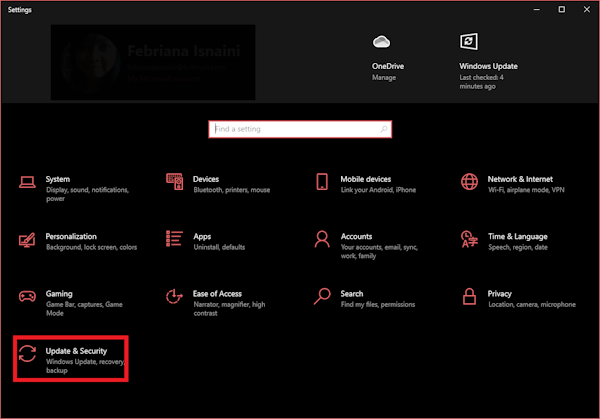
- In the new Settings window, select “Update & Security”
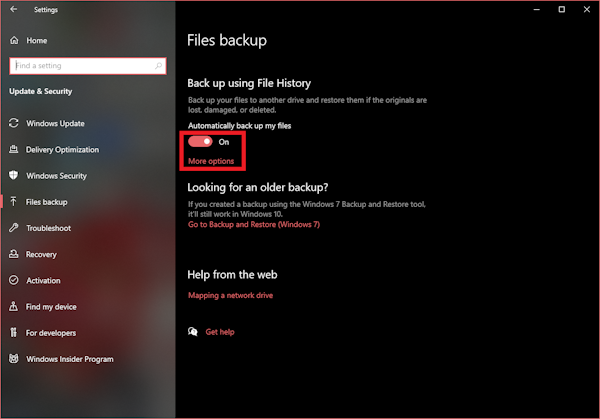
- A new window will appear, click “Files backup” from the left side menu > toggle on the “Automatically back up my files” option > click “More options”
- In the new window, you can select the frequency of File History and how long you want to keep your backups. You can also review the folders you want to back up. If there are any folder backups you want to omit, you can simply right-click the folder from the list > click “Remove”. If you want to add a new folder backup, you can click the button next to the “Add a folder” menu
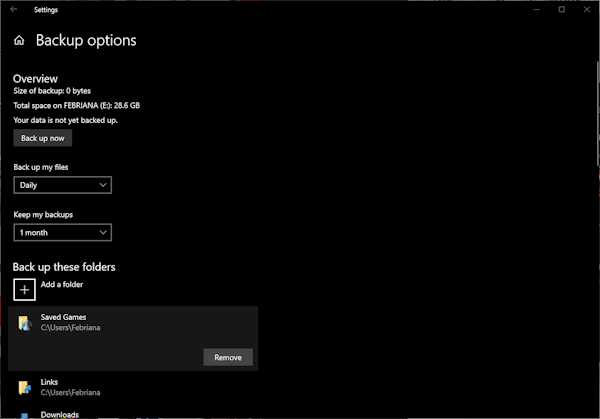
- If everything looks good, you can hit the “Back up now” button to start the backup process
Here’s another way for you to back up your data using File History:
- Connect an external drive to your computer
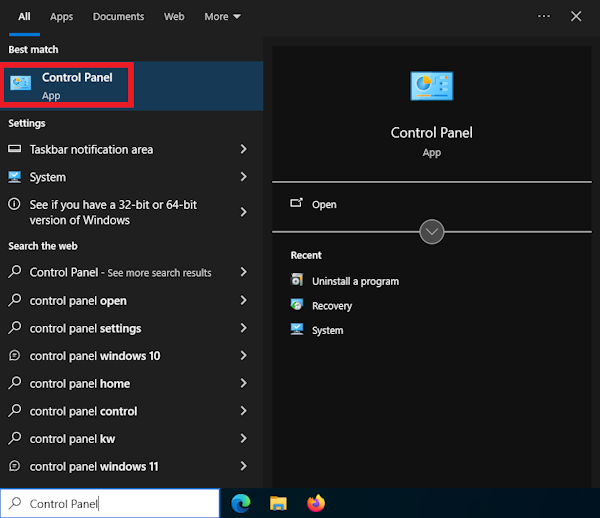
- Open File History menu from Control Panel. You can do this by searching “Control Panel” on Windows search bar > click the menu from the search results > in the new Control Panel window, select “System and Security”
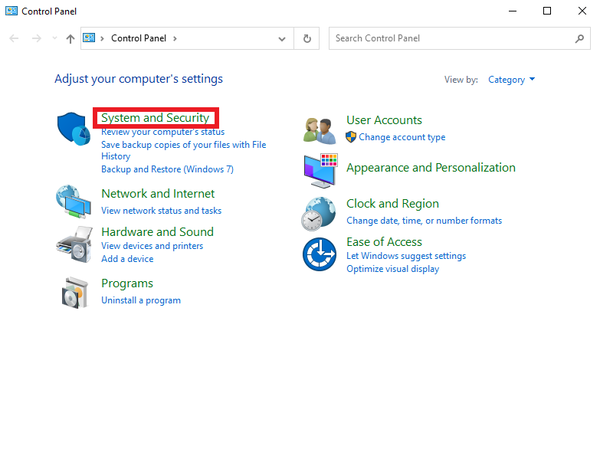
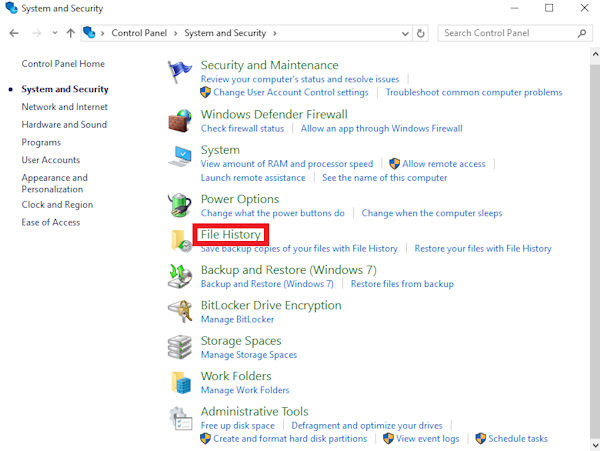
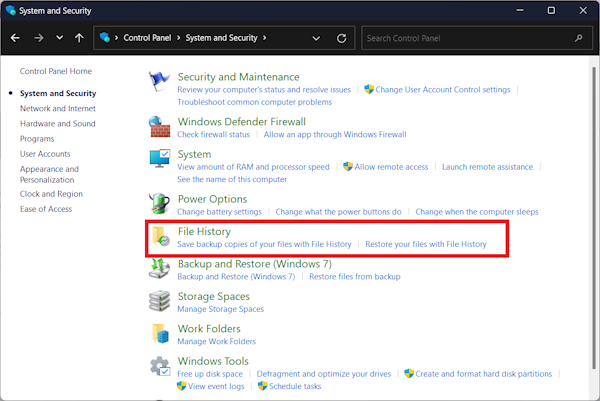
- In the new System and Security window, select “File History”
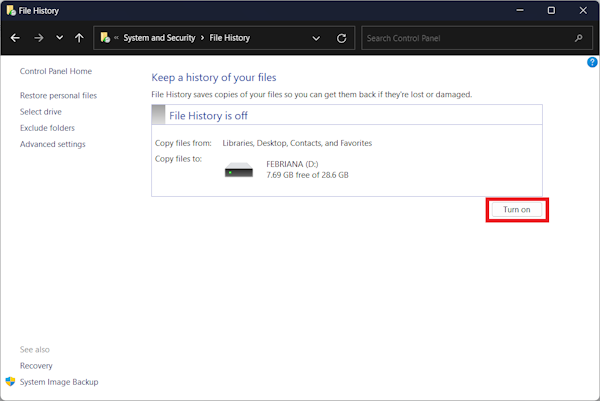
- Another new window will pop up, click the “Turn on” button
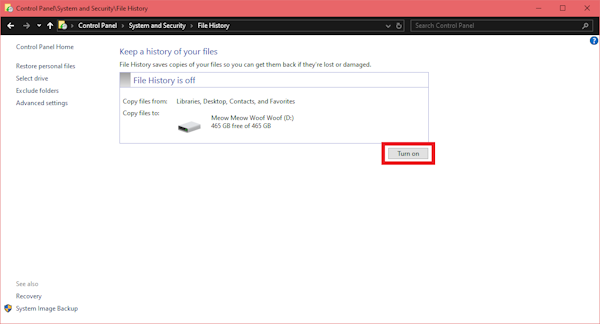
- You can select the drive where you want to save the backup by clicking the “Select Drive” menu from the left sidebar > click the external drive > click the “OK” button

- Click the “Run now” button to start the backup using File History
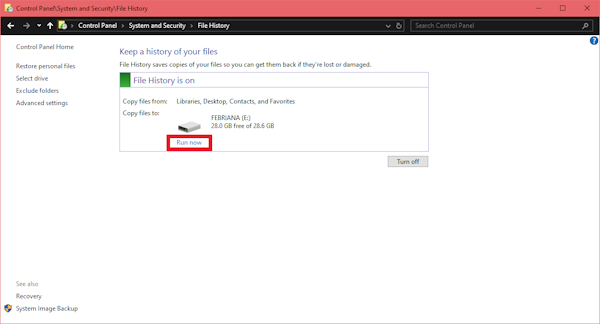
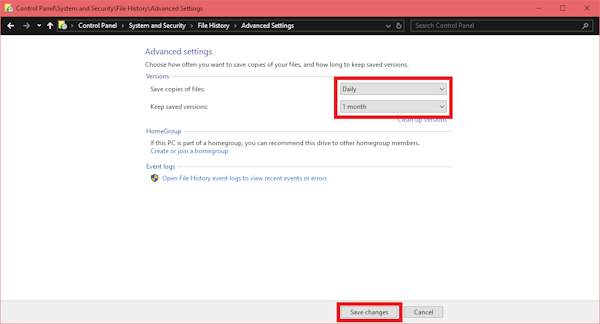
- You can change how often File History performs backup and the length of which backups will be kept by clicking “Advanced settings” from the left sidebar > choose the settings you want from the drop-down menu > click the “Save changes” button
On Windows 11
- Connect an external drive to your computer
- Open the File History menu from the Control Panel. You can do this by searching “Control Panel” on the Windows search bar > click the menu from the search results > in the new Control Panel window, select “System and Security”
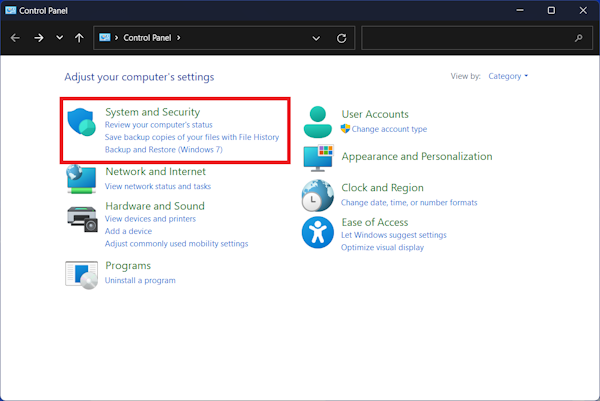
- In the new System and Security window, select “File History”
- Another new window will pop up, click the “Turn on” button
- You can select the drive where you want to save the backup by clicking the “Select Drive” menu from the left sidebar > click the external drive > select an existing backup > click the “OK” button
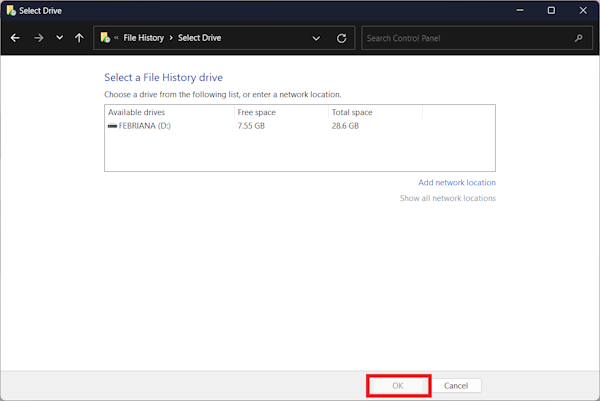
- Click the “Run now” button to start the backup using File History
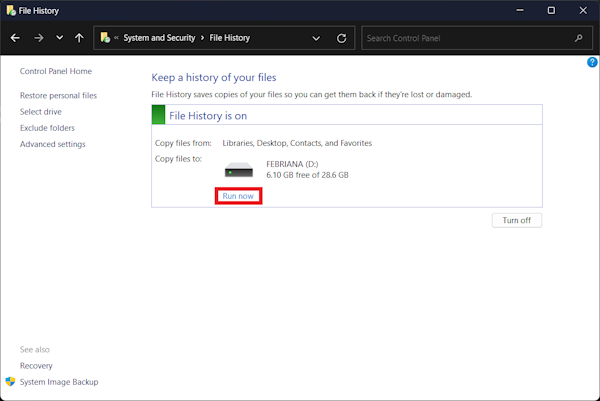
- You can change how often File History performs backup and the length of which backups will be kept by clicking “Advanced settings” from the left sidebar > choose the settings you want from the drop-down menu > click the “Save changes” button

Backing up your data using Cloud Backup Solutions
If backing up data using built-in Microsoft tools isn’t quite right up your street, you can leverage cloud services to perform your backup, such as OneDrive, Google Drive, or Dropbox for Windows.
You can create a backup of only your important files, the entire operating system or both using cloud backup services as long as you have enough storage space.
Cloud storage services typically give you some free storage quota, and once you hit the free limit you’ll be charged at different pricing points if you want to get more storage.
Backing up your data with cloud service is very simple. Typically you’ll only need to install their desktop apps or access their websites to do automatic cloud backup, then from there you can drag and drop the files you want to back up or use their automated sync feature.
If you opt for OneDrive, Windows has OneDrive desktop app integration where you can easily sync your file backups to OneDrive. Bear in mind that you need to log in to your Microsoft/OneDrive account to use this feature. Here’s how you can use it on both Windows 10 and Windows 11:
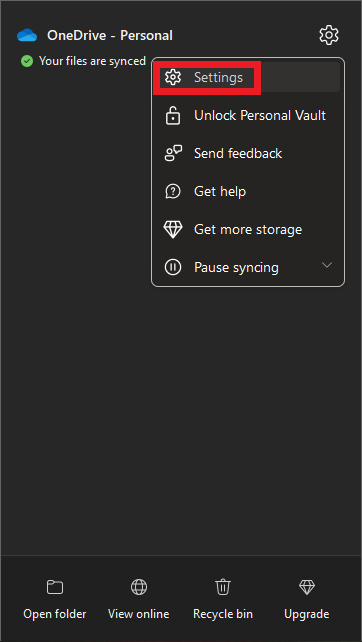
- Right-click the OneDrive icon on the lower right corner of your screen > click Settings
- In the new window, select the “Sync and backup” menu from the left sidebar > click the “Manage backup” button
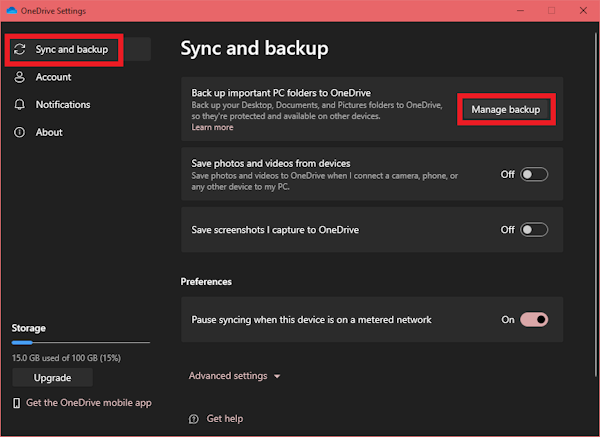
- Toggle on the folders you want to back up > click the “Save changes” button
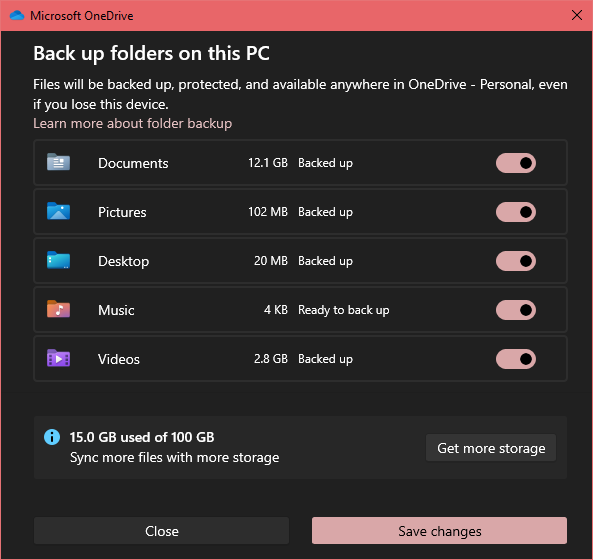
- Wait until the backup process finishes
Backing up your data using System Image Backup
If you want a more comprehensive backup, backing up your data using System Image is a good alternative. With System Image Backup, you can create an exact copy of your entire system, including installed apps, system settings, and all of the files and folders. Bear in mind that you’ll need a large storage space to do this. Typically you can save your System Image Backup in an external drive, network location, or DVDs.
Here’s how you can back up your data using System Image Backup:
On Windows 10
- Press the Windows key > select “Settings” or the gear icon
- In the new Settings window, select “Update & Security”

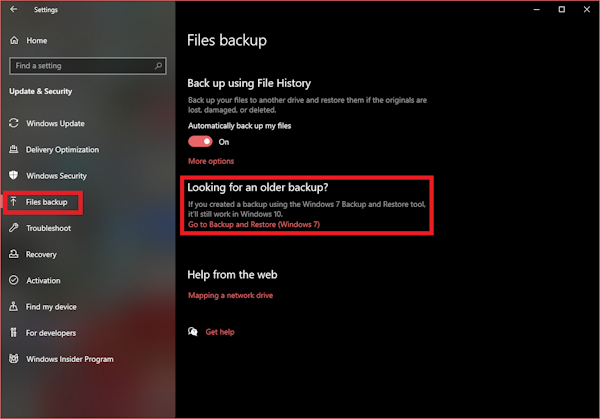
- In the new window, select “Files backup” from the left sidebar menu > Under “Looking for an older backup?” menu, click “Go to Backup and Restore (Windows 7)” option
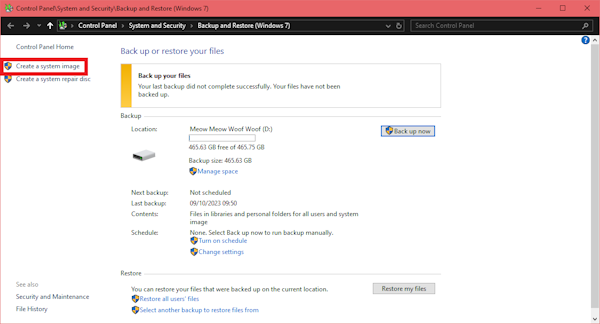
- A new window will appear, click the “Create a system image” menu from the left sidebar
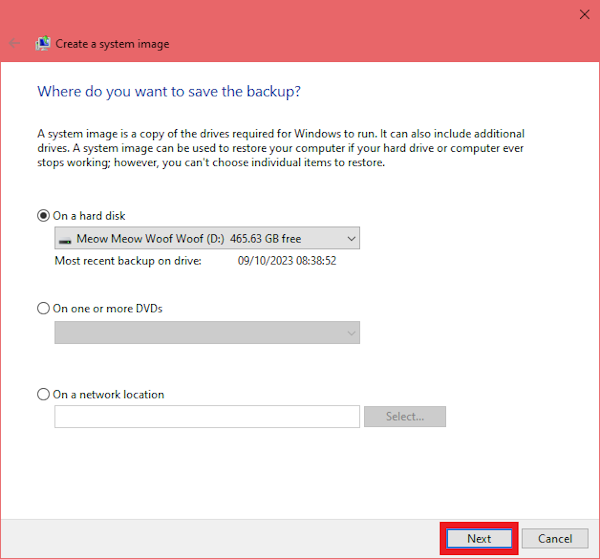
- In the new window, select where you want to save your backup > click the “Next” button
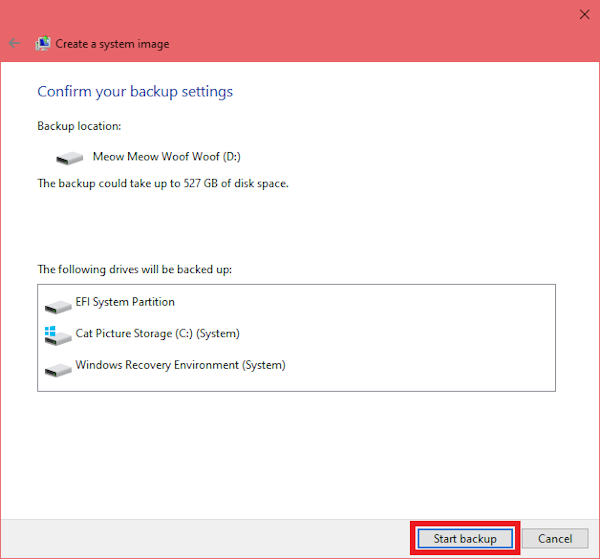
- Review the backup location and the drives that will be backed up. If everything looks good, click the “Start backup” button
On Windows 11
- Open Control Panel by looking up “Control Panel” from the search bar > click from the search results
- Under the “System and Security” menu in the new window, select “Backup and Restore (Windows 7)

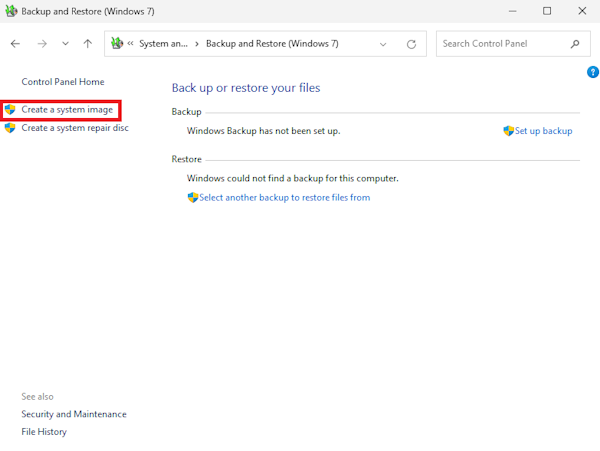
- A new window will appear, select “Create a system image” from the left sidebar
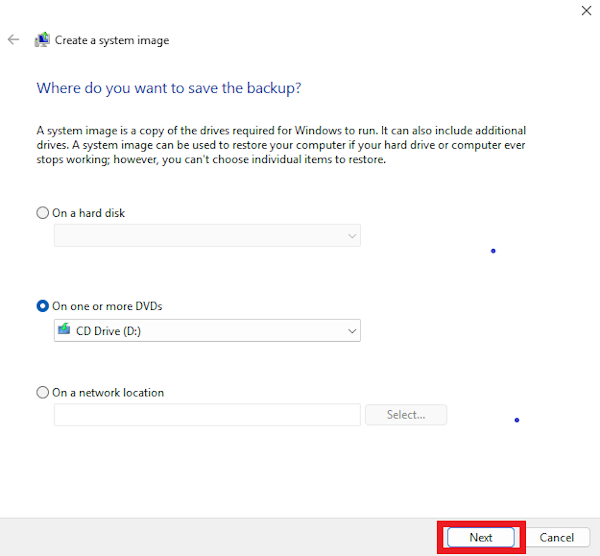
- In the new window, select where you want to save your backup > click the “Next” button
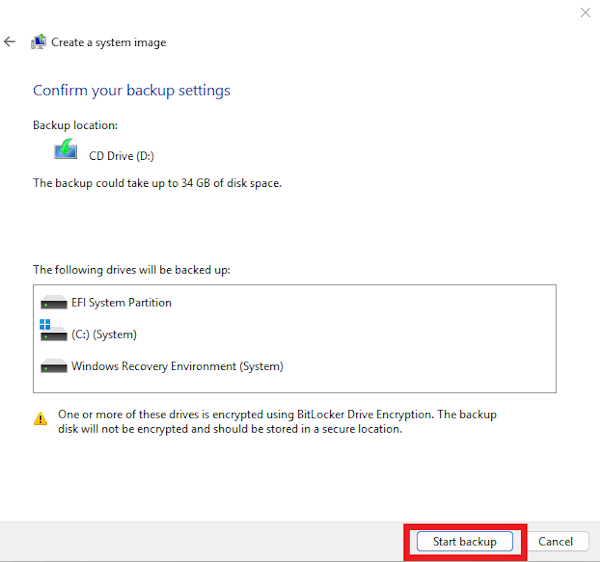
- Review the backup location and the drives that will be backed up. If everything looks good, click the “Start backup” button
Best Practices for Windows Backups
There are some tips we recommend related to backup strategy on Windows, such as:
- Back up your data regularly. Whichever backup method you choose, it’s important to do regular backups from time to time. If you’re concerned about forgetting to do a regular backup, choose a method that allows you to perform backup automatically, such as automatic sync to cloud storage like OneDrive integration on Windows
- Keep more than one backup. Backing up your data is a great start, but only keeping one backup still exposes you to the risk of losing data. Consider having more than one backup, for example, one in cloud storage and one in a hard drive so you still have access to your important data when one backup fails. The more backup you have, the better
- Speaking of failed backups, it’s also super important to test your backup to make sure it works properly. You can try restore your backup to see whether you still can retrieve your important data after performing a backup
- Select which data you want to keep. Nowadays you can get high-volume storage and it’s easy to be tempted to save copies of whatever data you have on your computer. However, decluttering your computer and regularly reviewing the files you no longer need is also as important
- Remember the 3-2-1 rule of backing up your data. The 3-2-1 rule stands from keeping three copies of your data (one primary copy, two backups), store them in two media types (for example, one in an external drive and one in cloud), and keep one backup outside of your home.
Conclusion
Backing up your data is very similar to buying insurance: you don’t know you need it until you need it. There are already a lot of horror stories regarding losing important data because someone loses their computer, system error, hardware issues, etc and it happens all too often. These stories are easily preventable with regular backup.
You can choose a method that suits you out of all the options we explained in this article. However, we can’t stress enough the importance of having more than one backup of your data, preferably from different methods such as combining cloud backup and system image backup for example.
If you find this article useful, please consider sharing this article. For more tips and tricks regarding using Windows, feel free to browse through our blog.


