The developer of RegCleaner, jv16 PowerTools, Uninstalr, WinFindr, Startup Timer, ScreenshotX, System Examiner and Windows Update Fixer.
Are you tired of all the pre-installed software slowing down your computer’s performance?
The experience is sadly universal. A lot of Windows users are frustrated with useless pre-installed apps which offer no function other than taking up the storage space in your device. These apps are called “bloatware” and this problem is an issue that exists in Windows 10 and Windows 11.
But what is bloatware, why is it bad for your computer and how to remove it? Find the answers in this article.
What Is Bloatware and Why Is It on Your Device?
The term bloatware refers to the pieces of software that you didn’t install on your computer and are usually unwanted, that’s why it’s also called potentially unwanted software. This software comes pre-installed, bundled in the operating system of your computer, and is also known as the default app.
Some examples of default apps are the Microsoft Maps, the Microsoft Groove Music, and many others. These apps clutter your storage and take up much physical space in your disk that could be used in other ways. The worst thing is that some of these bloatware apps run on startup which causes the boot time of your computer to increase and slow it down by using up unnecessary memory.
Bloatware can take the form of pre-installed applications from computer manufacturers, but that’s not the only way where you can get into your system. You can also get bloatware by visiting unsafe websites which force you to install unwanted additional software.
The Types of Bloatware
There are different types of bloatware: trialware, utility apps, and adware.
Trialware
Trialware refers to the trial versions or demonstration versions of software in the computer system. You can access the software for a limited time, but once the trial period ends, you won’t be able to access the features anymore unless you subscribe or buy the license. It’s recommended to uninstall trialware if you don’t want to use it since it’ll only take up space on your system.
Utility apps
Another form of bloatware is utility apps. Utility apps refer to pre-installed utilities by the device manufacturers or third-party utilities installed in a computer intended to help solve specific issues but oftentimes end up becoming unwanted programs. Examples of utility apps are weather apps, calendar apps, music apps, and productivity apps.
Adware
Adware or advertising software refers to software applications that display promotional material or annoying pop-up ads, download third-party applications, or direct Windows users to specific websites. Adware is one of the marketing channels employed by companies that do aggressive marketing techniques and usually don’t provide much value.
The Negative Impact of Bloatware on Your Device
In general, bloatware isn’t harmful and doesn’t inherently possess security threats to your computer. Instead, bloatware is annoying, interrupting user experience, eating up your system resources and memories, and eventually slowing down your computer.
However, there are cases where bloatware can threaten your computer’s security. One of the most famous cases is Lenovo’s Superfish bloatware in 2014 which was revealed to have security vulnerabilities that can expose users to man-in-the-middle attacks.
How to Identify Bloatware
You have read about bloatware’s definition, its type, and its negative impact, but how can you identify exactly what’s bloatware and differentiate it from legit software?
Here are some telltale signs to identify bloatware:
- The software is difficult to uninstall
Legit software should be easy to remove. So, if you come across software that is difficult to uninstall, that’s an indication that it’s actually bloatware. - You don’t recognize the software
If you don’t recognize it or don’t remember installing it, then the software is possibly pre-installed bloatware. - The software uses aggressive marketing techniques
If the software repeatedly asks you to make a purchase, then it could be bloatware (adware). - The software displays pop-ups
If the software displays annoying pop-ups and redirects you to unsafe websites, then it’s potentially bloatware. - You never use the software
If the software doesn’t offer you any real benefits and you never use it, then the software could be bloatware.
How to Remove Bloatware From the Computer
In some cases, removing these often useless programs and taking space in your Windows system is easy. You can simply do this by visiting ‘Add or remove programs’ or Control Panel.
In other cases, it’s not as straightforward. As the developers don’t install these apps like your normal several apps, they can’t be uninstalled from Control Panel. Manufacturers like Microsoft that add bloatware stand to profit from the use of these bloatware applications, which is why, they make it tricky to find and hide them.
However, we have found the most convenient ways to remove bloatware from Windows. These removal methods include traditional uninstall methods, PowerShell commands, and third-party uninstallers. Let’s take a look at how you can remove apps.
Remove Bloatware Applications from the Start Menu
When you open up the start icon, you get a whole list of apps and games, like the Microsoft Solitaire collection you never downloaded in the first place. There is a little difference between Windows 10 and Windows 11 here.
In Windows 10 all these bloatware are preinstalled apps, whereas in Windows 11 some of the apps are not installed, just present there and install when clicked.
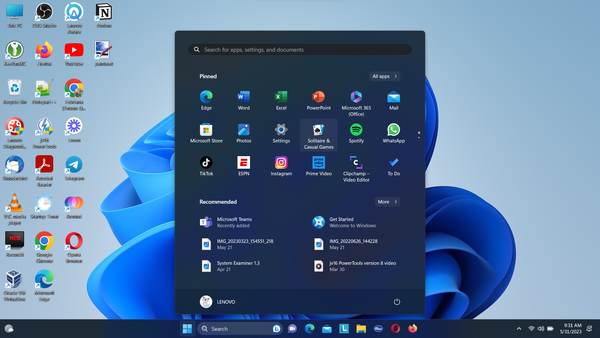
It is quite easy to uninstall these apps from the Start menu search bar, just right-click on any app on the menu and when a window pops up with a list of actions you can take, select the uninstall to remove bloatware applications.
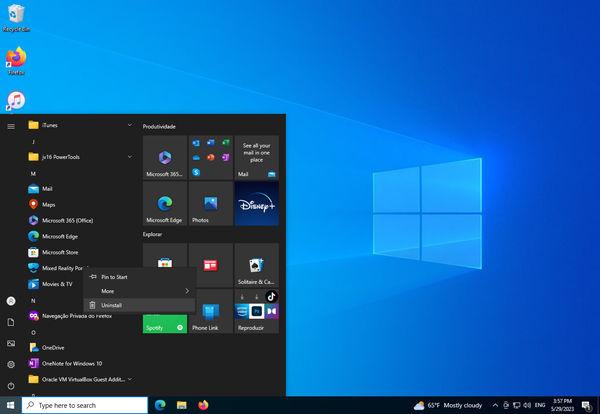
After that, another small window will come up, asking for confirmation about the decision you’re going to make, click Uninstall again and you’ll debloat windows in seconds!

Uninstall Bloatware From the “Add or Remove Programs” Menu
Sometimes bloatware is hidden from the start icon and it is difficult to locate it. Similarly, there are many other useless programs and software installed in the directory of your PC.
So, instead of looking for them in the throng of applications on your computer, you can take advantage of the built-in utility provided to you, get greater control, and find out the desired location.
In the Control Panel tool of your PC, in the settings app, look for “Add or Remove Programs,” this will allow you to in the Windows installation of applications and get rid of them. It is also the best way to track down all the apps present on your computer.
This tool in Windows 11 is in the Apps tab in the settings app, though it works in the same way as the one in Windows 10. The good news is that it is still present in the Control Panel as well and in the same interface as Windows 10.
So, here’s how you can remove bloatware from Windows using this tool:
1. Start Menu
You can either search for the “Add or Remove Programs” page on the start icon in both Windows 10 and 11.
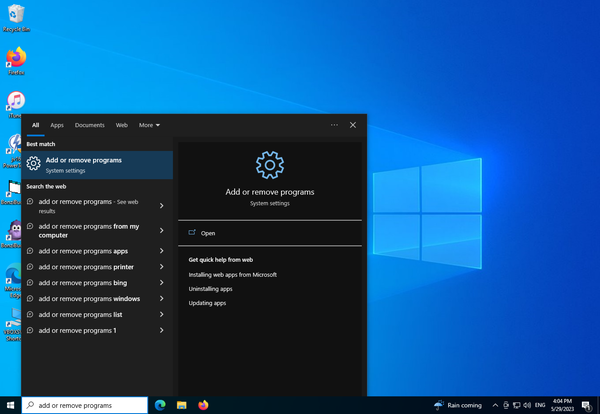
You can also go to the Control Panel window > click “Uninstall a Program.”
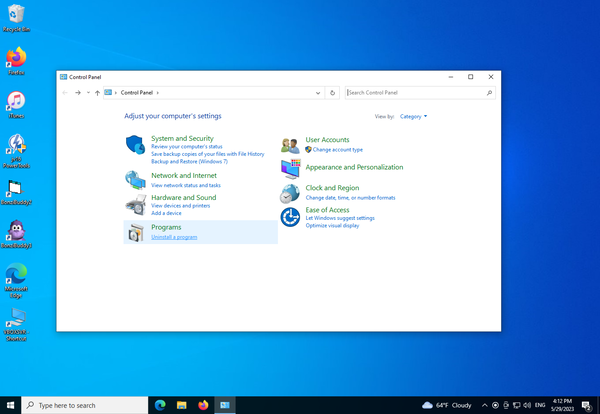
2. Control Panel
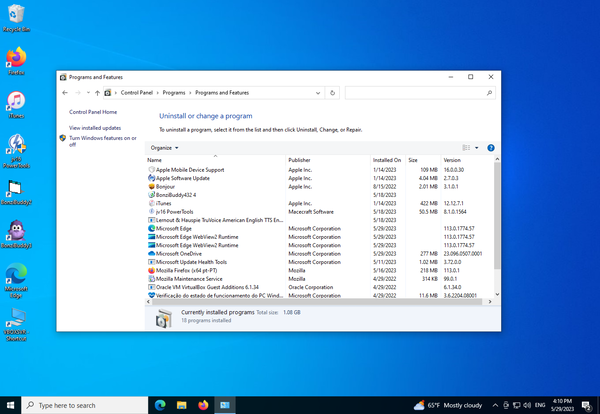
Once your window opens, you’ll come across a complete list of all the applications that you have installed on your computer.
3. Narrow Down the List
They are sorted in alphabetical order. You can either use another sorting setting to look for your bloatware applications or put a filter to narrow down the list.
4. Uninstalling
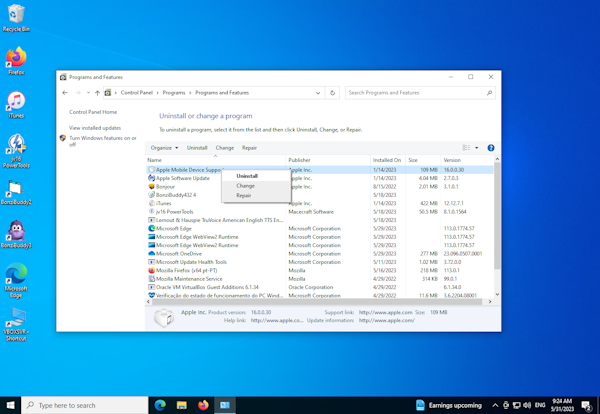
Now that you have access to all the applications, all you have to do is right-click on any application and select uninstall.
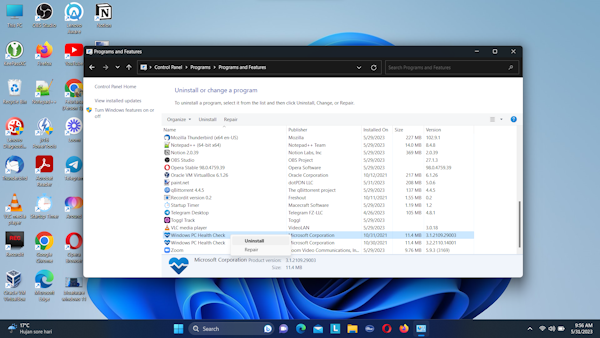
In Windows 11, you can also right-click on the software name and then select uninstall.
5. Granting Permisssion
As the bloatware apps are preinstalled apps, depending on the account permission, a window might pop up asking if you want the application to make changes to your computer, click on the yes, and you’ll debloat Windows right away!
Remove Bloatware Using PowerShell Command
Well, until now we were looking at ways to uninstall third-party apps. so, what about the applications and games that are incorporated within Windows itself?
They are not available in the control panel and neither can they be uninstalled from the start icon. So, what are we to do?
There’s a solution for that as well, called the PowerShell command line.
Windows PowerShell command-line utility is a tool that allows you to manage your computer with the help of scripts and task automation. It is like a more powerful version of the Command Prompt.
Using this following command, you can remove all kinds of unnecessary applications, even the ones bundled in Microsoft that are usually impossible to uninstall.
Here’s what you have to do.
1. Start PowerShell
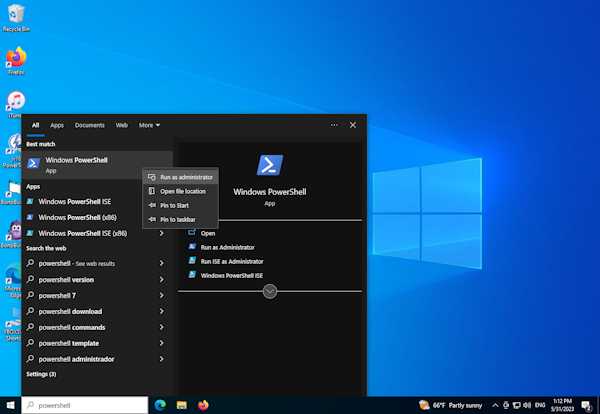
Don’t know where to get this Windows PowerShell command? Well, just type Powershell in the Start Menu!
Run this program as the administrator because some commands require administrator privileges. You can simply do the right click from the search results > select “Run as administrator”. When you click on it, a new PowerShell terminal will appear.
2. Get the App’s Name
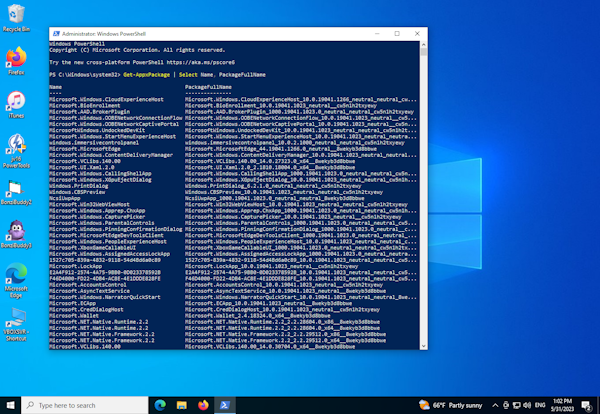
Before removing an app, you need to get the app’s name or the full package name. You can do so by using the following command:
Get-AppxPackage | Select Name, PackageFullName
This will enable you to get a list of all the packages active on your computer.
3. Remove Protected Apps
To remove a protected app, the simplest command to use in PowerShell is to go for Remove-AppxPackage. Here’s the PowerShell command you can use:
Get-AppxPackage *NameOfApp* | Remove-AppxPackage
Note that the *NameOfApp* needs to be changed with the app’s name you obtained from the previous step.
4. Pay Attention to Names
Even though the names are going to sound gibberish, your job is to pay attention to the few words in the starting that will help you determine the real names. For example, Zune Video is how we know the applications, but the name from Get-AppxPackage command shows it as “Microsoft.ZuneVideo”. You need to copy the correct name and paste them into a notepad file for now.
5. Delete Apps
Now comes the time to use the PowerShell command. You can do it by simply copy-pasting the command from Notepad to PowerShell. If, for example, you want to remove Zune Video, you can try using the following command and hit enter:
Get-AppxPackage Microsoft.ZuneVideo | Remove-AppxPackage
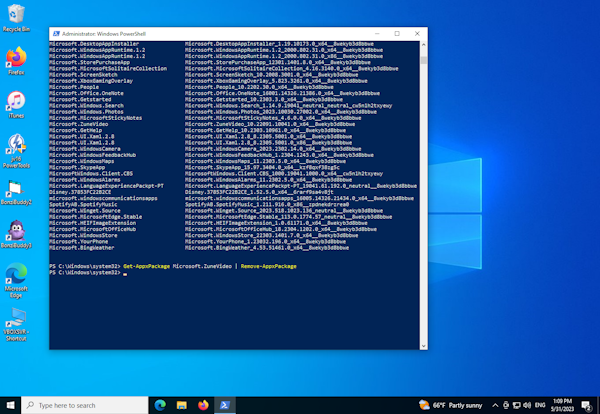
PowerShell will remove the app instantly and you can double-check whether the app has been successfully removed by running “Get-AppxPackage | Select Name, PackageFullName” command again and review the list of active packages in your system.
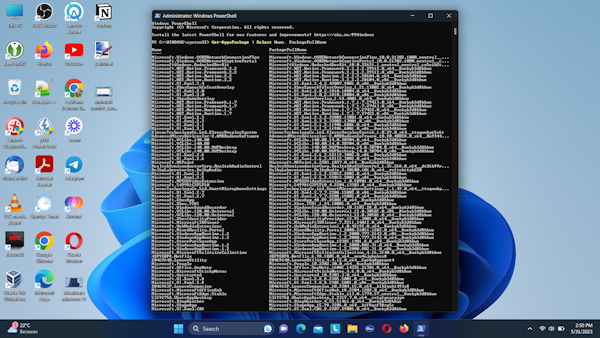
You can also use the above steps in Windows 11 since it also works just the same.
Remove Bloatware Using Third-Party Software
Aside from the steps above, another method you can try to remove bloatware is by using a trusted third-party software, such as jv16 PowerTools’ Software Uninstaller.
Software Uninstaller removes unwanted software from your Windows computer system. The tool provides a list of installed applications and allows you to easily select and remove the ones you no longer need. Whether it’s a single uninstallation or batch uninstallation, this tool got you covered and it works for both Windows 10 and 11!
Software Uninstaller comes as a part of the jv16 PowerTools Windows maintenance utility suite, or you can download it as a freeware standalone tool from https://uninstalr.com/ – It also has a portable version available.
Here’s how you can remove bloatware using Software Uninstaller:
- Run Software Uninstaller and click the “Start” button
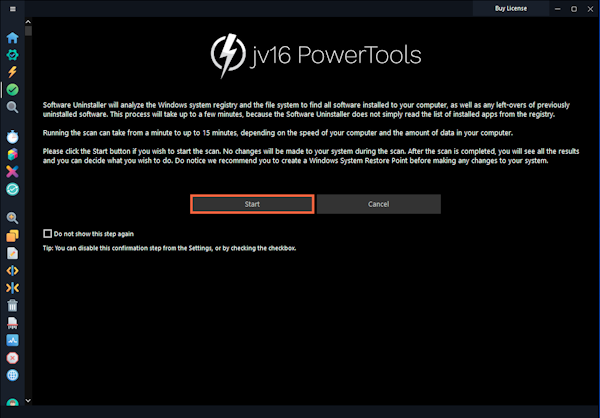
- Software Uninstaller will scan the entire system of your computer, wait until it finishes
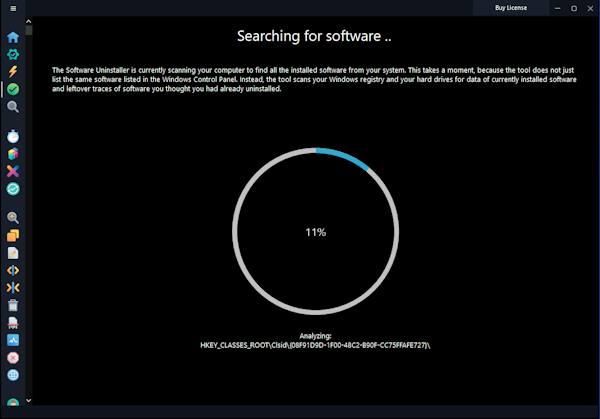
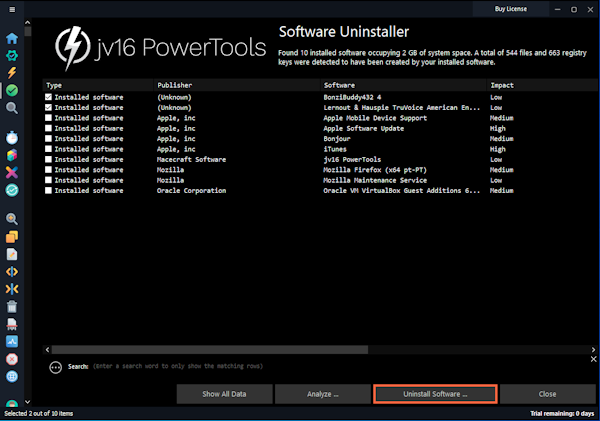
- Select the bloatware that you want to remove from the list of software > click the “Uninstall Software” button
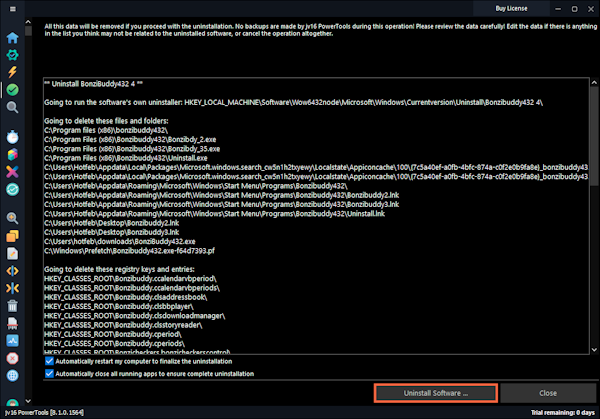
- Review the items that will be removed after the uninstallation. If everything looks good, click the “Uninstall Software” button and wait until the uninstallation process completes. If you tick the ‘Automatically restart my computer to finalize the uninstallation’ box, your computer will automatically restart to make sure that all changes have been applied
How to avoid bloatware in the future
Though sometimes it’s not possible to avoid bloatware, especially if it’s pre-installed, it’s still worth trying to minimize the risks of being exposed to it in the future. Here are some steps that you can try:
- Buy bloat-free computers from reputable companies
Even though a lot of computer manufacturers would include pre-installed bloatware on their products, there are select reputable companies that don’t use this strategy. Bear in mind that the pricing tends to be more expensive. - Make sure to download software from verified sources
Avoid downloading bloatware from malicious websites by verifying the download sources. Please only download software from the software’s official websites or Microsoft Store. - Take inventory of your system and review your installed apps
Every now and again, check your system inventory and review all of your installed apps. You may come across a few software that you don’t use or remember installing, and in that case, you can be proactive and uninstall them. One tool that you can use to easily check your system inventory is System Examiner.
Wrapping Up
Bloatware is unnecessary software that is usually pre-installed on your computer. Even though bloatware isn’t necessarily harmful, it’s recommended to uninstall it since this type of software is unneeded and will only slow down your computer in the long run.
An easy alternative you can try to uninstall bloatware is by using a trusted third-party tool, like jv16 PowerTools’ Software Uninstaller. You can access Software Uninstaller and 17 other powerful tools by signing up for a 14-day free trial. Or, you can download it for free as a standalone tool from https://uninstalr.com/.


