The developer of RegCleaner, jv16 PowerTools, Uninstalr, WinFindr, Startup Timer, ScreenshotX, System Examiner and Windows Update Fixer.
Copilot, officially known as Microsoft Copilot is an AI (Artificial Intelligence) powered chatbot developed by Microsoft. It was launched in early 2023 under the name of Bing Chat as a built-in feature for Microsoft Bing and Microsoft Edge and also as a replacement for Cortana. Bing Chat was later renamed to Copilot and integrated into Windows 11.
Copilot has a ChatGPT-like user interface. With the tagline “Your everyday AI companion”, Copilot boasts several features such as answering any questions you have, summarizing content, and generating images using simple prompts. Though, despite calling itself Artificial Intelligence, it still has limited abilities to provide accurate answers.
Regardless of the hype, this tool isn’t for everyone. An unnamed big pharmaceutical company recently canceled their Microsoft Copilot’s subscription and a study suggests that consumers are less likely to buy a product when there’s “Artificial Intelligence” wording involved. It’s no surprise that people want to disable Copilot on their Windows 11 computers or Microsoft Edge.
This article will show you how to disable Copilot on Windows 11 Home Edition and Microsoft Edge.
Table of Contents
How to Disable Copilot on Windows 11
Disabling Copilot on Windows 11 Home Edition is easy. Here’s the step-by-step to do it:
- Go to Settings by clicking the Windows button > click Settings or by typing in “Setting” in the Windows search bar > click Settings from the search results
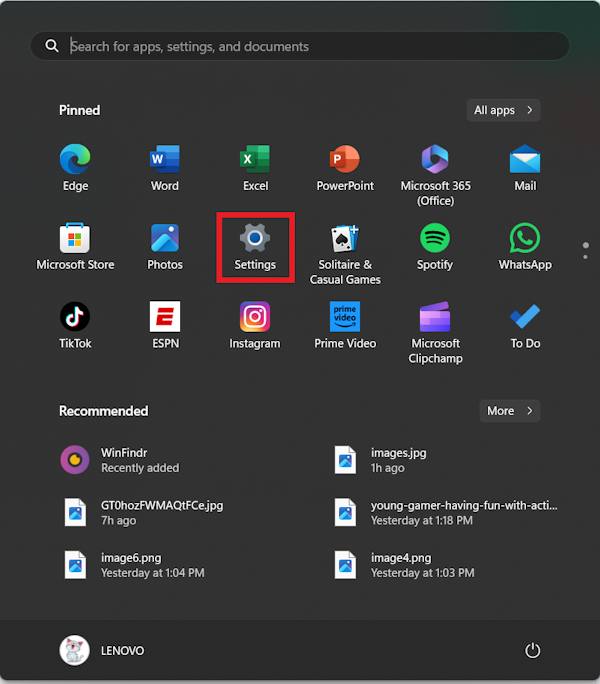
- In the new Settings window, click the “Personalization” menu from the left-hand panel
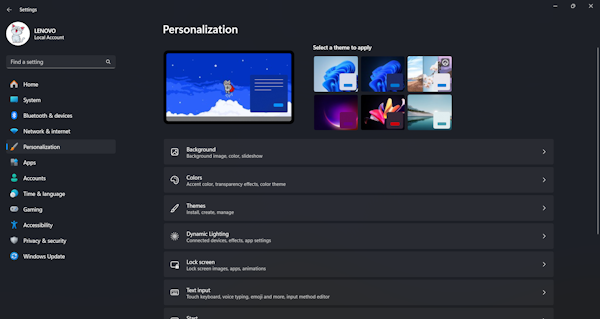
- In the new window, scroll down and click the “Taskbar” menu
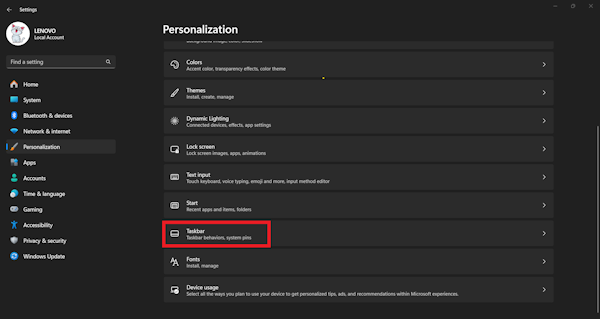
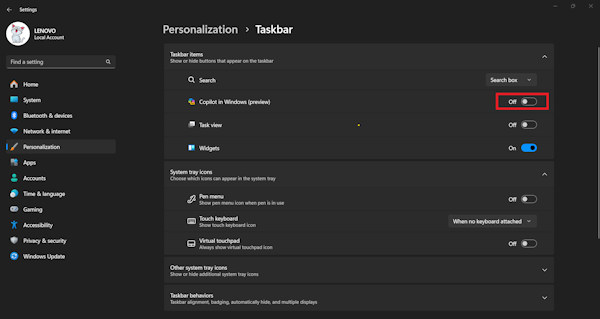
- Turn off the toggle switch for “Copilot in Windows (preview)”. This will disable Copilot and make it disappear from your taskbar
How to Disable Copilot on Microsoft Edge
Aside from a built-in feature on Windows 11, Copilot is also integrated into Microsoft Edge. If you’re using Microsoft Edge as your default browser and wish to disable Copilot, here are the steps you can try.
Disable Copilot from Microsoft Edge’s Settings
- Open Microsoft Edge
- Click the three dots on the right-hand panel of the browser > select “Settings”
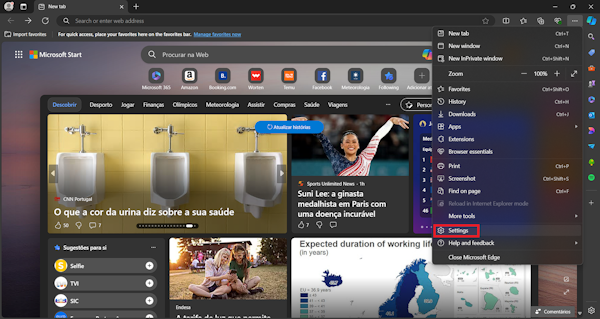
- In the new Settings window, select “Sidebar” > click “Copilot” from the option
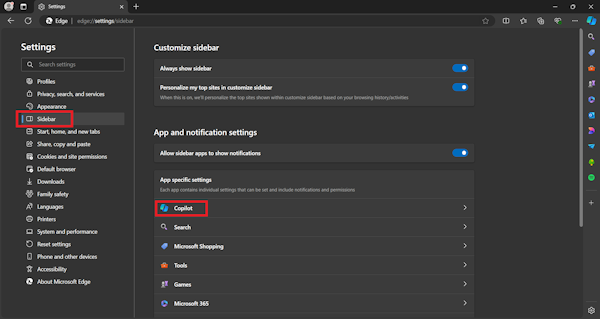
- You’ll be redirected to the “App and notification settings / Copilot” window, turn off the toggle switch for Copilot
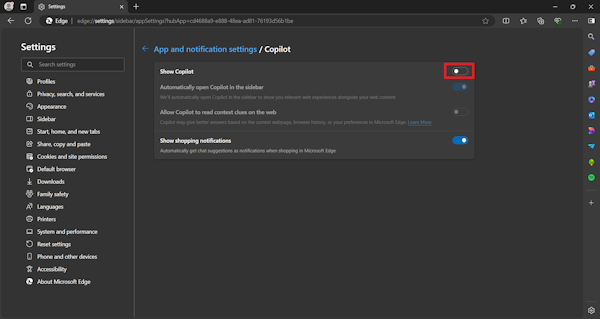
- Restart your browser to apply the changes
Disable Copilot from Copilot’s shortcut
- Open Microsoft Edge
- Hover over the Copilot shortcut on the top right-hand panel of the browser, this will open a new Copilot window
- Click the three dots on the top right corner of the Copilot window > select “Notification and app settings” menu
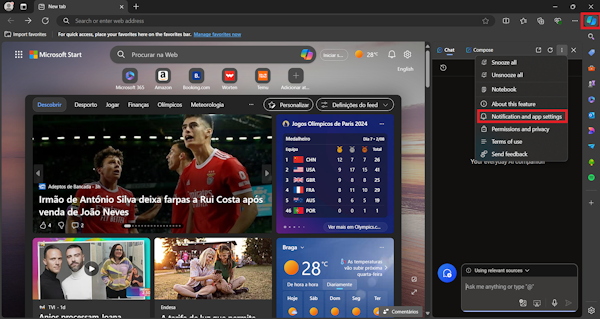
- You’ll be redirected to the “App and notification settings / Copilot” window, turn off the toggle switch for Copilot

- Restart your browser to apply the changes
How to Re-enable Copilot on Windows 11
The steps to re-enable Copilot are straightforward. You just need to access the Taskbar menu using the similar steps above and then toggle off the Copilot option. Here’s how:
- Go to Settings by clicking the Windows button > click Settings or by typing in “Setting” in the Windows search bar > click Settings from the search results

- In the new Settings window, click the “Personalization” menu from the left-hand panel

- In the new window, scroll down and click the “Taskbar” menu

- Turn on the toggle switch for “Copilot in Windows (preview)”
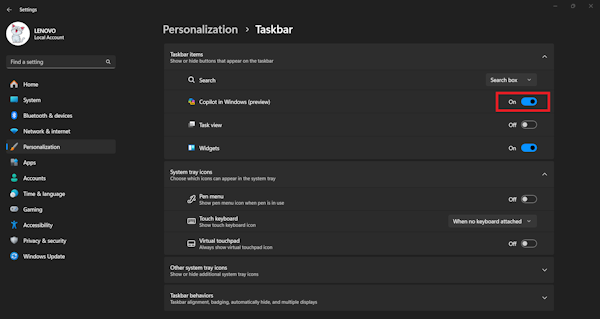
This will re-enable Copilot, and you can easily access the feature from the taskbar at the bottom right of your right screen.
Conclusion
Even though AI is the latest trendy technology, it’s understandably not everyone and some people prefer to opt out and disable Copilot from their Windows 11 system or Microsoft Edge. Luckily disabling Copilot is a straightforward process and what needs to be done is basically to toggle off Copilot from Settings as demonstrated above.
Give the steps a try if you want to disable Copilot, and if you find this guide useful, please share it on your socials. Feel free to check out our Tips and Tricks section for more tips on making your Windows experience better.


