

The developer of RegCleaner, jv16 PowerTools, Uninstalr, WinFindr, Startup Timer, ScreenshotX, System Examiner and Windows Update Fixer.
Welcome to our step by step instructions on System Restore in Windows 7.
For other OS specific step by step instructions please see:
For a general overview of Windows System Restore Feature:
How To Use System Restore In Windows
Windows 7
After the release of Windows 10, Windows 7 can be considered as ‘outdated’. Your PC might start slowing down, or cause you other system issues but no need to worry about an upgrade. If you are facing issues with your PC which runs on Windows 7, then no need to panic. Look no further because the solution is right in your computer in the form of System Restore.
Brief introduction to System Restore
Through system restore, you can get rid of slow working PC and/or any bugs. System Restore recovers your computer using restore points which are a collection of certain system files in your computer. Note that your personal files such as pictures, videos, notes etc. will not be recovered.
You can either create restore points yourself, or your computer will generate them by default every week. In the case of any Windows updates, new device driver, or installation of any app, your device will automatically create restore points as a precautionary measure.
How to Enable System Restore in Windows 7
- Step 1: Boot your Windows 7. In order to do this, restart your computer and press F8. Select ‘repair your computer’ from the list and then navigate through the choices.
- Step 2: Once rebooted, check whether System Restore is enabled or disabled. For many users, System Restore protection is turned on by default for your main system drive (C:) and not other drives on your computer. For other users, System Restore is not enabled by default for any of the drives.
If you want the protection that System Restore provides, you should enable it for at least your system drive. Most things that System Restore protects are located on the system drive. However, if you have programs installed on a different drive, you can turn on System Protection for those drives too.
- Step 3: Click Start button. In the search bar type restore
- Step 4: Select the first option “System Restore “from the list of options available.

- Step 5: In Windows 7, system may ask for administrator password- Enter password to continue.
- Step 6: Click on the “System Protection Tab”
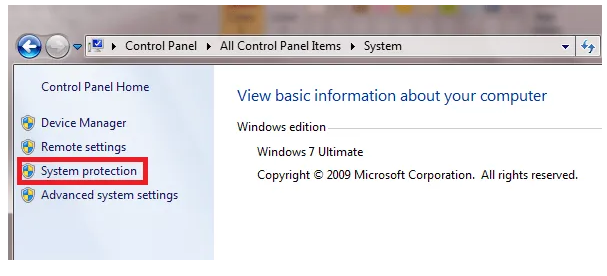
System Properties box opens.
- Step 7: From the different tab options available select the “System Protection Tab”
- Step 8: Under the ‘Protection Settings’ heading you’ll see the Available devices and their Protection Status either on or off. To turn on protection for the available devices, Click “Configure”.
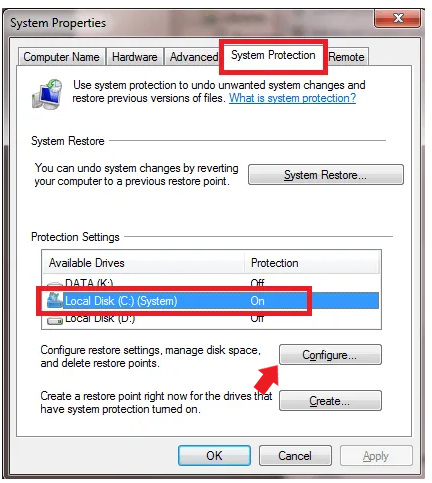
- Step 9: System Properties box opens. From the different tab options available select the “System Protection Tab”
- Step 10: Under the ‘Protection Settings’ heading you’ll see the Available devices and their Protection Status either on or off.
- Step 11: To turn on protection for the available devices, Click “Configure”.
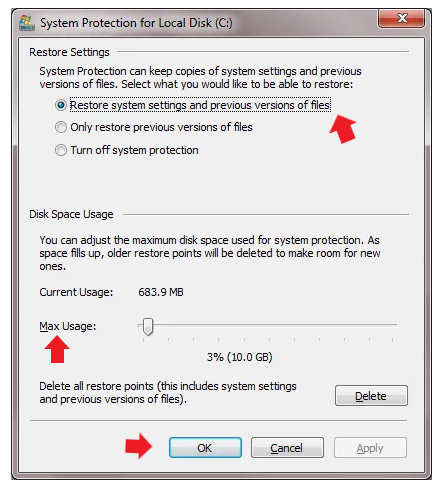
- Step 12: Set Max Usage according to your need – this determines the percentage of hard drive space that will be used for restore point-3% for a 64 GB drive and can vary from 5% to 10% for over 64 GB drive
- Click OK
- Click OK once more exit “System Properties” dialog box
How to Restore a System Restore Point in Windows 7
CREATING SYSTEM RESTORE POINT
When your system gets corrupted or something else goes wrong, you can use system restore point to restore the system to the previous state. Two ways are available. You can simply go to System Restore utility to make it. Or when you cannot boot into Windows 7, you can go to Safe Mode to use restore system.
If the user wants to create restore points manually before making any major system change they can by following the below explained procedure.
- Step 1: Click Start button
- Step 2: Write Restore in the search bar
- Step 3: Select the first option “System Restore” from the list of options available.
- Step 4: In Windows 7, system may ask for administrator password- Enter password to continue.
- Step 5: Click on the “System Protection Tab”
- Step 6: Click create which is under the configure button
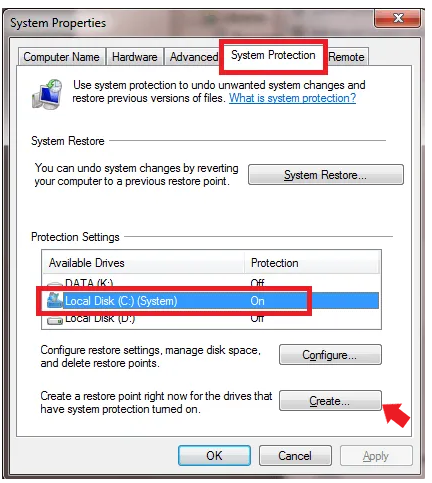
- Step 7: A box will appear fill in the details about the restore point. Enter details as required.

- Step 8: After you have entered the detail Click Create. Restore point creation will take 30 seconds.
Performing System Restore
- Step 1: To perform a System Restore, click Start button
- Step 2: In the search bar write restore
- Step 3: Select the first option “System Restore “from the list of options available.
- Step 4: In Windows 7, system may ask for administrator password- Enter password to continue. Click on the “System Protection Tab”
- Step 5: On the System Protection tab, Click ‘System Restore’ under the system restore heading.
- Step 6: A “Restore systems files and settings” window opens. Click next if you want to proceed with the recommended restore.
- Step 7: Click ‘choose a different restore point’- if you want to choose restore point of your choice.
- Step 8: Click next

A list of restore points will be presented

- Step 9: Scan for affected programs- this isn’t necessary but it always recommended to see what programs are affecting your PC.

- Step 10: Select a restore point. Click Next.

- Step 11: On the “confirm your restore point” dialog box, Click Finish.
- Step 12: Click yes to confirm. Windows will now restart your PC to start the process. System Restore on Windows 7 can take about 15 minutes or even hours-but after the process it will start from the last working state.
- Windows 7 will re-boot
- A “confirmation message” box will open.
- Step 13: Click close to the “Confirmation message” –System Restore completed successfully.
NOTE: Don’t touch or use the keyboard or mouse or any attached hardware devices during this process.
As mentioned above, system restore will restore system files, drivers, registry settings, and the installed software. Some programs like antivirus tool may not work as well they should, or at all, after the restoration. As you can see, Windows will list all the affected programs. Take a look at the list so you know which programs will be affected during the process.
Additionally, any Windows Updates installed after the creation of the restore point will be uninstalled. Your personal files and other data will not be affected, so system restore points cannot be considered as a data backup.
System restore does not remove or clean virus or malware because, unlike regular software, they are deeply rooted in and affect your operating system. Since restore points are saved on each volume, the system restore will not work if the volume has been corrupted. Therefore, you should have other ways to protect your windows software besides creating restore points in your Windows.